DUE TO SPAM, SIGN-UP IS DISABLED. Goto Selfserve wiki signup and request an account.
Introduction
In Apache OFBiz, Purchase Invoices are tightly integrated with the receiving process and follow a key principle: one invoice per shipment. Once a shipment is fully received, the system automatically makes an invoice available on the Purchase Order screen, pre-populated with quantities from the receipt and unit prices from the PO.
For the procurement team, the typical workflow after receiving is simple: review the generated invoice, make any necessary adjustments for real-world discrepancies (e.g., shortages, over-deliveries, or rejected items), approve the invoice, mark it as Ready, and allow the system to post General Ledger entries to respective pre-configured General Ledger (GL) accounts after which the accounts payable (AP) team takes over to complete the payment process. In this document, we will see how the invoicing process is managed in Apache OFBiz, particularly viewing invoices, and editing them when required.
Viewing Invoice
To begin with the invoicing process first let us see how to view invoices after the items have been received. There are 2 ways to view invoices explained below.
View Invoice from view PO screen
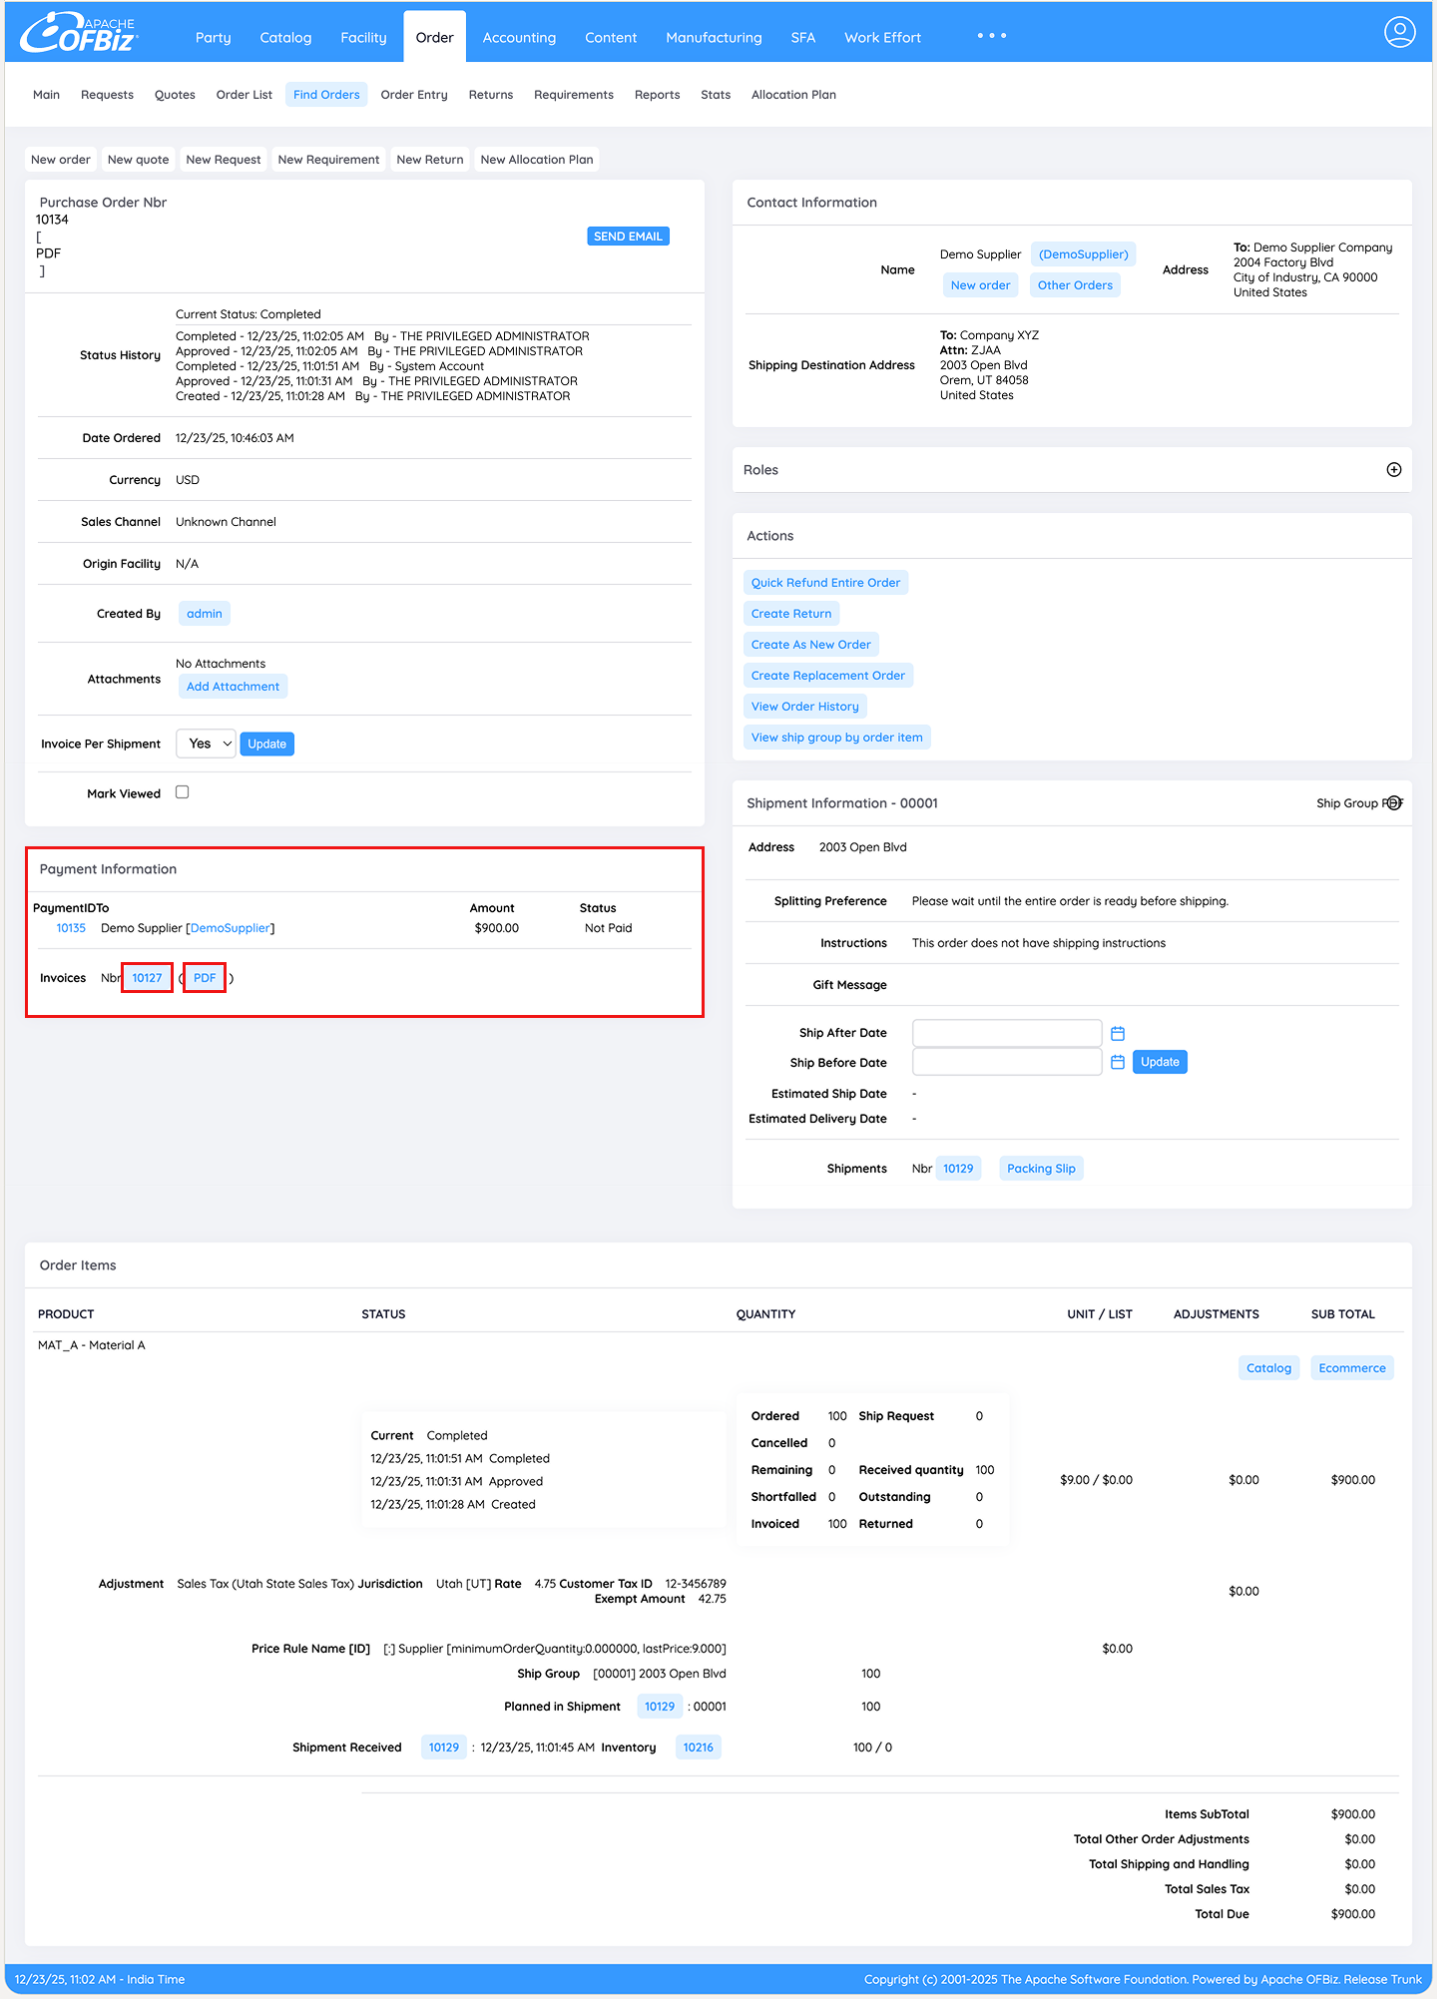
Once the shipment is fully received, Apache OFBiz automatically generates a single invoice, which appears in the Payment Information section at the bottom of the Purchase Order screen (as shown below).
- Click the PDF button next to the invoice to download a printable version for physical records or filing.
- Click the Invoice Number (or Invoice ID) to open the detailed Invoice screen, where the accounts payable team can review all line items, quantities received, unit prices, totals, supplier details, and other relevant information before proceeding to edits or approval.
View Invoice from Accounting module
Alternatively, you can also view the invoice via the Accounting Module as well.
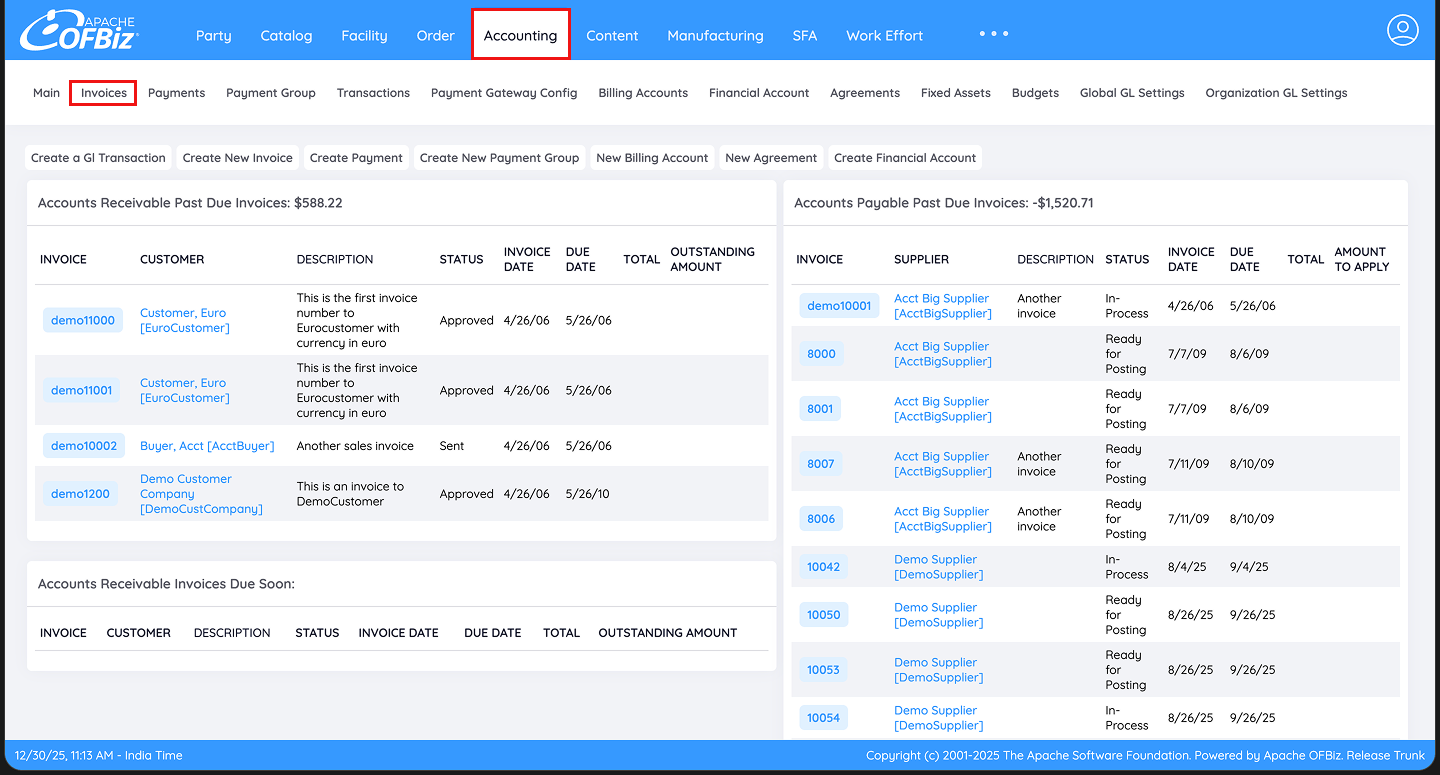
Step 1: Navigate to the Accounting Module by clicking on the Accounting tab from the main menu at the top of the screen. Then click on Invoices.
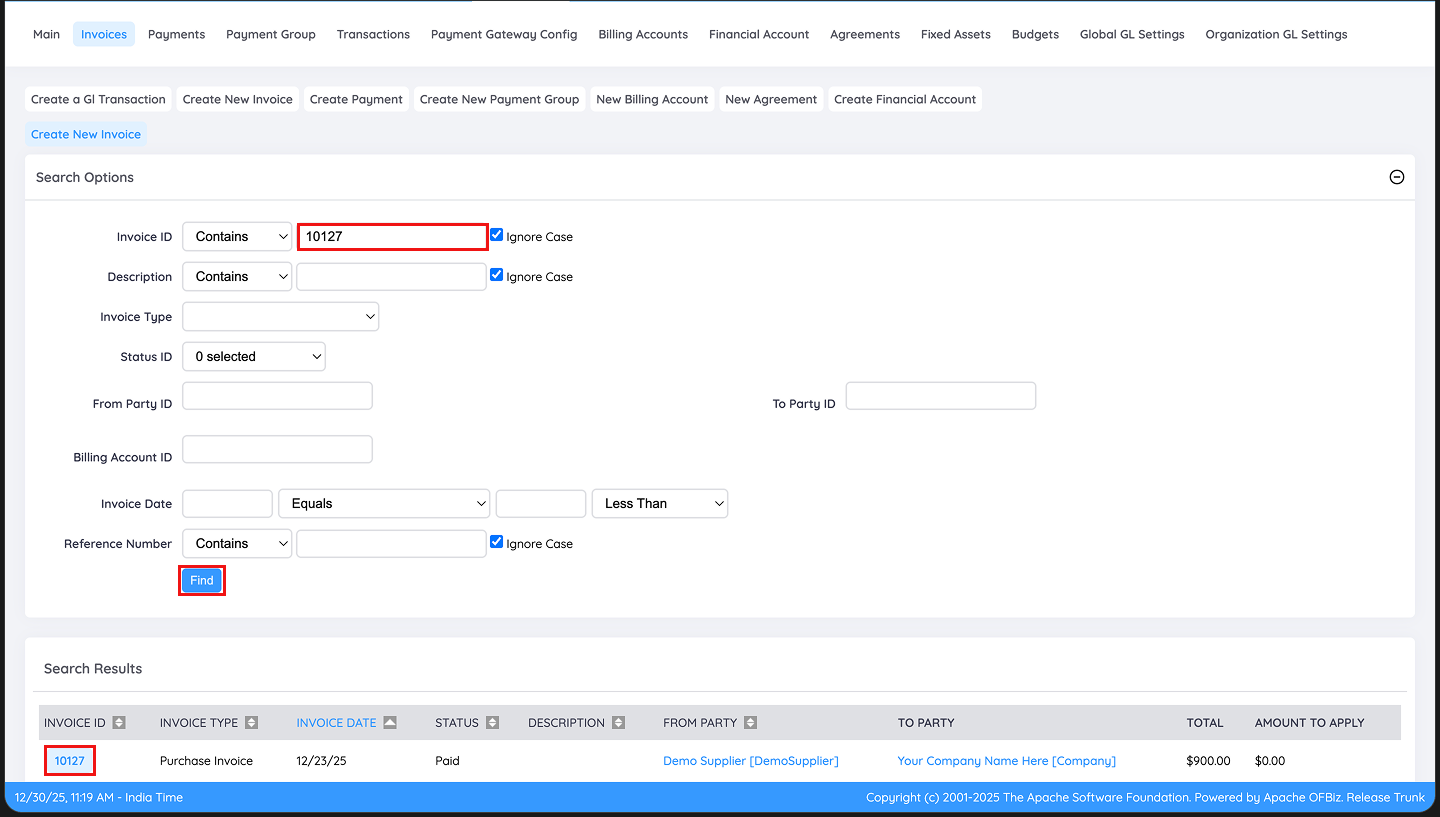
Step 2: In the field against Invoice ID, enter the invoice ID and click on Find and click on the invoice as shown below to open the invoice detail screen.
Understanding the detailed Invoice Screen and Editing
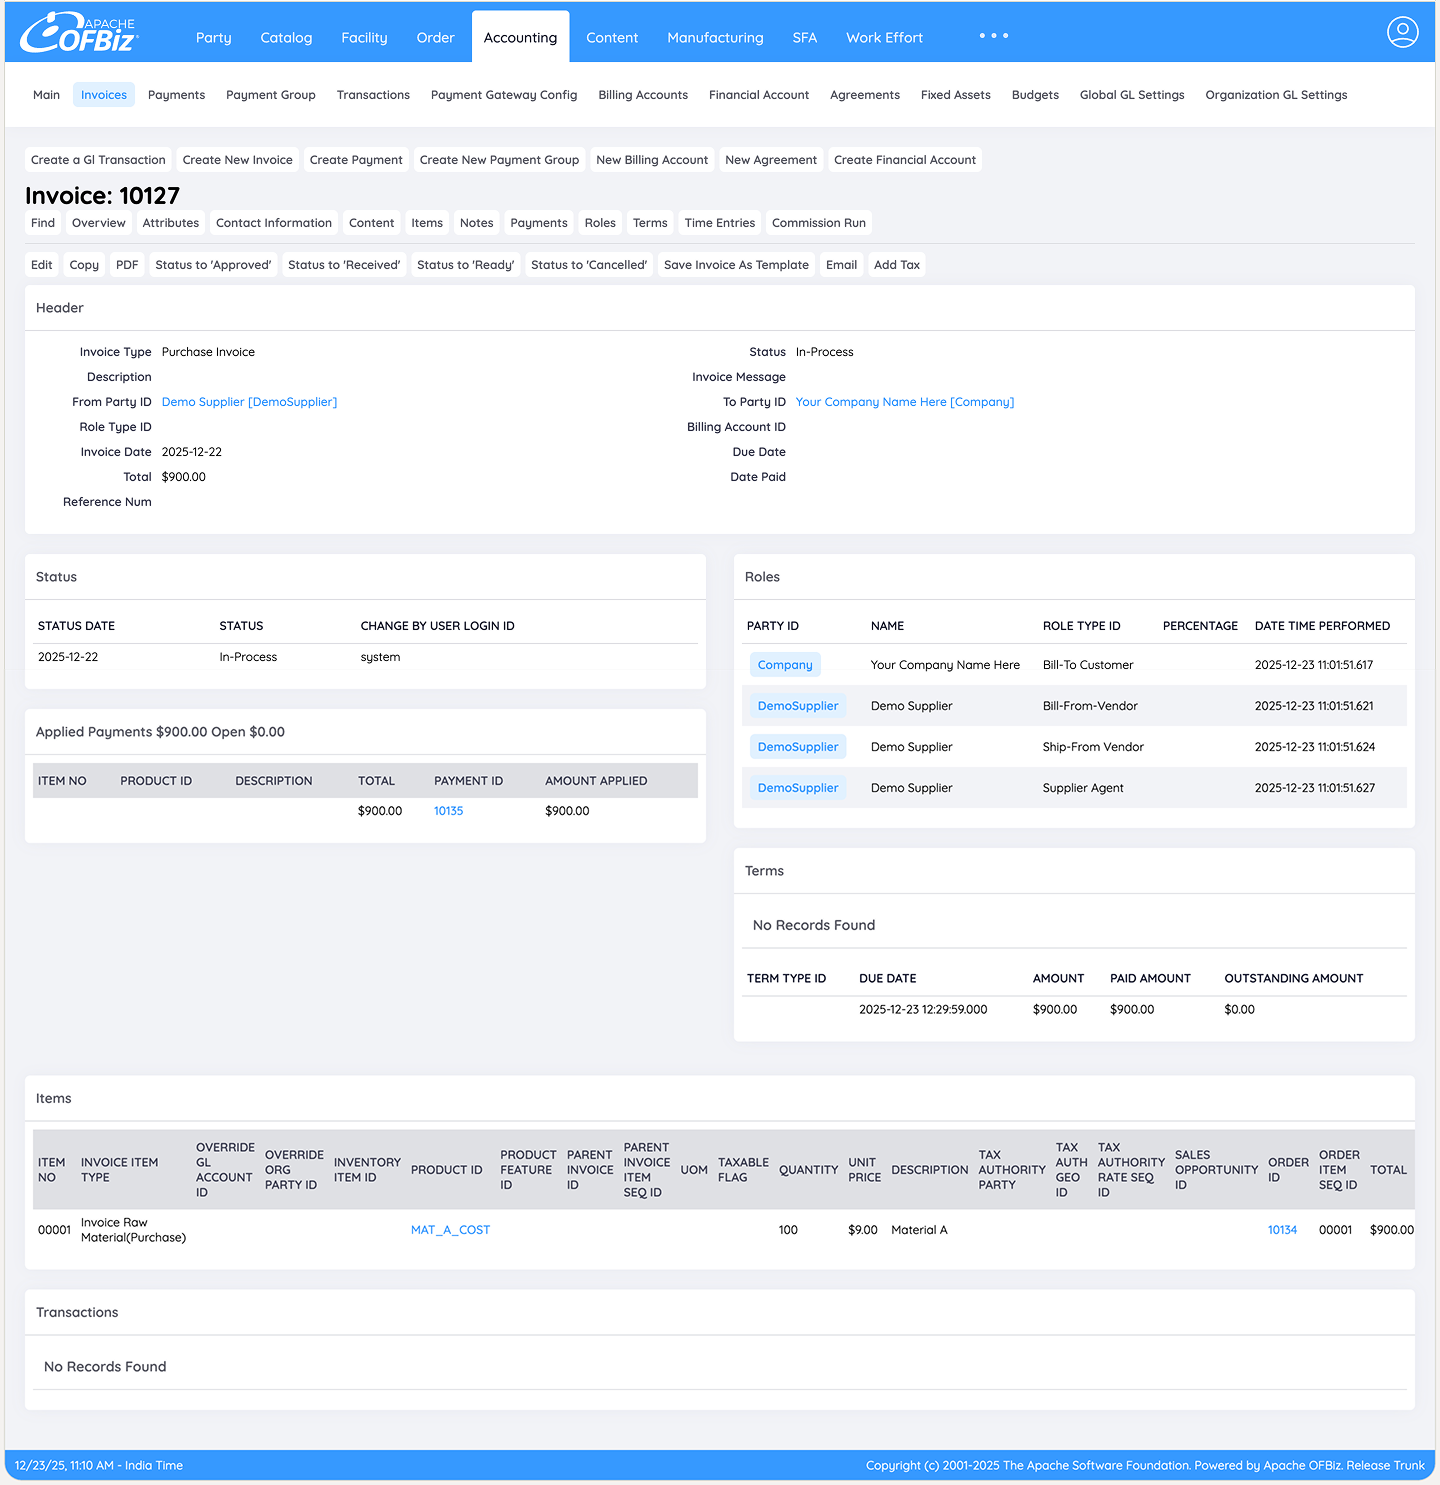
Once the detailed Invoice screen opens up as shown below, you can see that this view provides the accounts payable team with a comprehensive breakdown for verification, including:
- Line items with descriptions and quantities received
- Unit prices and line totals
- Subtotal, taxes, adjustments, and grand total
- Supplier details, invoice date, reference numbers, and terms
All essential information is displayed here to facilitate matching against the supplier's bill, performing any necessary edits, and proceeding to approval.
Editing Invoices to Handle Real-World Discrepancies
In practice, real supplier invoices frequently differ from the auto-generated invoice in Apache OFBiz due to factors such as:
- Additional charges (e.g., freight, insurance, duties, taxes, or handling fees)
- Price adjustments or negotiated discounts not reflected in the PO
- Corrections for currency fluctuations, rounding differences, or supplier-specific terms
- Other miscellaneous fees or credits that were not anticipated at the time of purchase order creation
For these common scenarios, Apache OFBiz provides flexible editing tools directly on the generated invoice. Procurement or AP teams can quickly add, modify, or remove lines to reconcile the system invoice with the actual supplier bill before approval and posting.
Important note
Many of the more significant quantity-related variances (e.g., over-receiving, under-receiving, additional items, or rejected/damaged goods) practically and typically require prior coordination or agreement with the supplier. These are usually resolved outside the system (via credit notes, revised invoices, or updated receipts) rather than through unilateral invoice edits in the system. The editing tools are primarily intended to handle financial adjustments and add-ons that align the recorded invoice with the payable amount.
This ensures the final invoice accurately reflects what is legally and contractually owed, while keeping the process efficient and auditable.
Editing Invoice Header Details
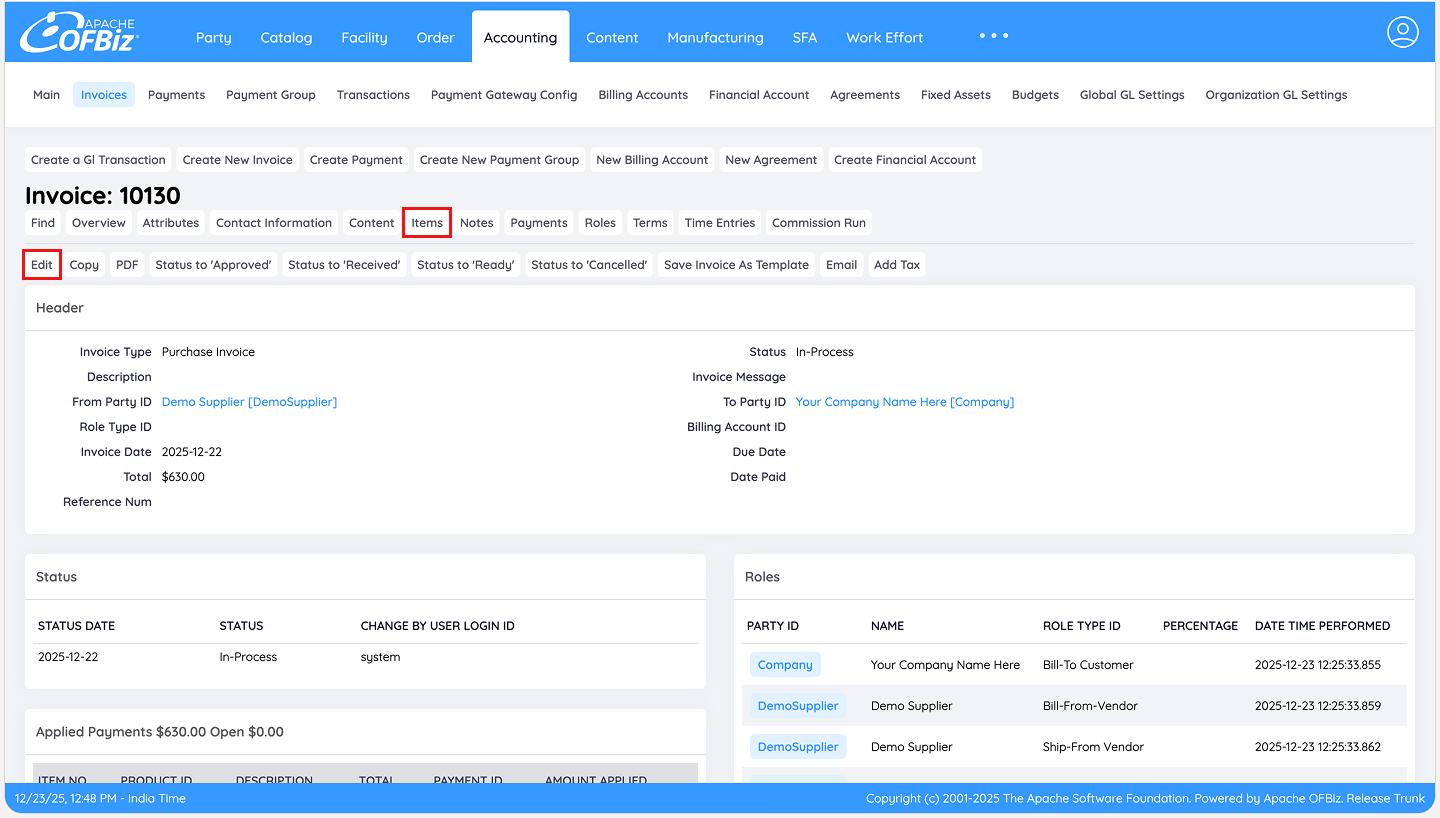
From the Invoice detail screen as shown below, click on Edit to modify header-level invoice details, such as invoice date, currency, reference numbers, description, invoice message, or associated parties.
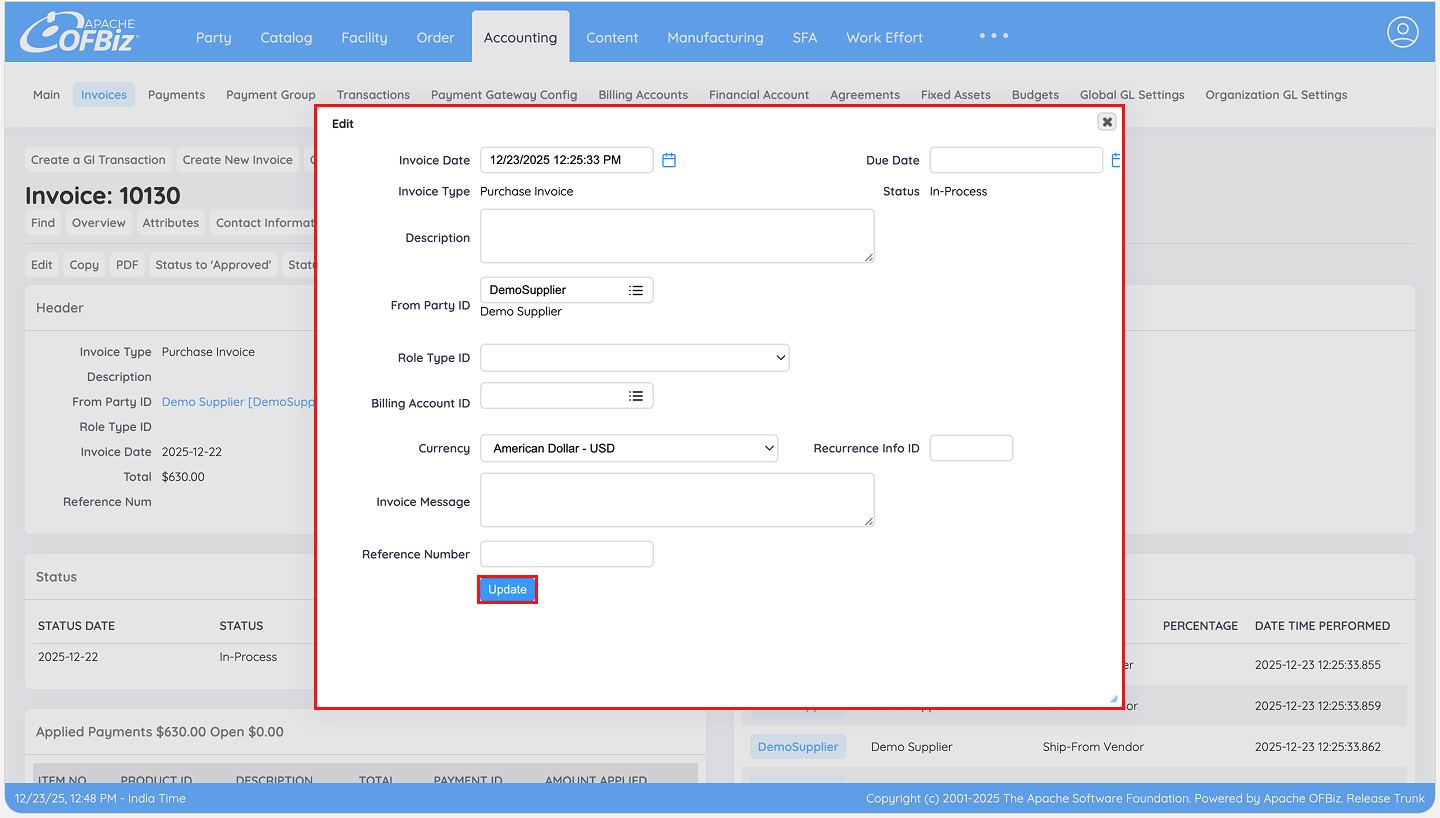
Once you click the Edit button, a pop-up window appears as shown below. This allows you to modify header-level information, including:
- Invoice date and type
- Currency
- Associated parties (add, remove, or change)
- Reference numbers
- Invoice message and description
These changes are useful for aligning the invoice with the supplier's actual bill or adding internal notes.
Managing Invoice Line Items
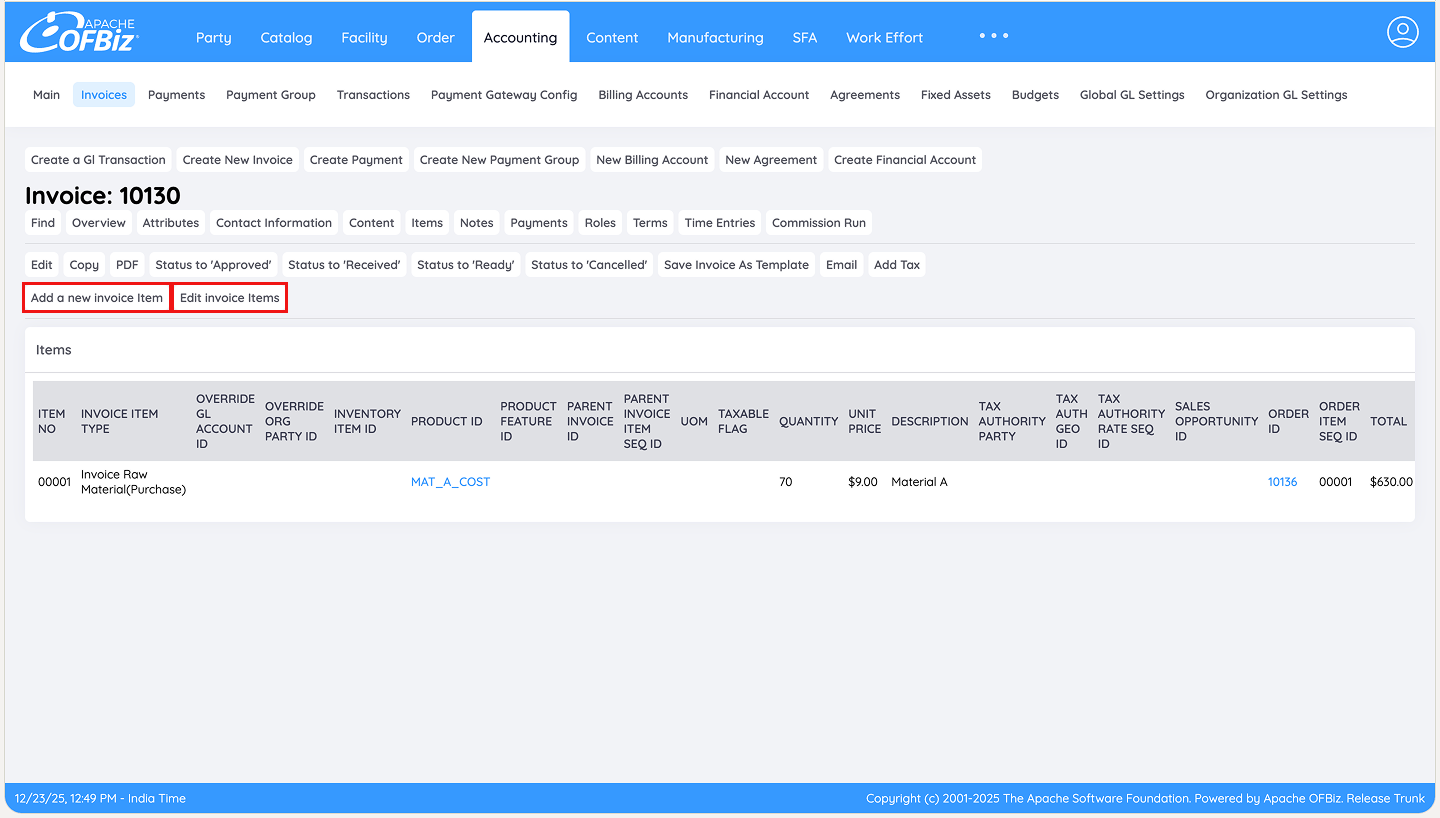
To edit and manage invoice items, click on Items from the Invoice Screen. Clicking on this button opens the line-item management screen as shown below, where you can add new items, edit existing quantities/prices, or remove lines entirely.
Here, two key buttons are available for adjustments:
- Add a new invoice item: Click this button to open a pop-up window where you can add items that were received but not originally on the PO (e.g., bonus or substitute products) or add charges previously not accounted for in the PO (e.g., duties, handling fees, insurance, etc.). Enter the product ID, description, quantity, unit price, and any applicable taxes or adjustments.
- Edit invoice items: Click this button to open a pop-up window, allowing you to modify quantities, unit prices, descriptions, or other details for accurate matching.
These tools enable precise reconciliation of the invoice with physical receipts and the supplier's bill.
Removing Invoice Line Items
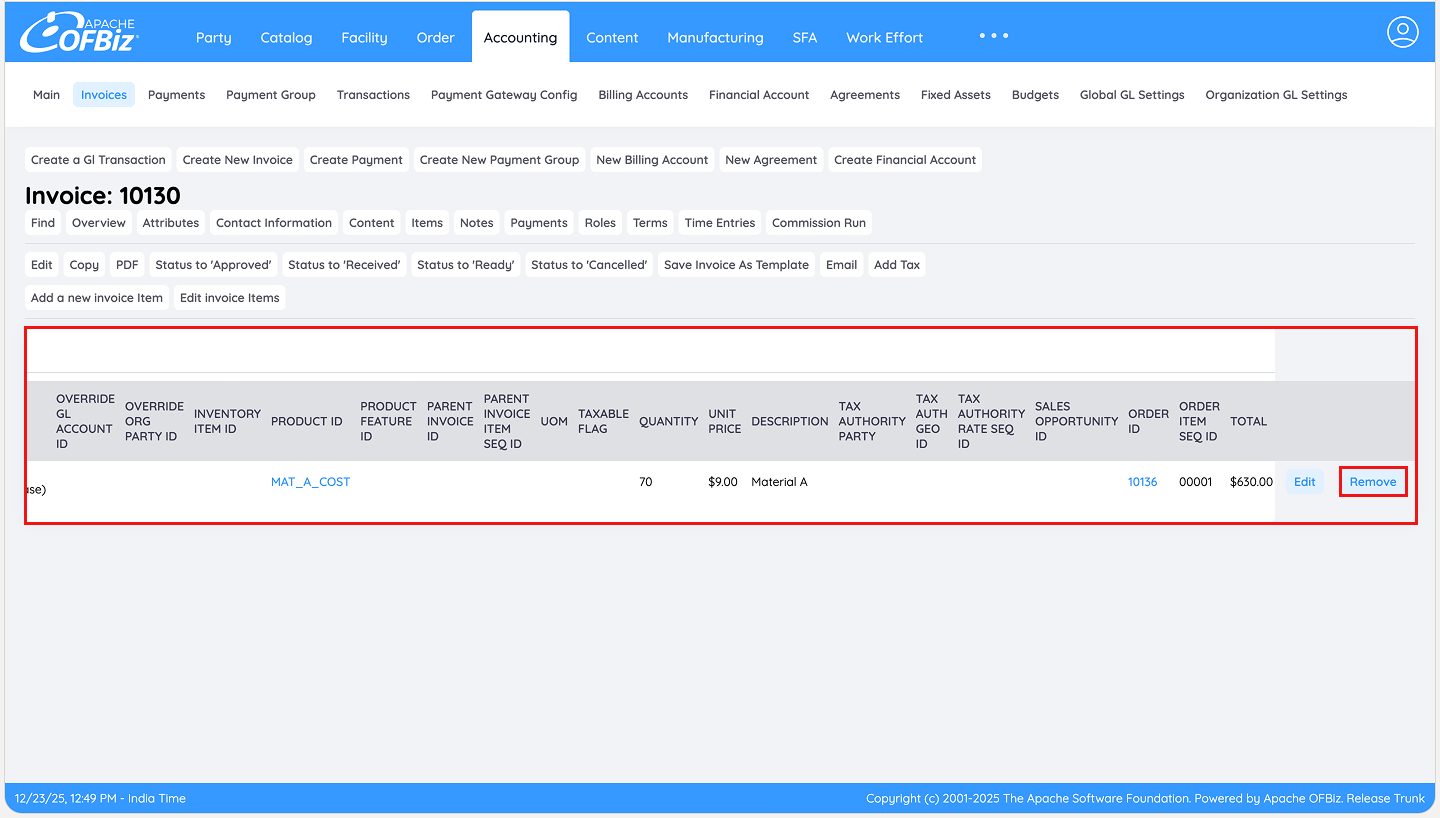
To remove an unwanted item from the invoice (e.g., rejected goods or erroneous lines), navigate to the line-item management screen and scroll horizontally to the right of the items table if necessary.
Each row includes a Remove button. Click it next to the relevant item to delete the line entirely. After removal, the invoice totals update automatically, ensuring the bill accurately reflects what will be paid.
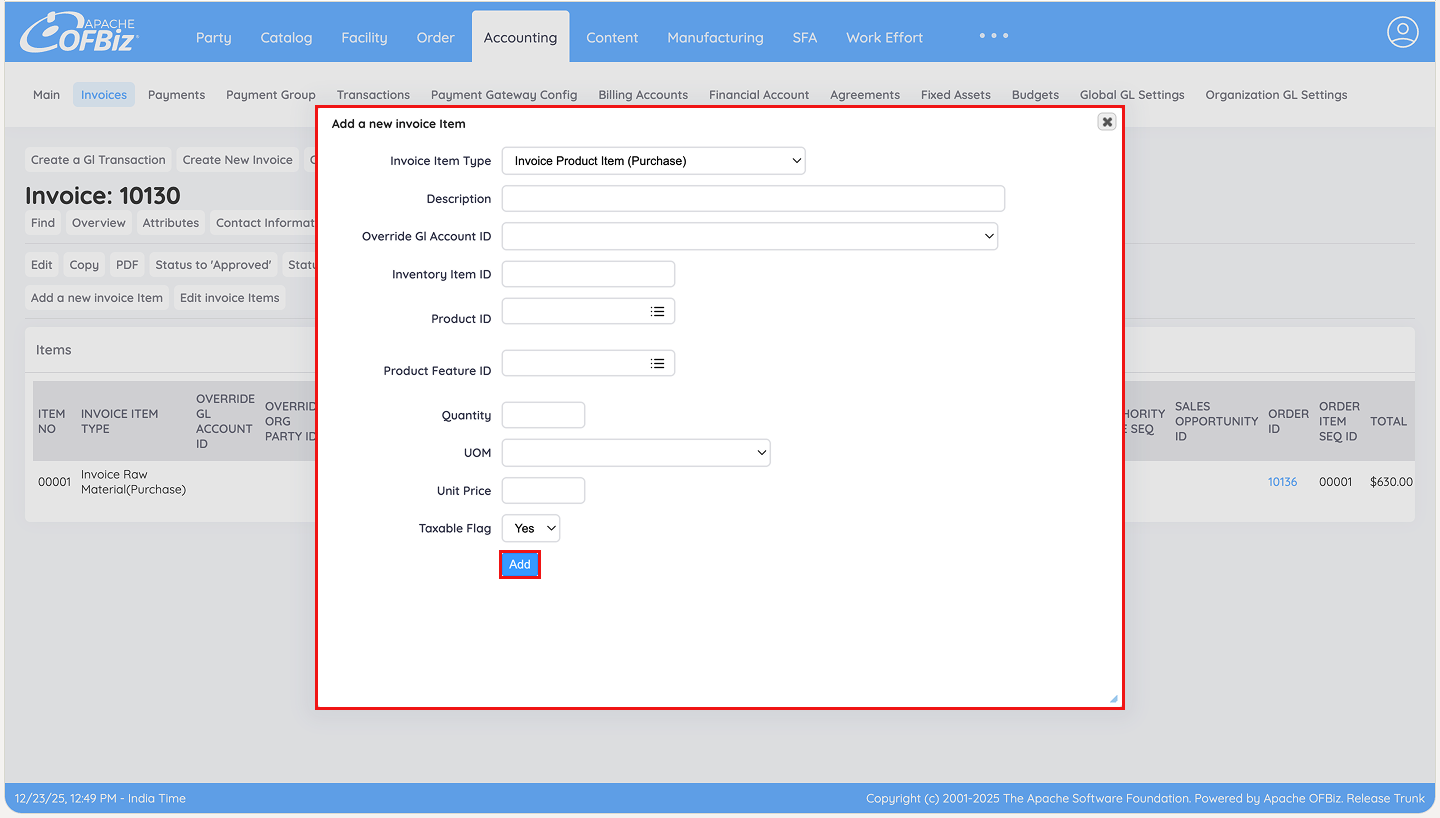
Adding a New Invoice Item
To include an item that was received but not originally on the purchase order (e.g., handling fees, duties etc.), click Add a new invoice item on the line-item management screen (highlighted in the previous screenshot).
This opens a pop-up window as shown below where you can:
- Enter the product ID or search for the item
- Specify the quantity
- Set the unit price and any applicable taxes or adjustments
- Add descriptions or references as needed
Once submitted by clicking on Add, the new line is added to the invoice, and totals update automatically ensuring the invoice accurately reflects what should be paid.
Editing Existing Invoice Item Details
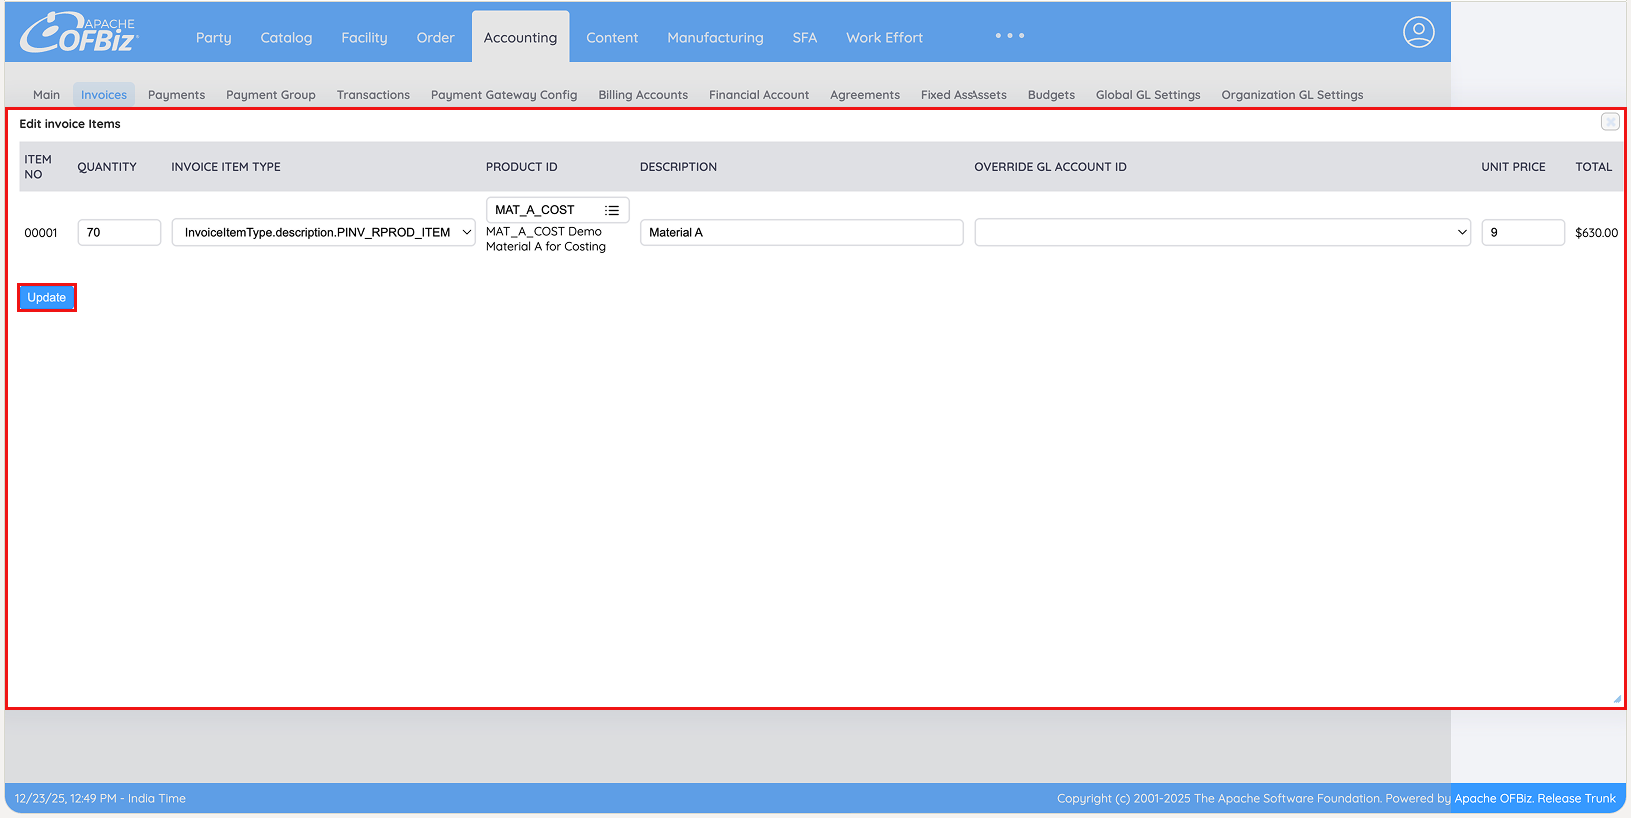
To modify an existing line item (e.g., adjusting for shortages, over-receives, or price corrections), click Edit invoice items on the Invoice detail screen (highlighted in the previous screenshot).
This opens a pop-up window as shown below where you can:
- Update the quantity (to reflect accepted/received amounts)
- Change the unit price (if it differs from the PO or supplier bill)
- Adjust descriptions as needed
Once changes are complete, click Update to apply them. The invoice totals will recalculate automatically.
Finalising the Invoice
Once the invoice has been thoroughly reviewed and any necessary edits applied to reflect real-world variances if any, the accounts payable team can complete the financial validation process.
This involves two simple status changes on the Invoice detail screen:
- Set the status to Approved. This step helps to ensure that an authorized person has reviewed and approved the invoice.
- Then set it to Ready, which means it's ready to pay and this step automatically triggers General Ledger posting to respective General Ledger accounts.
At this point, the transaction is fully recorded in the accounting system, updating liabilities and expense accounts accurately.
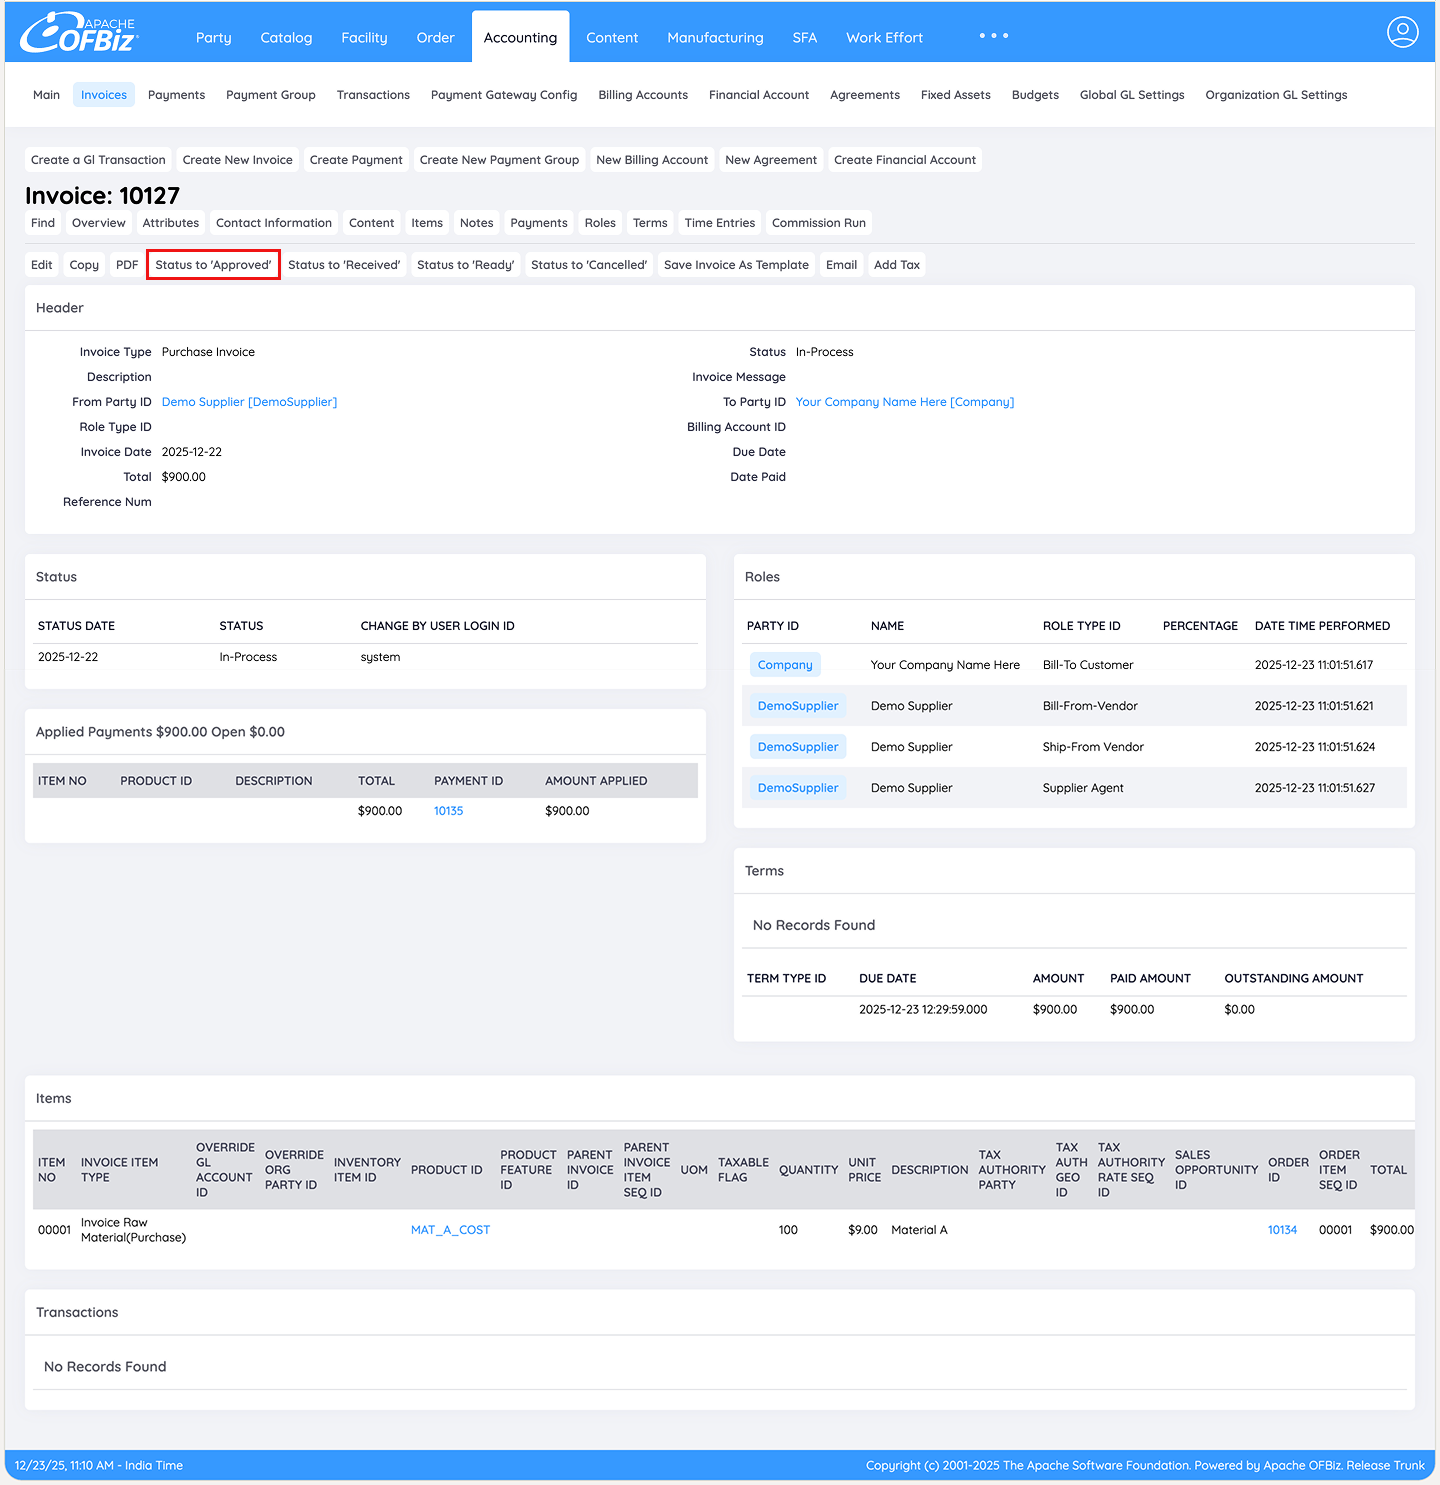
Step 1: Approving the Invoice
Once all details have been verified and any required edits completed, return to the main Invoice detail screen.
To formally authorise the invoice for processing, change the status to approved using the Status to ‘Approved’ button as shown below.
Step 2: Marking the Invoice as Ready
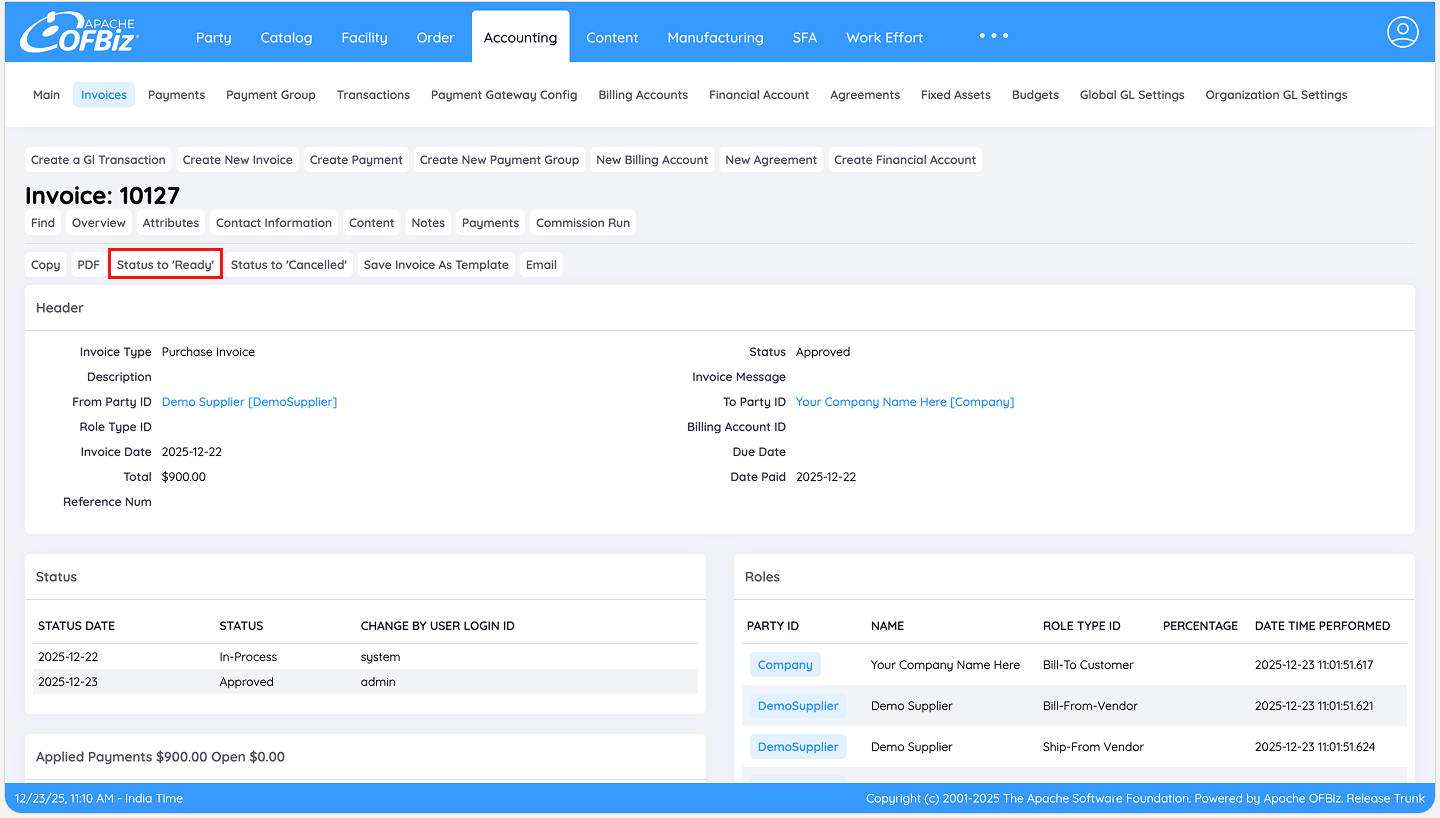
Once the invoice has been reviewed, approved, and any necessary adjustments have been made, the final step before payment is to mark it as ready, to do so simply click the button Status to Ready on the Invoice detail screen.
Why this step is important
Marking the invoice as Ready locks it against further edits and triggers Apache OFBiz to automatically post the transaction to the general ledger for purposes of recording the liability. This creates the corresponding journal entries, debiting and crediting respective accounts depending on configuration.
This step is required because OFBiz will not allow you to mark an invoice as Paid unless it has first been set to Ready. The system enforces this sequence to ensure proper financial posting and reconciliation thus preventing incomplete or unposted invoices from being closed prematurely.
After this step, the invoice is financially recorded and ready for payment processing. All that remains is to create and apply the payment (covered in the Payment Workflows guide).
Conclusion
The invoicing workflows in Apache OFBiz provide a robust, integrated way to bridge warehouse receipts with financial records, centred on the reliable principle of one invoice per shipment. By automatically generating pre-populated invoices upon full receipt, and offering straightforward editing tools for real-world variances, the system ensures accuracy in records while minimising manual effort and errors.
With the invoice marked as ready and posted to the ledger, accounts payable is updated and the transaction is financially recorded. The only remaining step is to settle with the supplier. For complete guidance on payment processing, refer to the separate Payment Workflows in Apache OFBiz guide. This final step will complete the full procure-to-pay cycle. To understand the receiving process in full, refer to our guide Receiving Items Against a Purchase Order in Apache OFBiz.