DUE TO SPAM, SIGN-UP IS DISABLED. Goto Selfserve wiki signup and request an account.
OFBIZ-13240 - Getting issue details... STATUS
Introduction
In Apache OFBiz, there are multiple workflows that enable warehouse teams to receive a single purchase order (PO) that is fulfilled through several distinct shipments over time. Each shipment is created, received, and tracked separately, while remaining linked to the original PO. This approach fully respects the system's core rule: one invoice per shipment. As a result, inventory is updated progressively with each receipt, and separate invoices are generated for each shipment once it is completed, ensuring accurate financial records and clear traceability.
This workflow is essential for businesses dealing with ongoing or staggered deliveries, where forcing everything into a single shipment would not reflect reality.
Common Use Cases
- Your supplier is fulfilling a large or blanket purchase order in multiple batches over weeks or months.
- Different items on the same PO are shipped separately due to availability, size, or logistics constraints.
- Long-term vendor agreements involve recurring deliveries against one PO, where the supplier prefers to bill per shipment to align with their cash flow.
By managing receipts this way, businesses gain precise inventory control, avoid overstocking risks, and maintain clean, shipment-specific financial tracking.
How It Works in Practice
The process requires creating a separate shipment for each incoming batch either from the Purchase Order view screen or the Facility module, then receiving against that specific shipment via the Facility module.
For this guide, we demonstrate shipment creation from the Purchase Order view screen and receiving primarily through the Facility module's Incoming Shipments tab, as it aligns with how multiple deliveries are typically handled on the warehouse floor.
Below is a detailed, step-by-step walkthrough for receiving multiple shipments against a single purchase order in Apache OFBiz.
Step-by-step guide with screenshots
Note on Manual Shipment Creation
While Apache OFBiz supports manual shipment creation, a few known issues currently affect the standard receiving workflow. For most scenarios (except multi-shipment receiving), the recommended workaround is to use automatic shipment creation via the Receive button on the Purchase Order screen. This method ensures seamless visibility and full functionality. For details, see the guide: Receive Partially Against an Incoming Shipment.
When a shipment is created manually (from either the Purchase Order screen or Facility module), it is successfully generated and linked to the PO. However, the newly generated shipment does not appear when searching by PO number in the Receive Inventory screen of the Facility module while trying to receive items.
Users must instead:
- Navigate to Incoming Shipments,
- Search by the specific Shipment ID, and
- Select Receive Against PO.
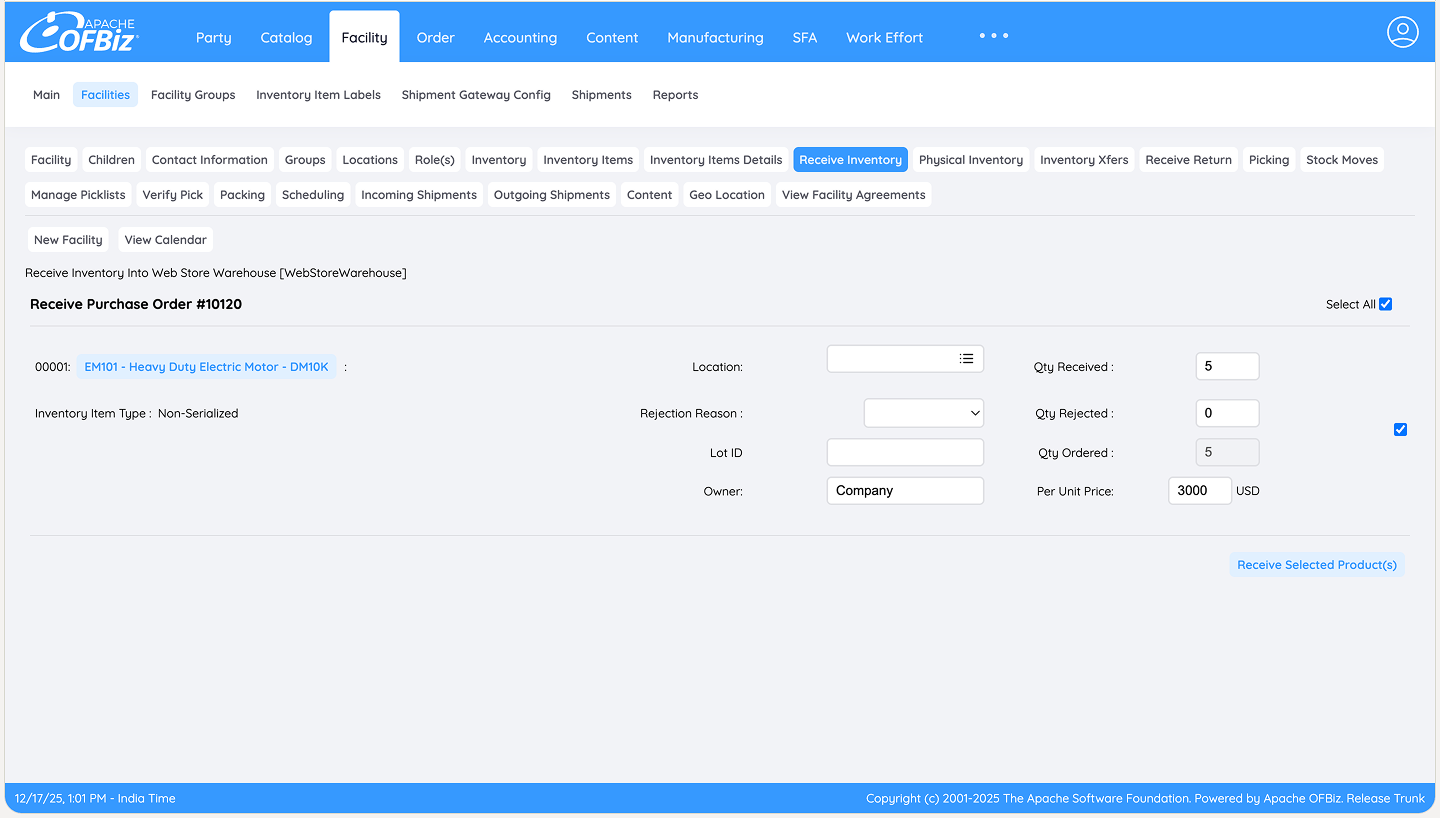
This alternative receiving screen (as you will see in the coming steps) supports accepting quantities but lacks a proper option to reject items (e.g., due to quality issues), a feature available in the standard Receive Inventory flow. For comparison we have attached a screenshot below of the said screen as well. The current workaround of cancelling quantities incorrectly suggests the order was cancelled rather than items being received but rejected.
JIRA tickets have been raised to address these limitations, including improved visibility and proper rejection handling. We will update this documentation once resolved. In the meantime, automatic shipment creation remains the most reliable approach for consistent, error-free receiving.
(Screenshot for the receiving screen via Receive Inventory option)
Step 1: Review the Purchase Order and create a new shipment manually
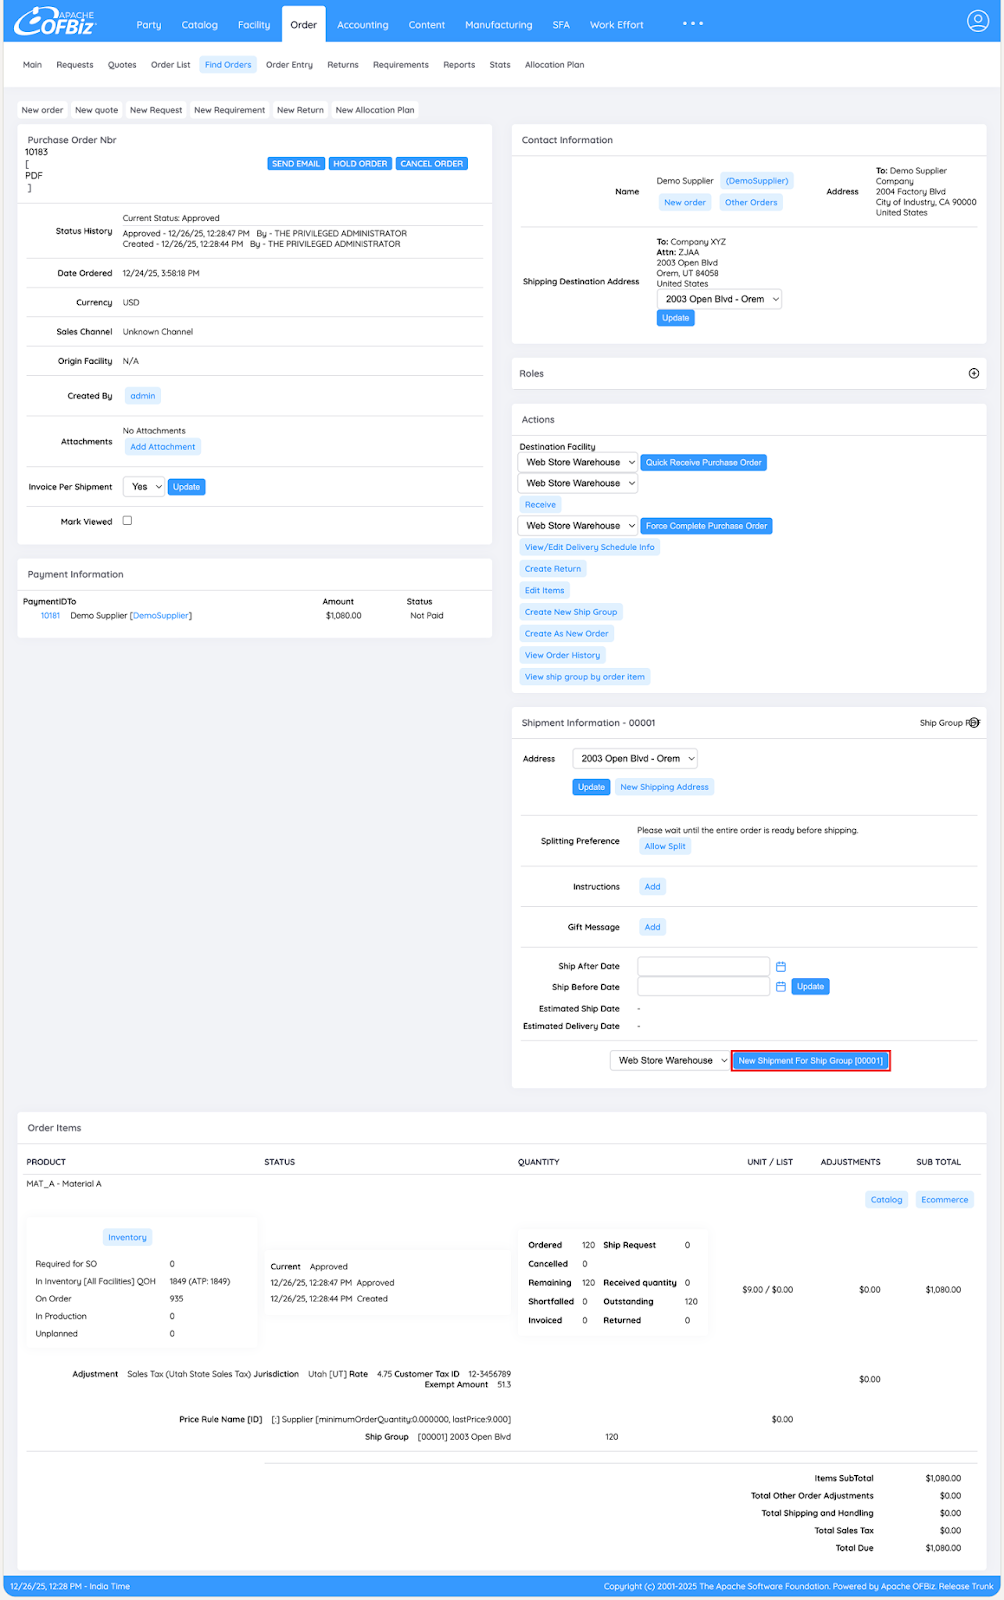
Open the approved Purchase Order and confirm the items, quantities, and any existing ship groups.
Click on the “New Shipment For Ship Group [00001]” button to create a new shipment through the PO screen.
Alternatively you can also create a new shipment manually though the Facility Module as well.
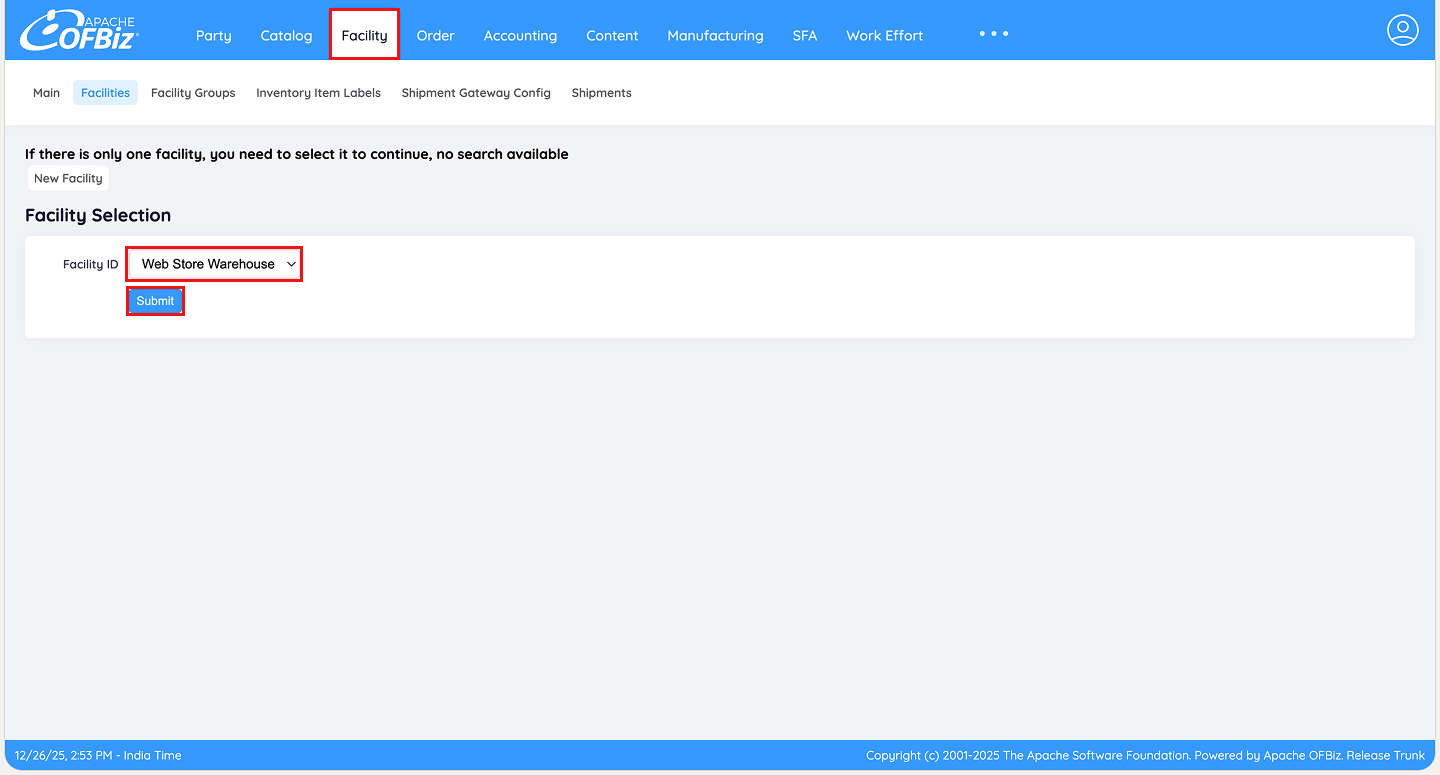
Navigate to the Facility Screen
From the main menu, select Facility, choose the receiving warehouse, and click Submit.
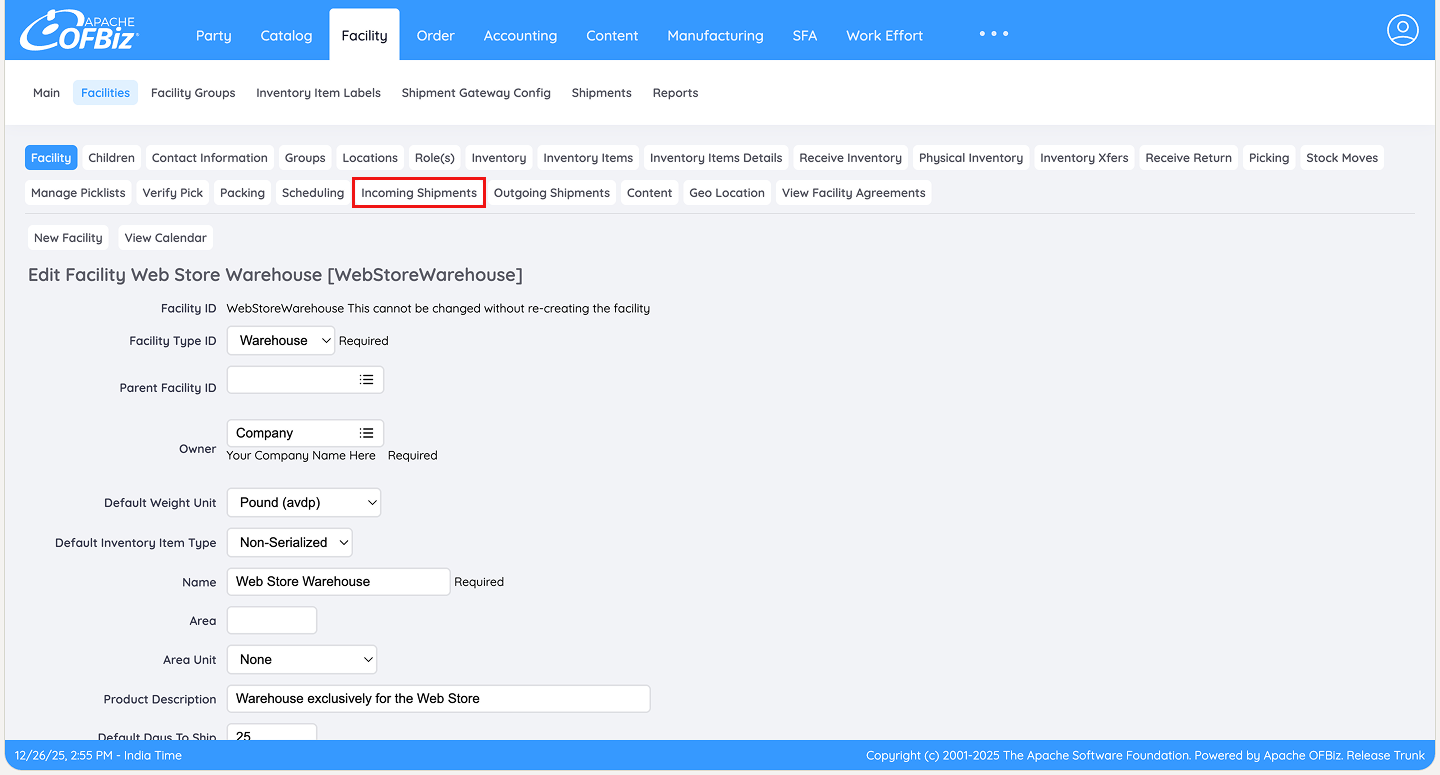
Access Incoming Shipments
On the Facility detail page, click the Incoming Shipments tab.
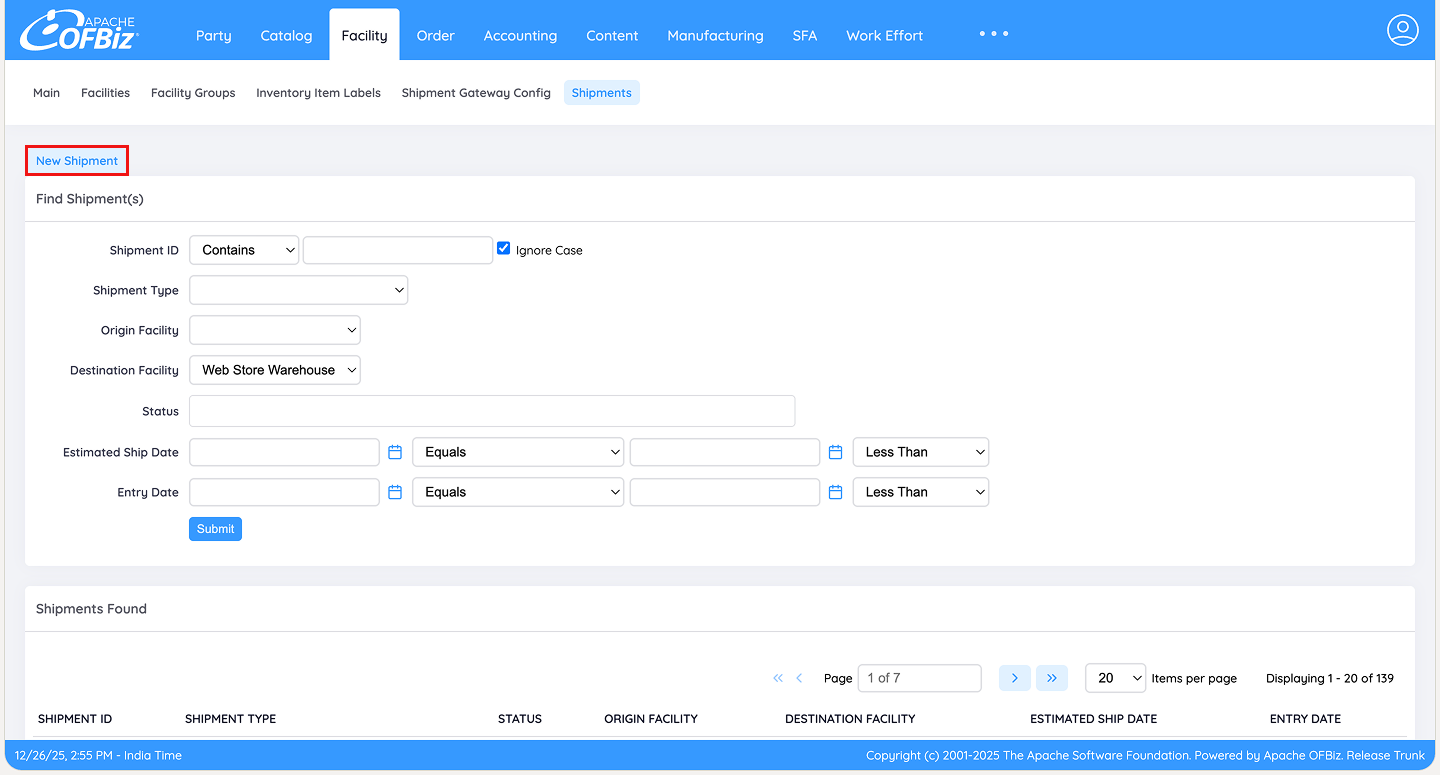
Create a New Shipment
Click New Shipment to start from scratch.
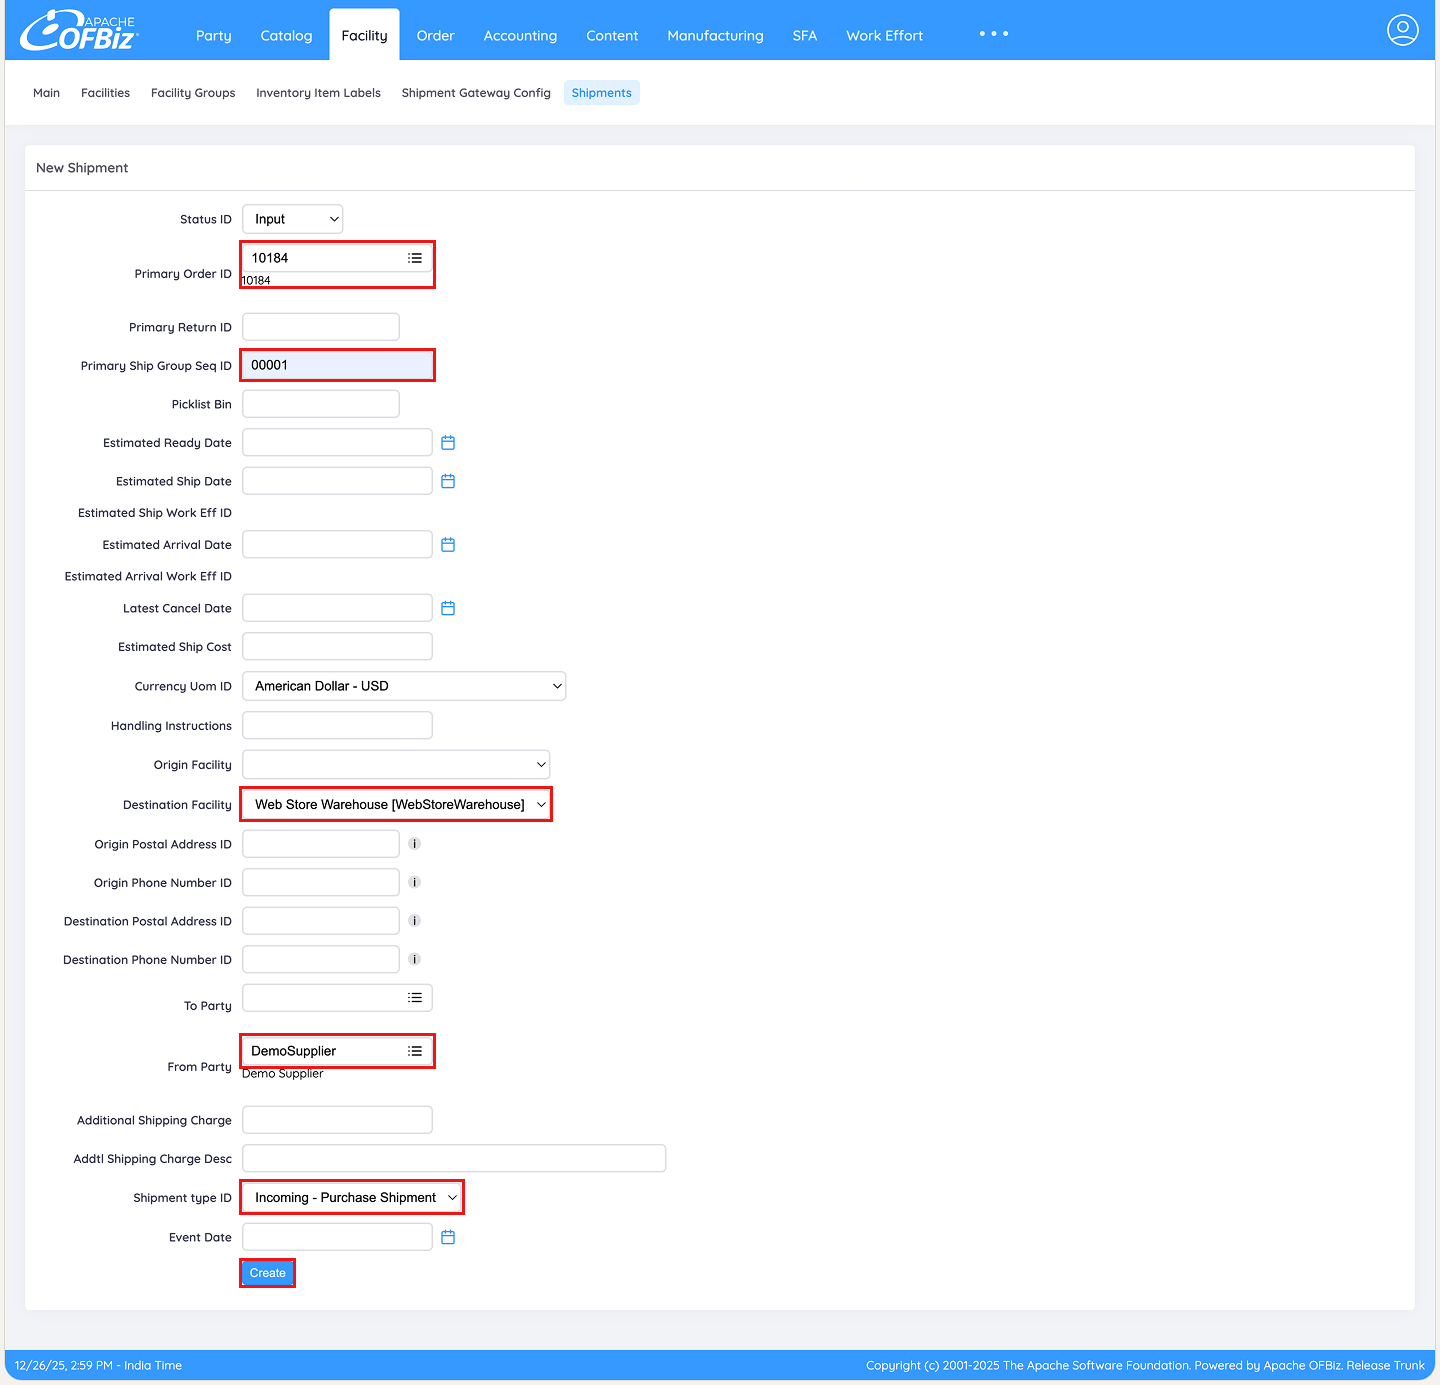
Enter Shipment Details
Input the PO number, ship group, supplier, estimated dates, and other relevant information, then click Create. A confirmation message appears—note the generated Shipment ID.
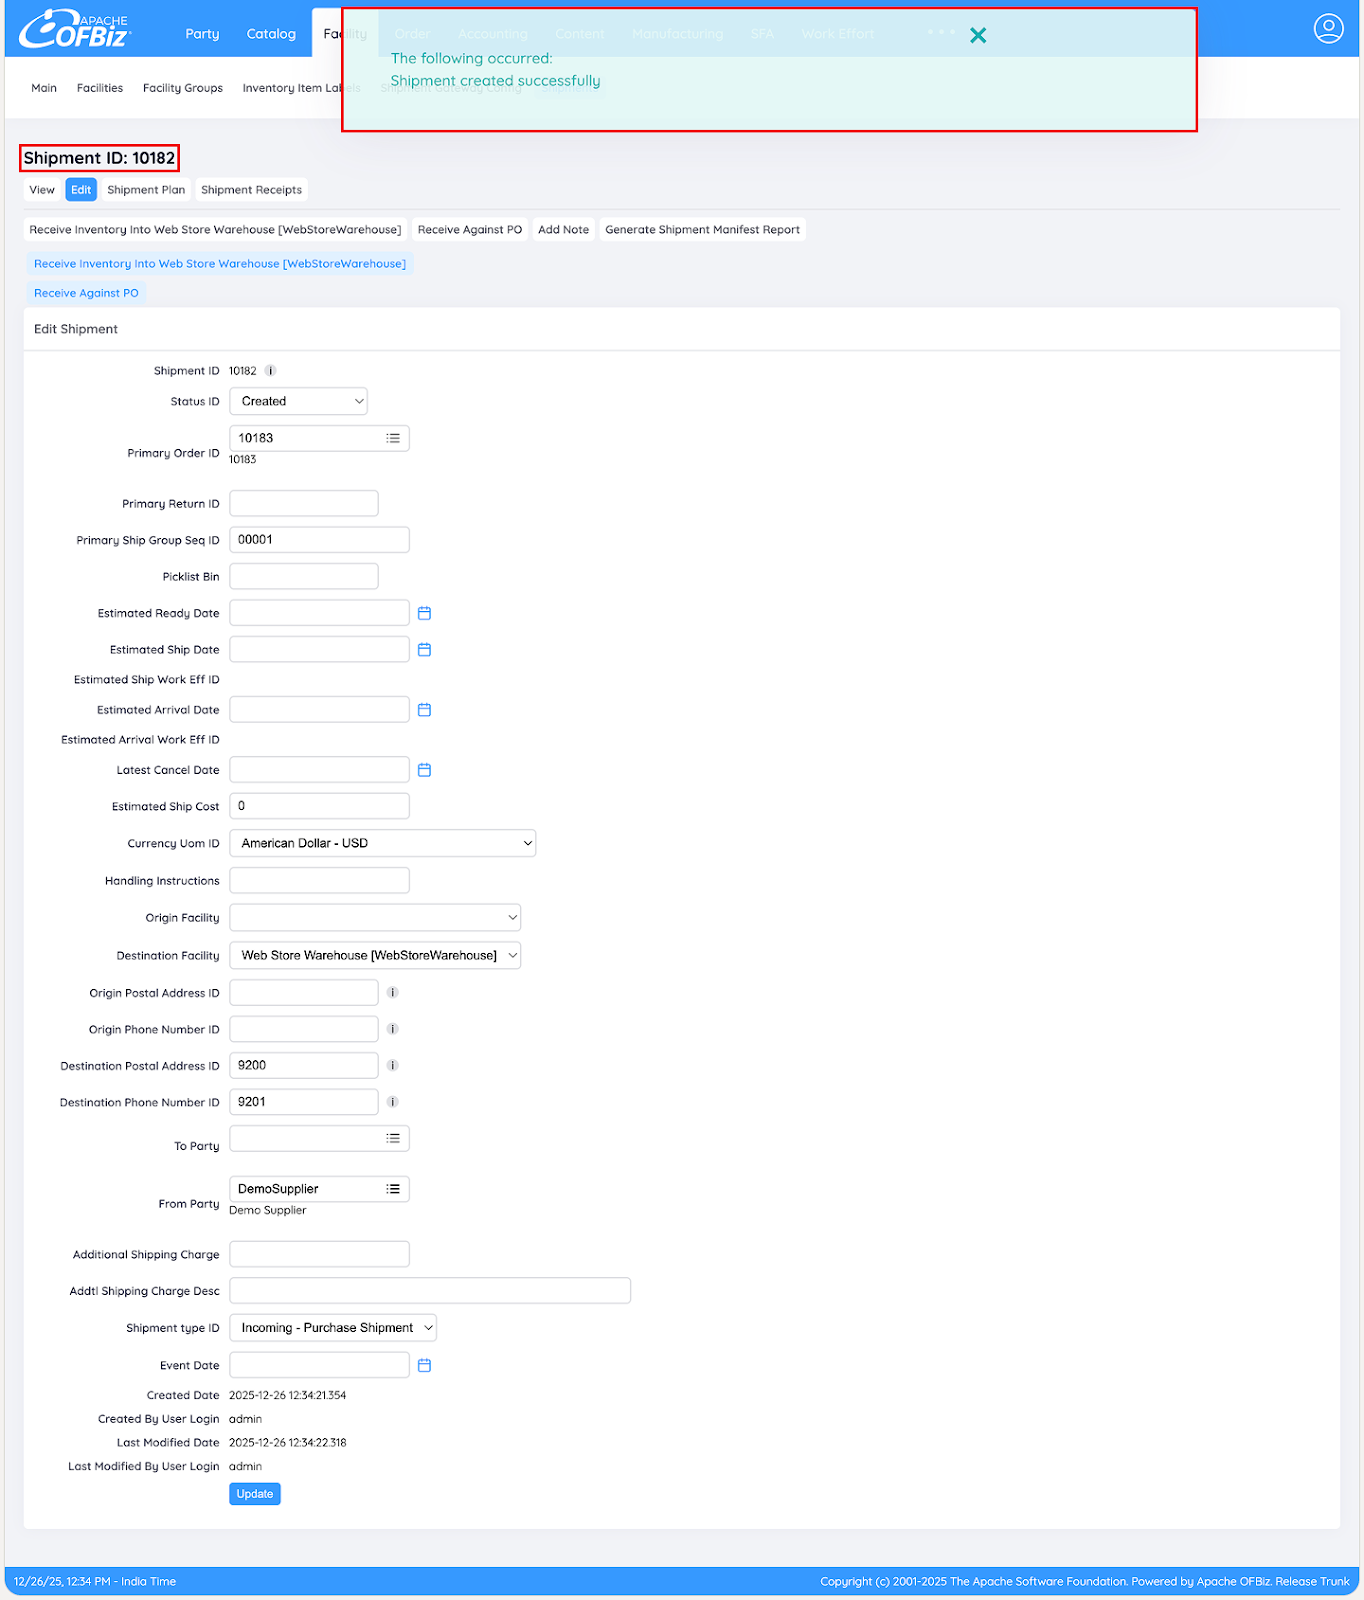
Step 2 - New Shipment is generated
A confirmation message appears, and a unique Shipment ID is generated (note it down, as highlighted below).
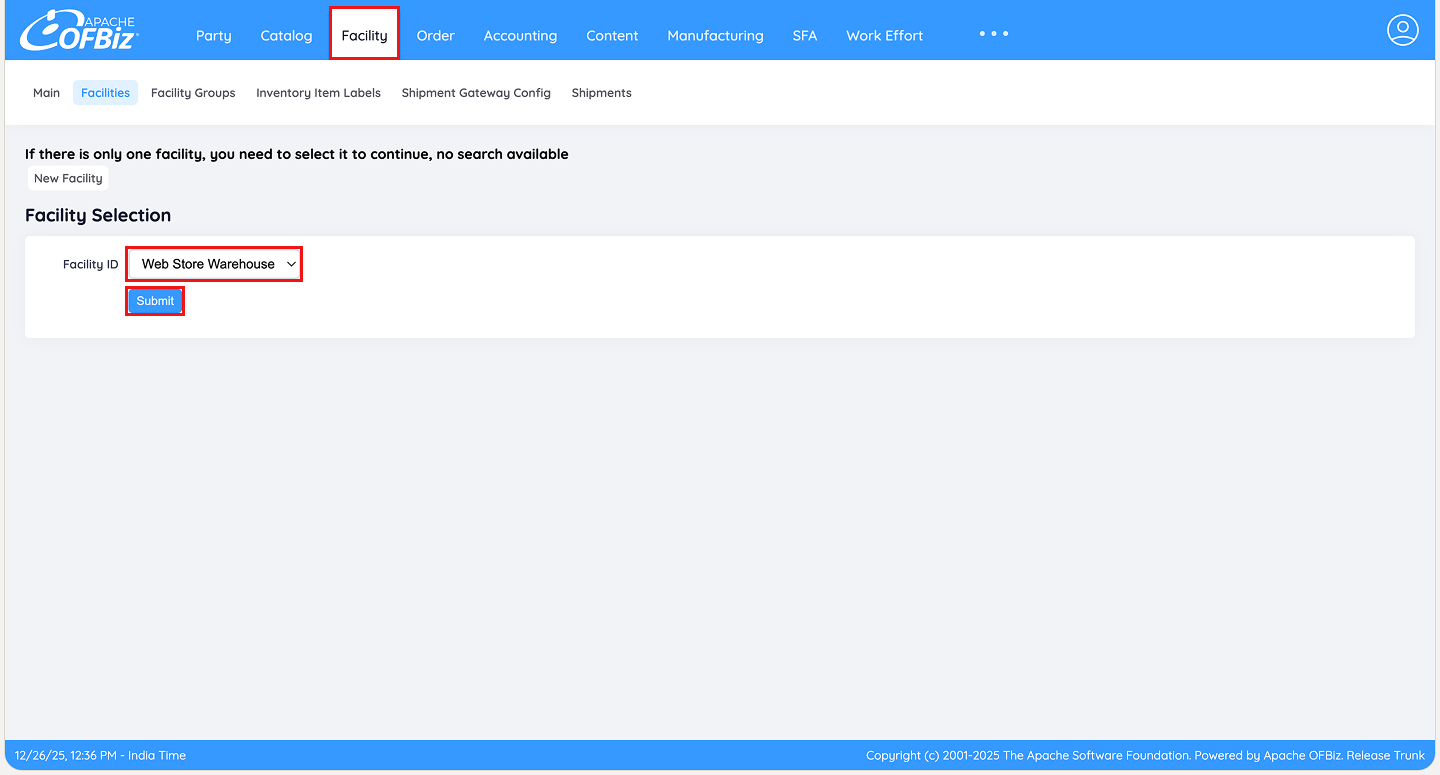
Step 3: Navigate to the Facility Screen
From the main menu, select Facility, choose the receiving warehouse, and click Submit.
Step 4: Access Incoming Shipments
On the Facility detail page, click the Incoming Shipments tab.
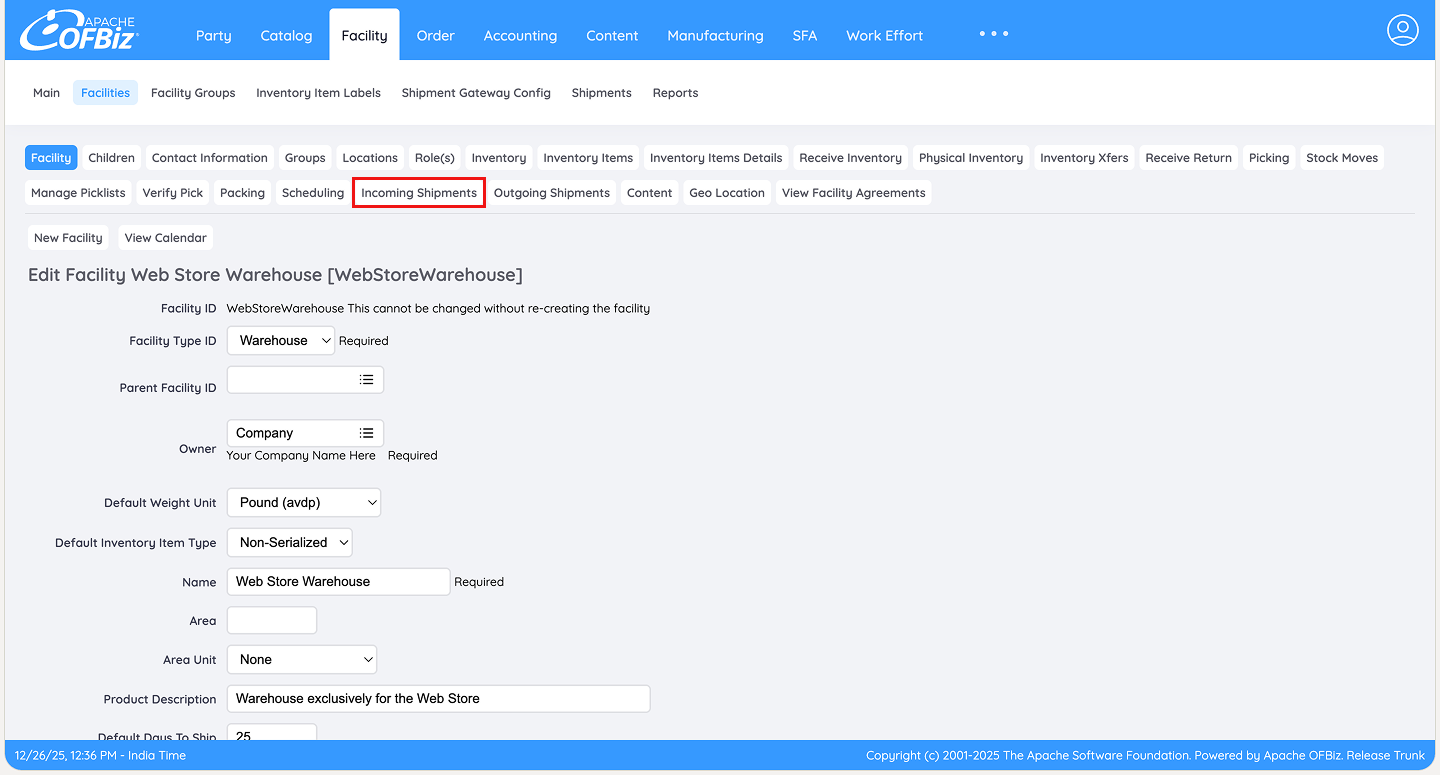
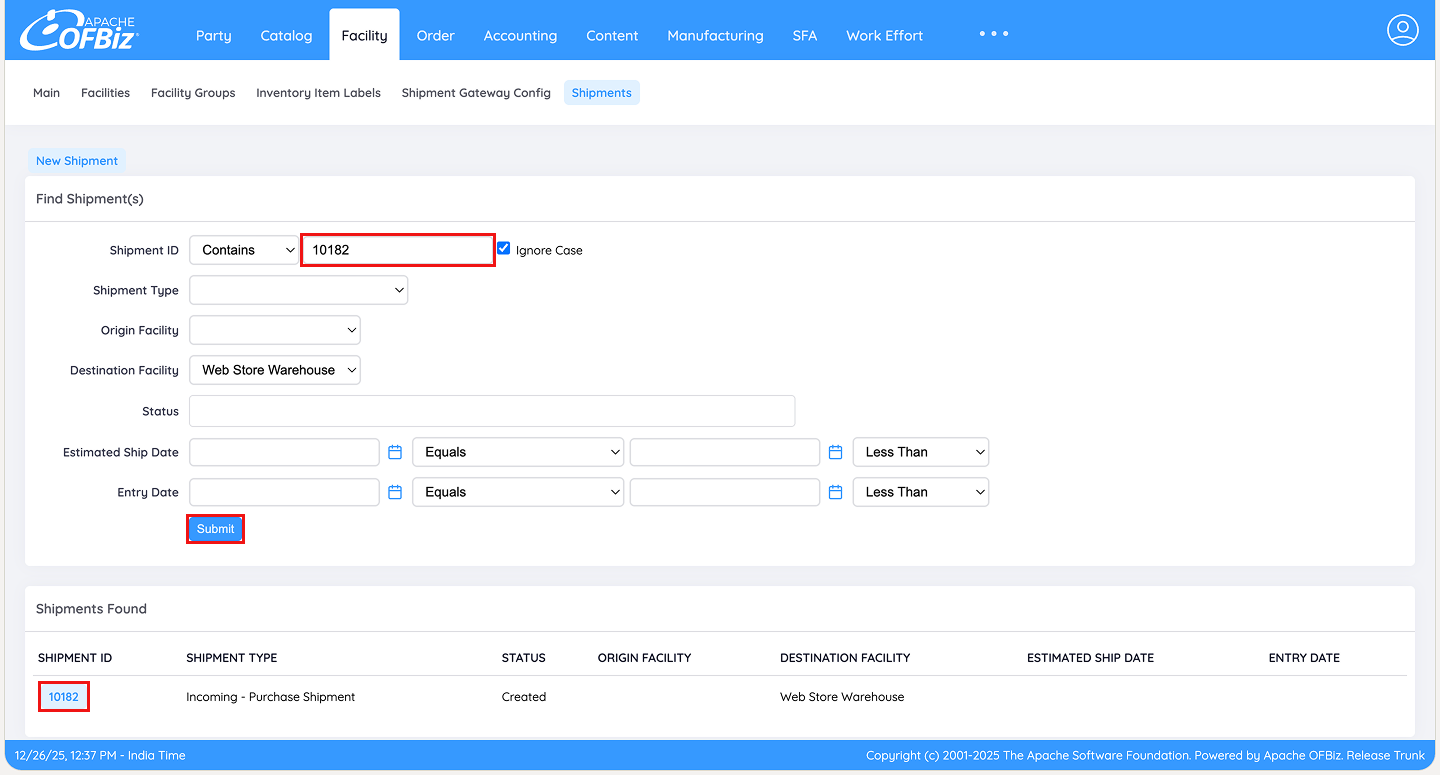
Step 5: Locate the Shipment
Enter the Shipment ID in the search field, click Submit, and select the shipment when it appears.
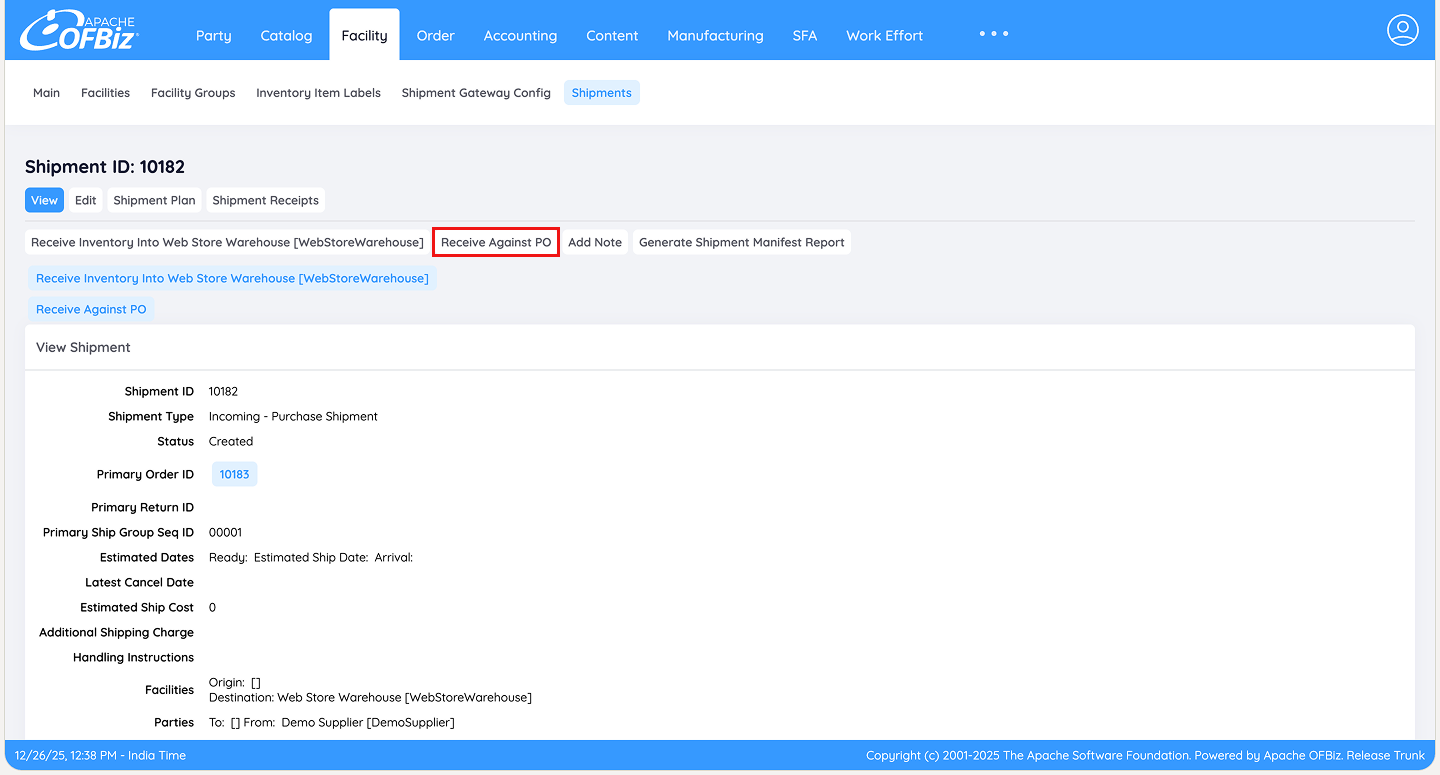
Step 6: Initiate Receiving
On the Shipment detail screen, click Receive Against PO.
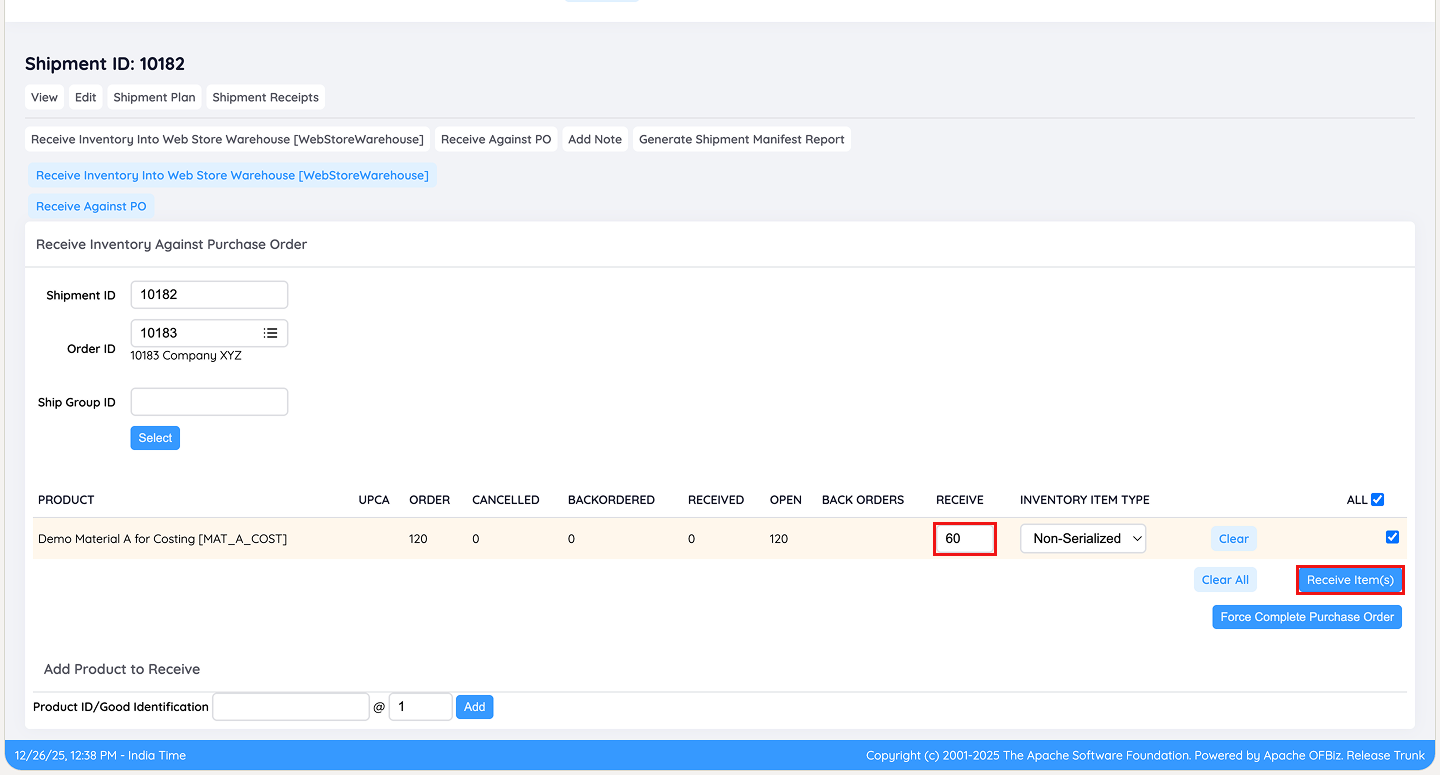
Step 7: Enter Received Quantities
In the receiving screen, enter the quantities actually arrived in this batch and click Receive Item(s).
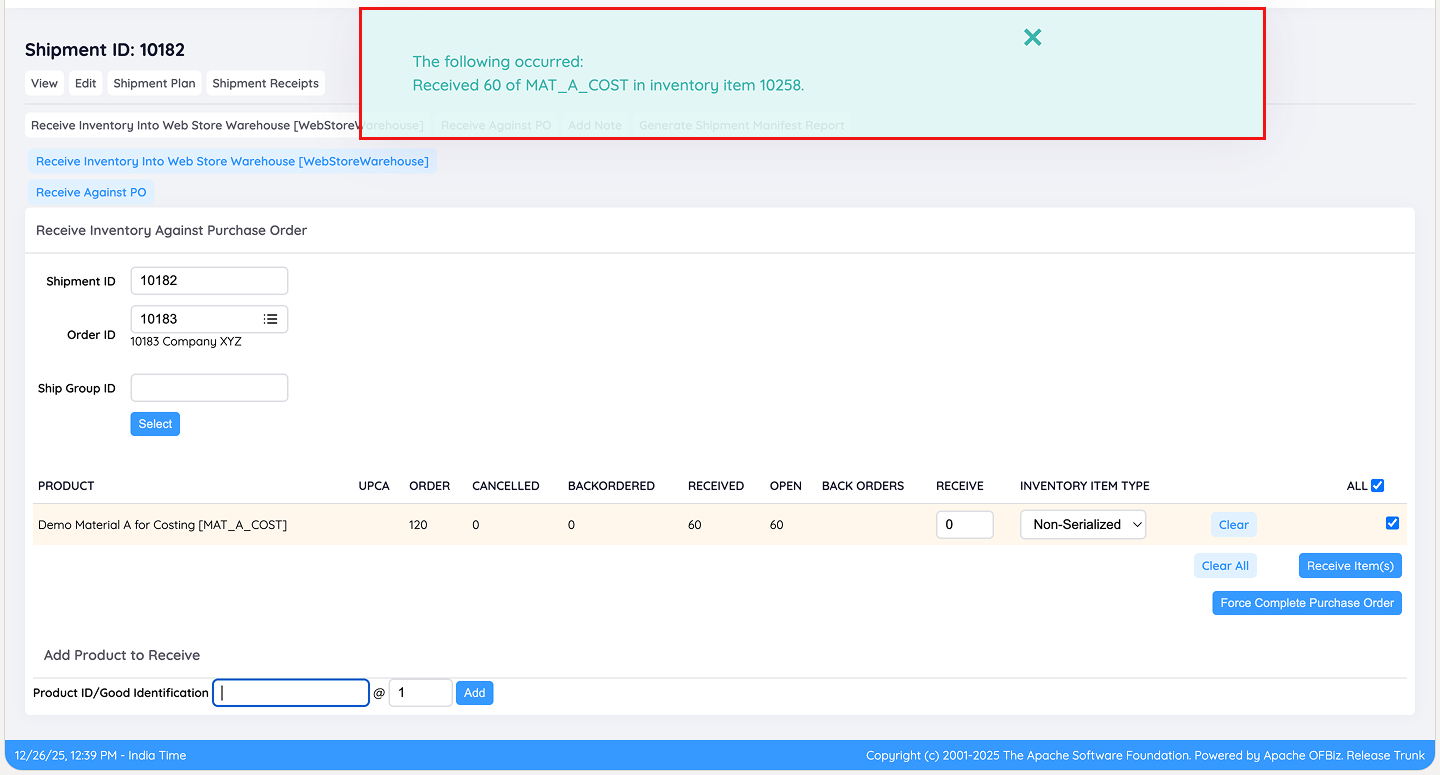
Step 8: Confirm Receipt
A confirmation message appears at the top, notifying that inventory has been updated for this shipment.
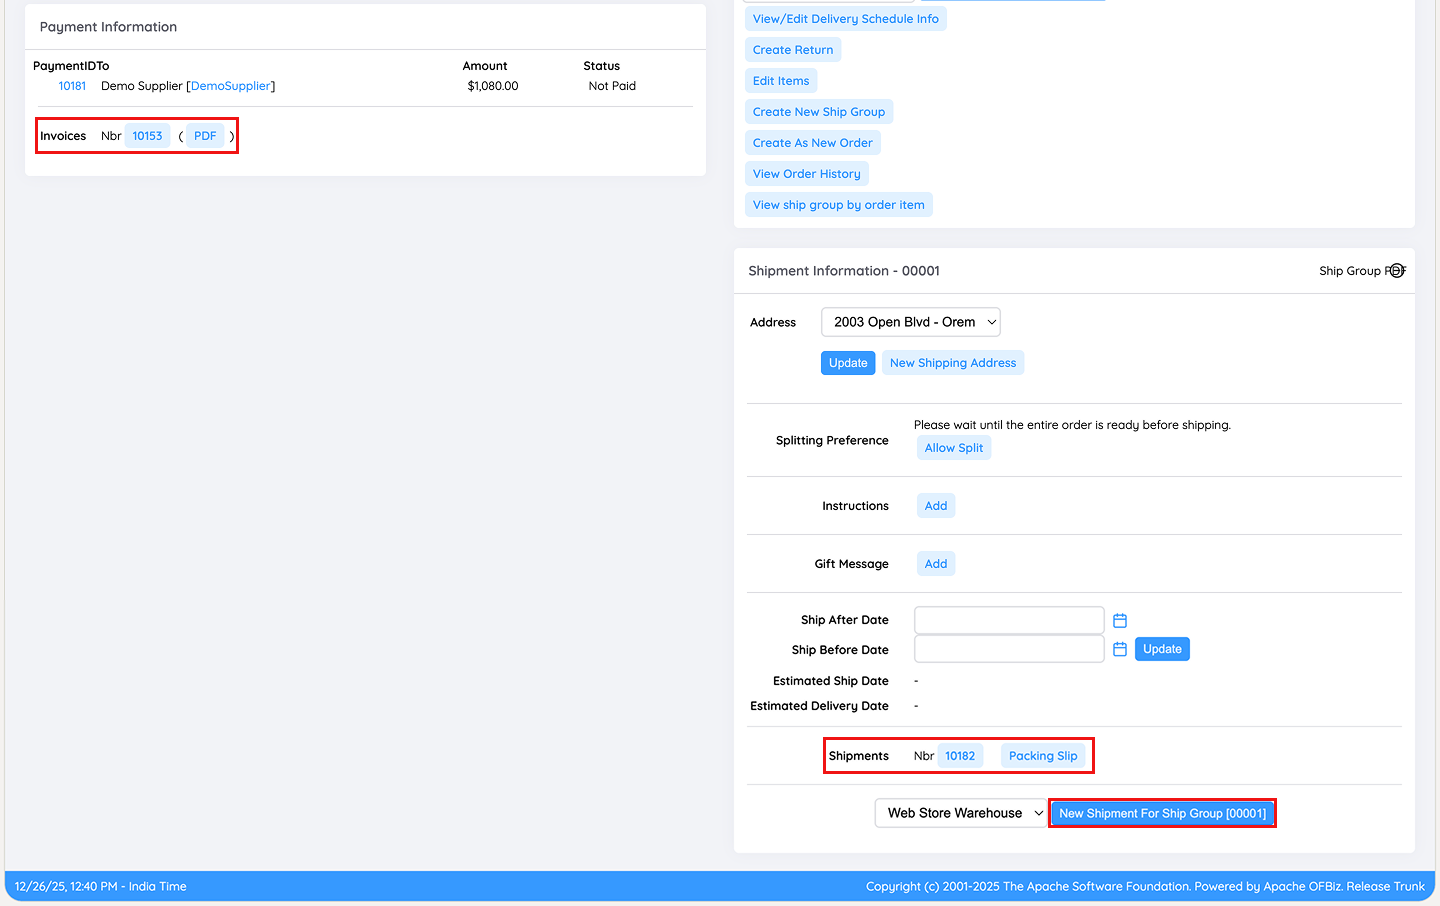
Step 9: Check Progress on the Purchase Order
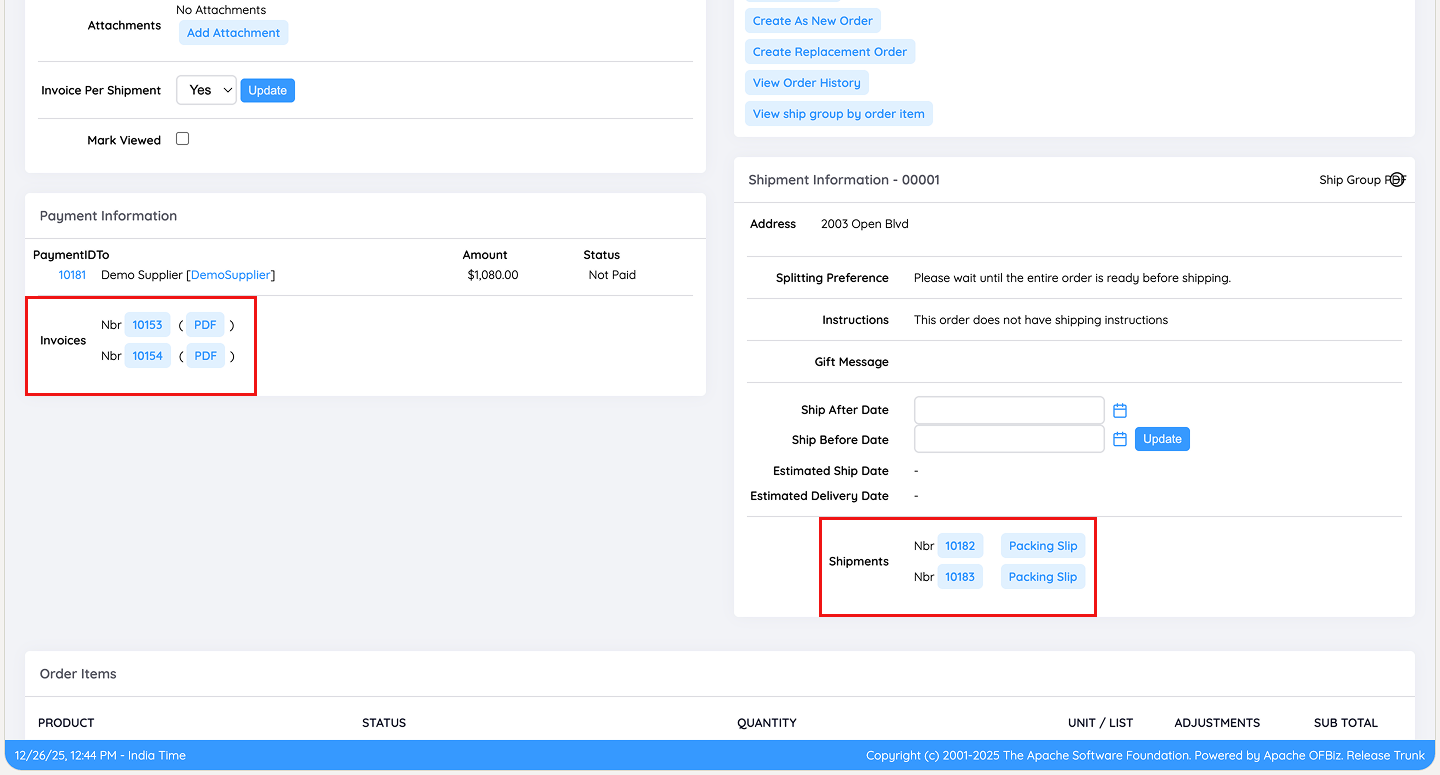
Return to the PO screen. The Payment Information section now shows the invoice for the completed shipment, and the Shipment Information section lists details of the received batch.
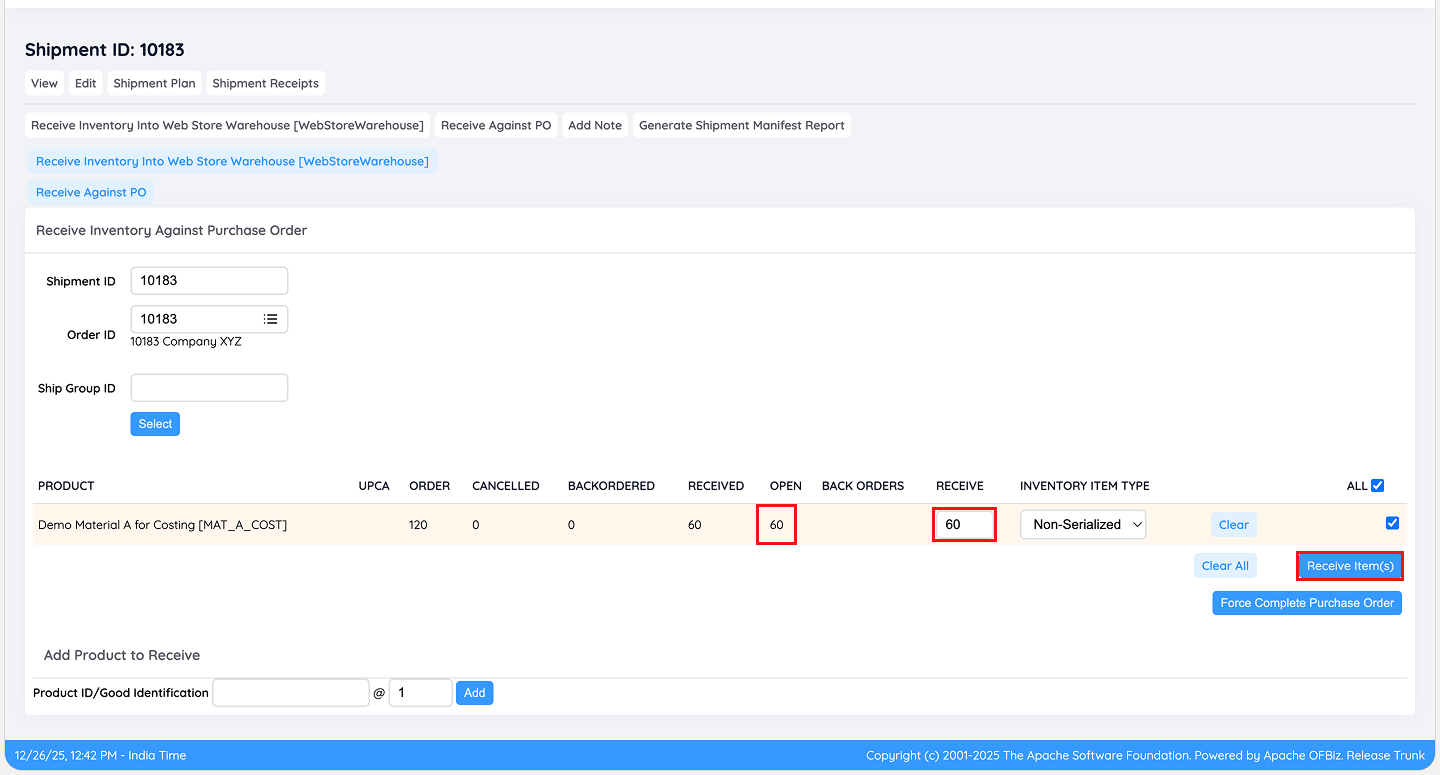
Step 10: Receive Subsequent Shipments
When the next batch arrives, repeat Steps 1 – 8 using a new shipment (created via New Shipment for Ship Group). The receiving screen will display remaining quantities for reference.
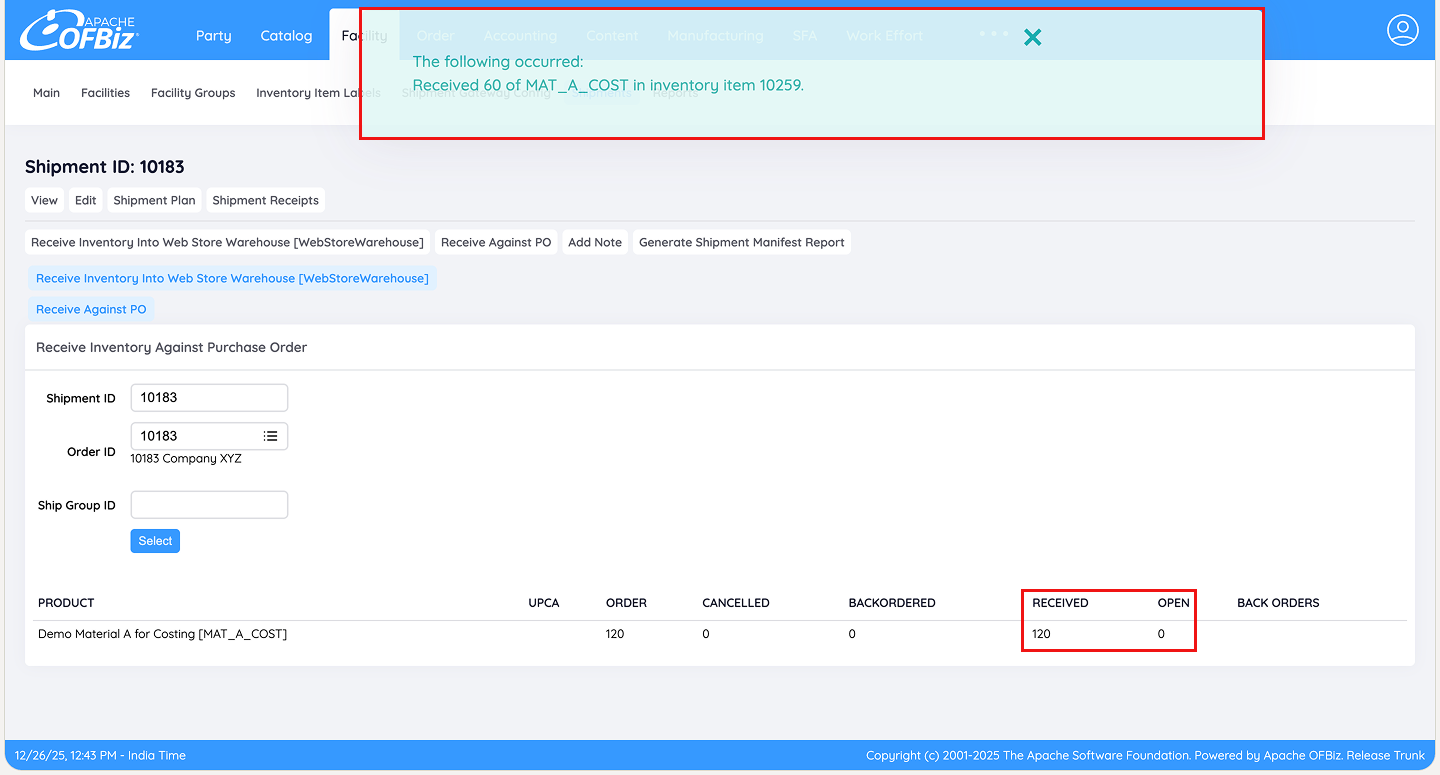
Step 11: Verify Full Completion
Once all batches are received, the Open column on the receiving screen shows '0', indicating no quantities remain.
Step 12: Final Purchase Order Overview
Back on the PO screen, separate invoices for each shipment are listed in Payment Information, with full shipment details visible.
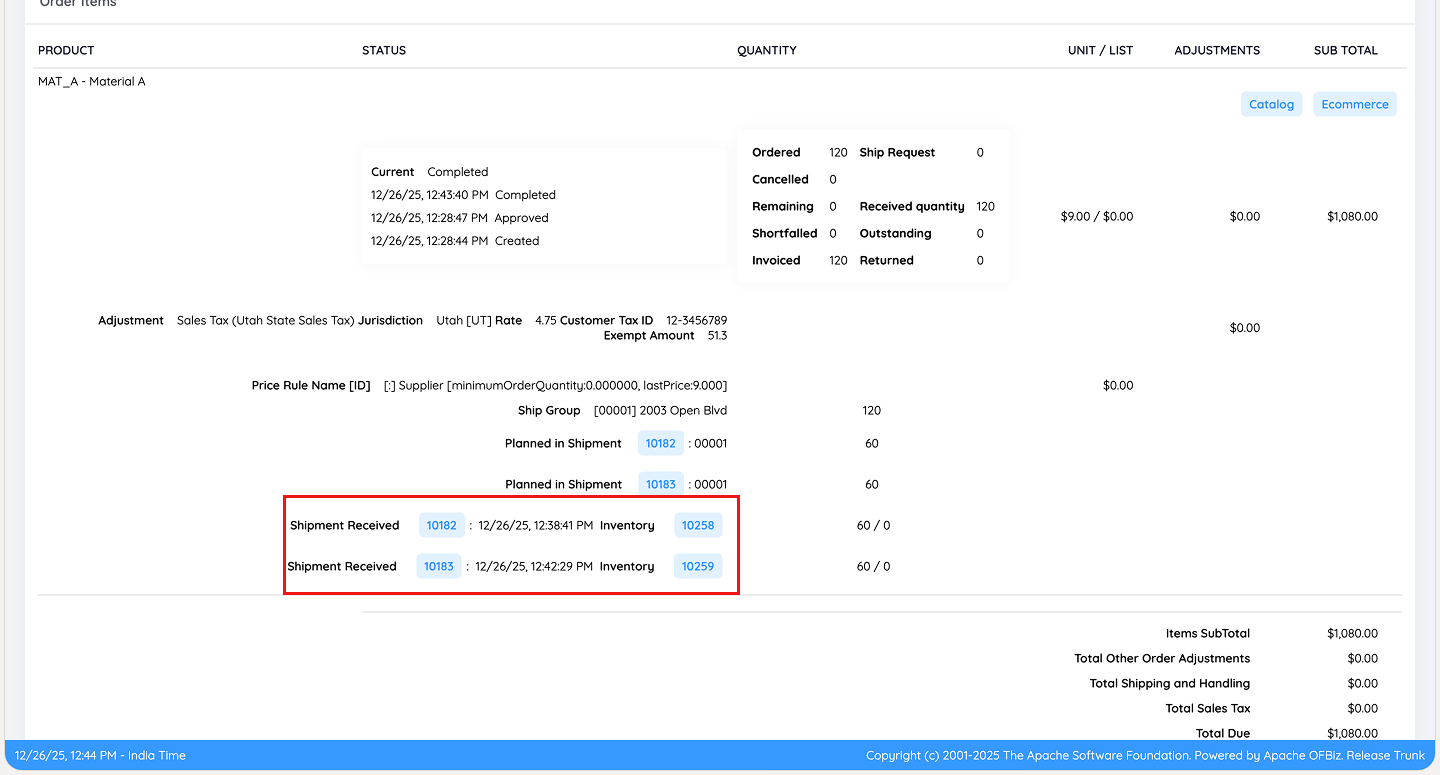
Step 13: Traceability in Order Items
Scroll to the Order Items section. Received quantities are summarised, with links to individual shipments and their generated inventory items for ongoing tracking.
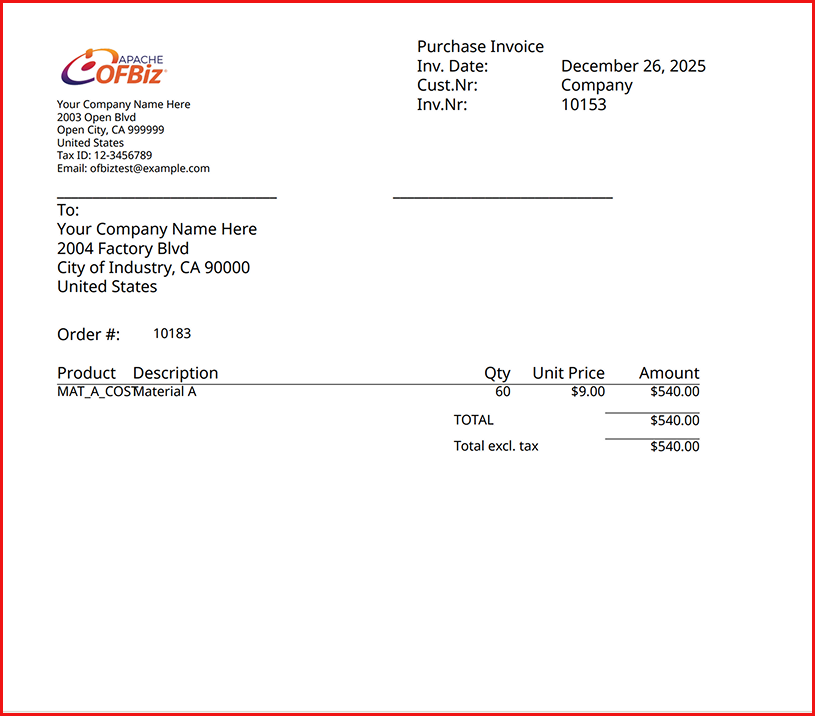
Step 14: Invoice PDFs
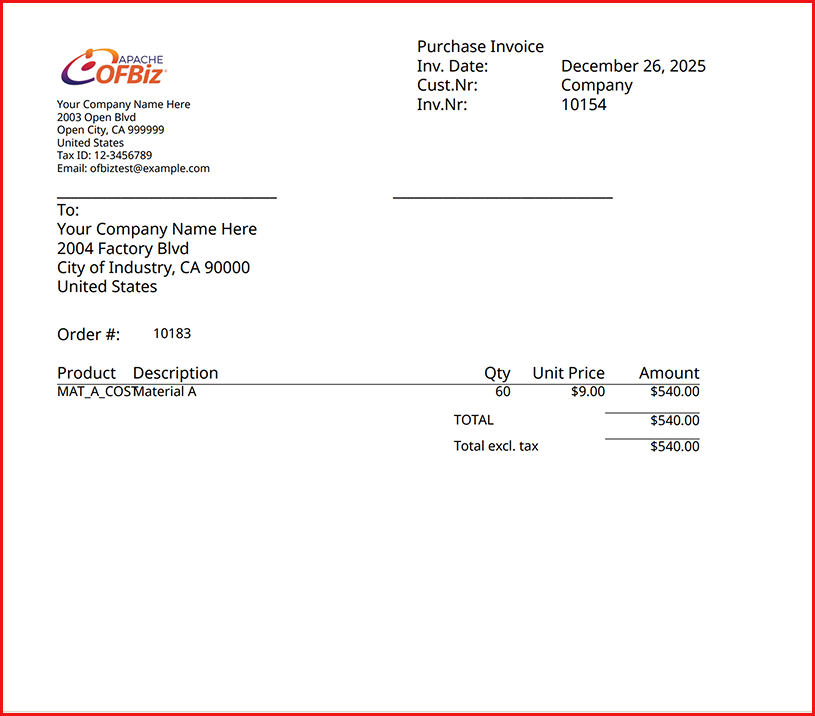
Each shipment's invoice can be downloaded individually via the PDF button for documentation and reconciliation.
(PDF invoice for second shipment.)
Conclusion
The multiple receiving workflow in Apache OFBiz provides a flexible, structured solution for managing complex procurement scenarios where a single purchase order involves staggered or separate deliveries. By creating distinct shipments (through PO screen or Facility Module) and enforcing one invoice per shipment, the system promotes precise inventory management, financial clarity, and robust traceability for warehouse and accounting teams. This ensures operations remain efficient even with extended supplier timelines, paving the way for smooth invoicing and payments.
For further reading on related receiving workflows, refer to the guides on:
- How to do Partial Receiving of a Shipment against a Single PO in Apache OFBiz?
- How to Manage Purchase Orders and Receive Inventory in Apache OFBiz without creating Shipments or Invoices?
- How to Receive Shipments without a Purchase Order in Apache OFBiz?