Fineract-CN contains more than a dozen of microservices. One doesn't need to run all of them at once - this would be actually quite resource consuming.
These instructions list the bare minimum - getting a single microservice - Identity provisioned and running.
Once you complete these steps you will get a basic understanding of how fineract-cn works and how its microservices are provisioned.
Once you have completed these steps you can move on and try to provision more microservices.
You will need:
P.S: it is possible to go without Docker and Docker compose (you need to install Postgres and Cassandra yourself) but we don't cover it here.
Find hosts file (/etc/hosts in Unix/Mac or c:\Windows\System32\Drivers\etc\hosts in Windows) and add:
127.0.0.1 cassandra
127.0.0.1 activemq
127.0.0.1 eureka
127.0.0.1 postgres
127.0.0.1 provisioner-ms
127.0.0.1 identity-ms
$ mkdir fincn_bare_minimum
$ cd fincn_bare_minimum
$ git clone https://github.com/apache/fineract-cn-identity
$ git clone https://github.com/apache/fineract-cn-provisioner
$ git clone https://github.com/apache/fineract-cn-docker-compose/
$ java -cp fineract-cn-docker-compose/external_tools/lang-0.1.0-BUILD-SNAPSHOT.jar \
org.apache.fineract.cn.lang.security.RsaKeyPairFactory SPRING > application-common.properties
This generates RSA keys so the microservices trust each other. The contents of application-common.properties will be something like this:
system.publicKey.exponent=65537
system.publicKey.modulus=1654279...
system.publicKey.timestamp=2019-12-10T07_53_27
system.privateKey.modulus=165427..
system.privateKey.exponent=11642831705210..
Open newly generated application-common.properties and add this to the end of the file:
activemq.brokerUrl=tcp://activemq:61616
cassandra.cl.delete=ONE
cassandra.cl.read=ONE
cassandra.cl.write=ONE
cassandra.cluster.pwd=password
cassandra.cluster.user=cassandra
cassandra.clusterName="datacenter1"
cassandra.contactPoints=cassandra:9042
cassandra.keyspace=seshat
eureka.client.fetchRegistry=true
eureka.client.initialInstanceInfoReplicationIntervalSeconds=10
eureka.client.instanceInfoReplicationIntervalSeconds=1
eureka.client.serviceUrl.defaultZone=http://eureka:8761/eureka
eureka.client.serviceUrl.registerWithEureka=true
eureka.instance.hostname=eureka
eureka.instance.leaseRenewalIntervalInSeconds=10
eureka.registration.enabled=true
feign.hystrix.enabled=false
portfolio.bookLateFeesAndInterestAsUser=service-runner
postgresql.host=postgres
rhythm.beatCheckRate=60000
rhythm.user=imhotep
ribbon.eureka.enabled=true
ribbon.listOfServers=eureka:8761
server.max-http-header-size=24576
spring.cloud.config.enabled=false
spring.cloud.discovery.enabled=true
system.initialclientid=service-runner
$ cd fineract-cn-docker-compose/external_tools
$ docker-compose up -d
$ cd ../..
Now, wait for external tools (Postgre, Cassandra, ActiveMQ and Eureka) to start.
You probably will get a flollowing warning that you can safely ignore: 'WARNING: Some services (activemq, cassandra, eureka) use the 'deploy' key, which will be ignored. Compose does not support 'deploy' configuration - use `docker stack deploy` to deploy to a swarm."
Open fineract-cn-provisioner with IntelliJ IDEA and wait for the project to be imported
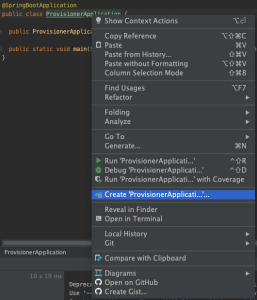
Open ProvisionerApplication class and right-click on the class name and choose "Create ProvisionerApplication Run/Debug configuration"
In the dialog open Environment and under Program Arguments add: --spring.config.location=../application-common.properties
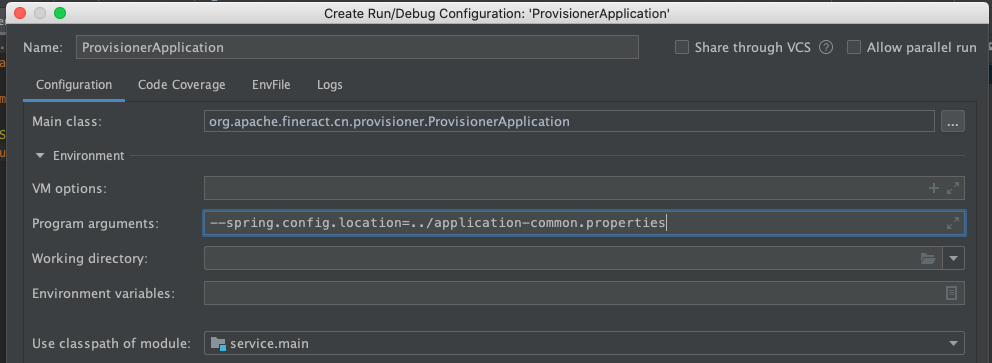
Click OK and then right click again and select Run
If it doesn't run (you get error: "Cause: org.gradle.api.internal.ClosureBackedAction") then open Gradle properties:
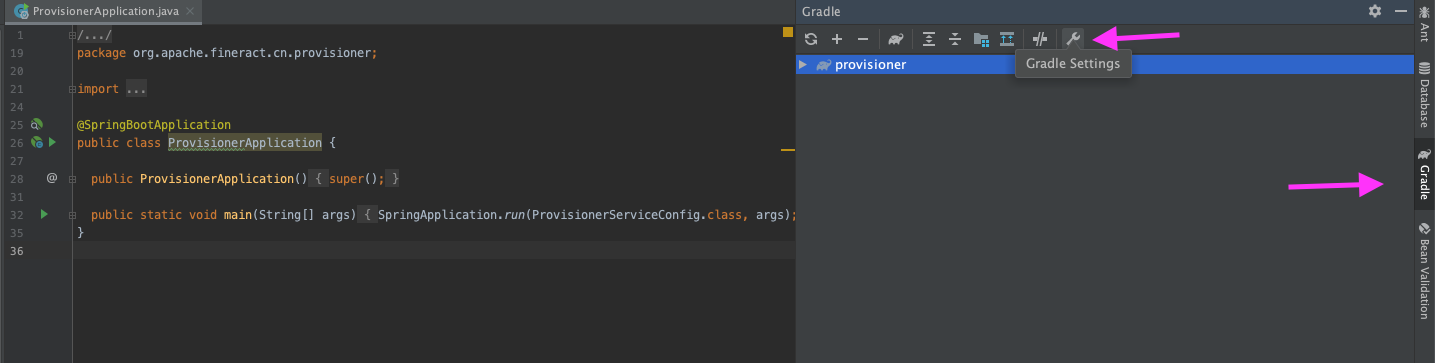
and switch to run with IntelliJ
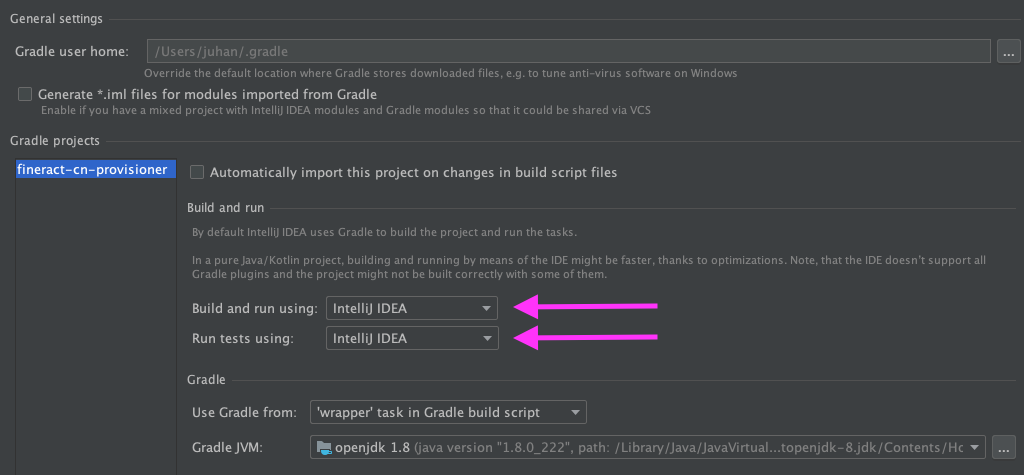
And then Run again.
After ~10sec you should get in terminal:
10:10:01.081 [main] INFO o.a.f.c.p.ProvisionerApplication - Started ProvisionerApplication in 11.642 seconds (JVM running for 13.988)
Now we repeat the same steps with fineract-cn-identity:
Open fineract-cn-identity with IntelliJ IDEA and wait for the project to be imported
Open IdentityServiceConfig class and right-click on the class name and choose "Create ProvisionerApplication Run/Debug configuration"
To program arguments set:
--spring.config.location=../application-common.properties --eureka.instance.hostname=identity-ms
Click OK and then right-click again on IdentityServiceConfig and select Run.
If you managed to do it correctly you should see in logs:
10:19:31.047 [main] INFO o.a.f.c.i.c.IdentityServiceConfig - Started IdentityServiceConfig in 7.874 seconds (JVM running for 9.701)
10:19:31.385 [DiscoveryClient-InstanceInfoReplicator-0] INFO c.netflix.discovery.DiscoveryClient - DiscoveryClient_IDENTITY-V1/192.168.1.116:identity-v1:2021 - registration status: 204
Open http://identity-ms:2021/ with your browser. You should get error served by microservice:
Problem accessing /info. Reason:
Not Found
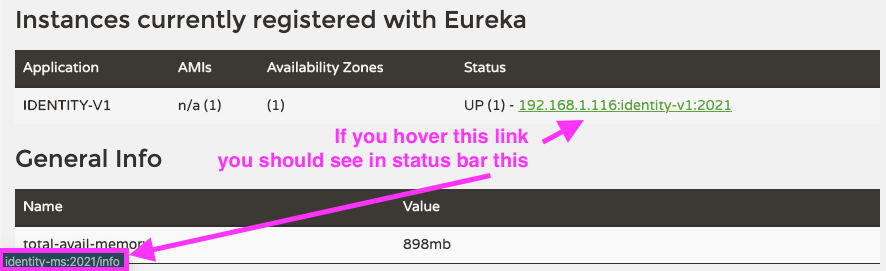
Wait a few minutes and open http://eureka:8761/ and make sure "identity-v1" is there in the list.
Hover the link and make sure it points to identity-ms:2021/info
Fineract-CN microservices use client-side load balancing. This works like this:
We provide a postman-request-collection as well as a postman-environment that defines variables that are used to hold values received in responses.
Both files are located under fineract-cn-docker-compose/postman-initial-requests folder:
postman_scripts/Fineract-Cn-Initial-Requests.postman_collection.json
postman_scripts/Fineract-Cn-Initial-Setup-Environment.postman_environment.json
Initialize Postman as follows:
Import and then selecting the file.The first request (01. Log in root user) will retrieve a token. The response should look like this, with a different token:
{
    "token": "Bearer eyJhbGciOiJSUzUxMiJ9.eyJhdWQiOiJwcm92peWjpWZirFgcYLIzxsKv_-E5k6Gd0pv01OC0XpY3NSgfAolVVgvSXKoRnL3NwAMP2yuzX6i8hR_q82Q...",
    "accessTokenExpiration": "2019-07-18T22:26:57.784"
}
If you don't get a token there is something wrong with your setup. The token is necessary for authentication in other requests thus be sure that these steps work. Important: Be sure to execute the requests in the right order! The outcome is often stored in variables - check the Tests section of the requests.
Only execute the following steps (besides 01 that we already did)
Execute Postman step 02.01 Create an identity-v1 application
→ in Cassandra database seshat in table applications, there should now be a record about identity-v1
Execute Postman step 03.1 Create first tenant 'playground'
→ Now wait a bit and verify the following has happened:
Execute Postman step03.2 Assign identity-v1 for Tenant and obtain Tenant Admin (user antony) Password
→ Now identity tables are created to tenant 'playground' database in cassandra.
→ Identity has a nickname 'isis' and you should see that at least 9 tables (names start with prefix 'isis_' ) have been created under Cassandra Keyspace
→ Identity doesn't keep anything in Postgre database so there are no new tables there.
Execute Postman step03.3 Login Antony (tenant superadmin) with obtained password
Execute Postman step03.4 Change Antony Password to 'antonyPassword'
→ Fineract forces every user to change their password on the first login. This is why we are changing the password and logging in again (in next step)
→ If we would log in with Fims Web App then the UI would tell us to change the password.
Execute Postman step03.5 LOGIN ANTONY (tenant SuperAdmin) with pwd 'antonyPassword'
... skip a bunch of steps...
Execute Postman step05.1 Create administrator role for tenant "playground"
Execute Postman step05.2 Create Admin User operator with password 'initialPassword'
Execute Postman step05.3 Log in with the initial password
Execute Postman step05.4 Change user 'operator' password to 'operatorPassword'
05.5 LOG IN TENANT ADMIN (operator)
Run step:
05.6 Pull operator permissions
You have now set up Identity Microservice and provisioned it using Provisioner microservice.
You should have schemas 'seshat' and 'playground' in Cassandra and Postgres databases.
Identity Micro Service is responsible for managing users and their roles - a bit more info can be found here: Fineract CN Project Structure#identity
From identity code open UserRestController and find method getUserPermissions - this method serves the same request '05.6 Pull operator permissions' that we just sent with Postman.
Examine yourself what kind of other requests you could send to Identity.
You should be able to log in to Fims Web App (untested)
git clone https://github.com/apache/fineract-cn-fims-web-app
cd fineract-cn-fims-web-app
npm i
npm run dev
Open localhost:8888 and log in with
tenant: playground
user: operator
password: operatorPassword
cd fineract-cn-docker-compose/external_tools
docker-compose stop
docker-compose rm -f
docker volume rm external_tools_cassandra-volume
docker volume rm external_tools_postgres-volume