THIS IS A TEST INSTANCE. ALL YOUR CHANGES WILL BE LOST!!!!
This document describes how to release Apache Kafka from trunk.
It is a work in progress and should be refined by the Release Manager (RM) as they come across aspects of the release process not yet documented here.
NOTE: For the purpose of illustration, this document assumes that the version being released is 0.10.0.0 and the following development version will become 0.10.1.0.
Prerequisites
- Send an email to dev@kafka.apache.org offering to act as the Release Manager (RM). Look for previous emails with "I'd like to volunteer for the release manager". Sample format for a bug fix release is available below.
Hey folks,

I'd like to volunteer to be the release manager for a bug fix release of the
{{3.5 CHANGE ME!}} line. This will be the first bug fix release of this line and will be
version {{3.5.1 CHANGE ME!}}.


If no one has any objections, I will send out a release plan on {{DD-MM-YYYY}} that includes a list of all of the fixes we are targeting for
{{3.5.1 CHANGE ME!}} along with a timeline.

Thanks!
- Prepare release plan in the wiki, notifying the community the overall plan and goals for the release (For example: Release Plan 0.10.0)
Go over JIRA for the release and make sure that blockers are marked as blockers and non-blockers are non-blockers. This JIRA filter may be handy:
project = KAFKA AND fixVersion = 0.10.0.0 AND resolution = Unresolved AND priority = blocker ORDER BY due ASC, priority DESC, created ASC
It is important that between the time that the release plan is voted to the time when the release branch is created, no experimental or potentially destabilizing work is checked into the trunk. While it is acceptable to introduce major changes, they must be thoroughly reviewed and have good test coverage to ensure that the release branch does not start off being unstable. If necessary the RM can discuss if certain issues should be fixed on the trunk in this time, and if so what is the gating criteria for accepting them.
- RM must have gpg keys with the public key publicly available to validate the authenticity of the Apache Kafka release: If you haven't set up gpg key, set up one using 4096 bit RSA (http://www.apache.org/dev/release-signing.html). Make sure that your public key is uploaded to one of the public servers (http://www.apache.org/dev/release-signing.html#keyserver). Also, add your public key to https://github.com/apache/kafka-site/blob/asf-site/KEYS
- Once added, you will have to ask a PMC member to update the KEYS file in https://dist.apache.org/repos/dist/release/kafka/KEYS. Feel free to create a thread in the mailing list.
- RM's Apache account must have one of the RM's ssh public key so that the release script can use SFTP to upload artifacts to the RM's account on home.apache.org. Verify by using `
sftp <your-apache-id>@home.apache.org`; if you get authentication failures, login to id.apache.org and add your public ssh key to your Apache account. If you need a new ssh key, generate one with `ssh-keygen -t rsa -b 4096 -C <your-apache-id>@apache.org` and saving the key in `~/.ssh/apache_rsa`, add the key locally with `ssh-add ~/.ssh/apache_rsa`, add the public SSH key (contents of `~/.ssh/apache_rsa.pub`) to your account using id.apache.org, and verify you can connect with sftp (may require up to 10 minutes for account changes to synchronize). See more detailed instructions. - Make sure docs/documentation.html is referring to the next release and links and update docs/upgrade.html with upgrade instructions for next release. For a bugfix release, make sure to at least bump the version number in the "Upgrading to ..." header in docs/upgrade.html. If this is a major or minor release #, it's a good idea to make this change now. If you end up doing it after cutting branches, be sure the commit lands on both trunk and your release branch. Note that this must be done before generating any artifacts because these docs are part of the content that gets voted on.
- Install the dependencies for the release scripts:
pip install jira=2.0.0or newer. - Ensure you have configured SSH to pick up your key when connecting to apache.org domains. In ~/.ssh/config, add:
Host *.apache.org
IdentityFile ~/.ssh/<apache-ssh-key>
You will need to upload your maven credentials and signatory credentials for the release script by editing your `
~/.gradle/gradle.properties` with:~/.gradle/gradle.propertiesmavenUrl=https://repository.apache.org/service/local/staging/deploy/maven2 mavenUsername=your-apache-id mavenPassword=your-apache-passwd signing.keyId=your-gpgkeyId # <- needs to be the 8-letter key ID signing.password=your-gpg-passphrase signing.secretKeyRingFile=/Users/your-id/.gnupg/secring.gpg
If you don't already have a secret key ring under ~/.gnupg (which will be the case with GPG 2.1 and beyond), you will need to manually create it with `
gpg --export-secret-keys -o ~/.gnupg/secring.gpg`.Obviously, be careful not to publicly upload your passwords. You should be editing the `gradle.properties` file under your home directory, not the one in Kafka itself.Make sure your `~/.m2/settings.xml` is configured for pgp signing and uploading to the apache release maven:
~/.m2/settings.xml<servers> <server> <id>apache.releases.https</id> <username>your-apache-id</username> <password>your-apache-passwd</password> </server> <server> <id>your-gpgkeyId</id> <passphrase>your-gpg-passphrase</passphrase> </server> </servers> <profiles> <profile> <id>gpg-signing</id> <properties> <gpg.keyname>your-gpgkeyId</gpg.keyname> <gpg.passphraseServerId>your-gpgkeyId</gpg.passphraseServerId> </properties> </profile> </profiles>You may also need to update some gnupgp configs:
echo "allow-loopback-pinentry" >> ~/.gnupg/gpg-agent.conf

echo "use-agent" >> ~/.gnupg/gpg.conf
echo "pinentry-mode loopback" >> ~/.gnupg/gpg.conf

echo RELOADAGENT | gpg-connect-agent
Cut Branches
Skip this section if you are releasing a bug fix version (e.g. 2.2.1).
- Make sure you are working with a clean repo (i.e. identical to upstream - no changes in progress). If needed clone a fresh copy
- git checkout trunk
- Check that current HEAD points to commit on which you want to base new release branch. Checkout particular commit if not.
- git branch 0.10.0
- git push apache 0.10.0
- Modify the version in trunk to bump to the next one (eg. "0.10.1.0-SNAPSHOT") in the following files:
- docs/js/templateData.js
gradle.properties
kafka-merge-pr.py
streams/quickstart/java/pom.xml
streams/quickstart/java/src/main/resources/archetype-resources/pom.xml
streams/quickstart/pom.xml
tests/kafkatest/__init__.py
tests/kafkatest/version.py (do not add the new release version, it will only be added after the release is completed)
- Commit and push to trunk in apache.
- Check that the branch was correctly propagated to Apache using the webui: https://gitbox.apache.org/repos/asf?p=kafka.git
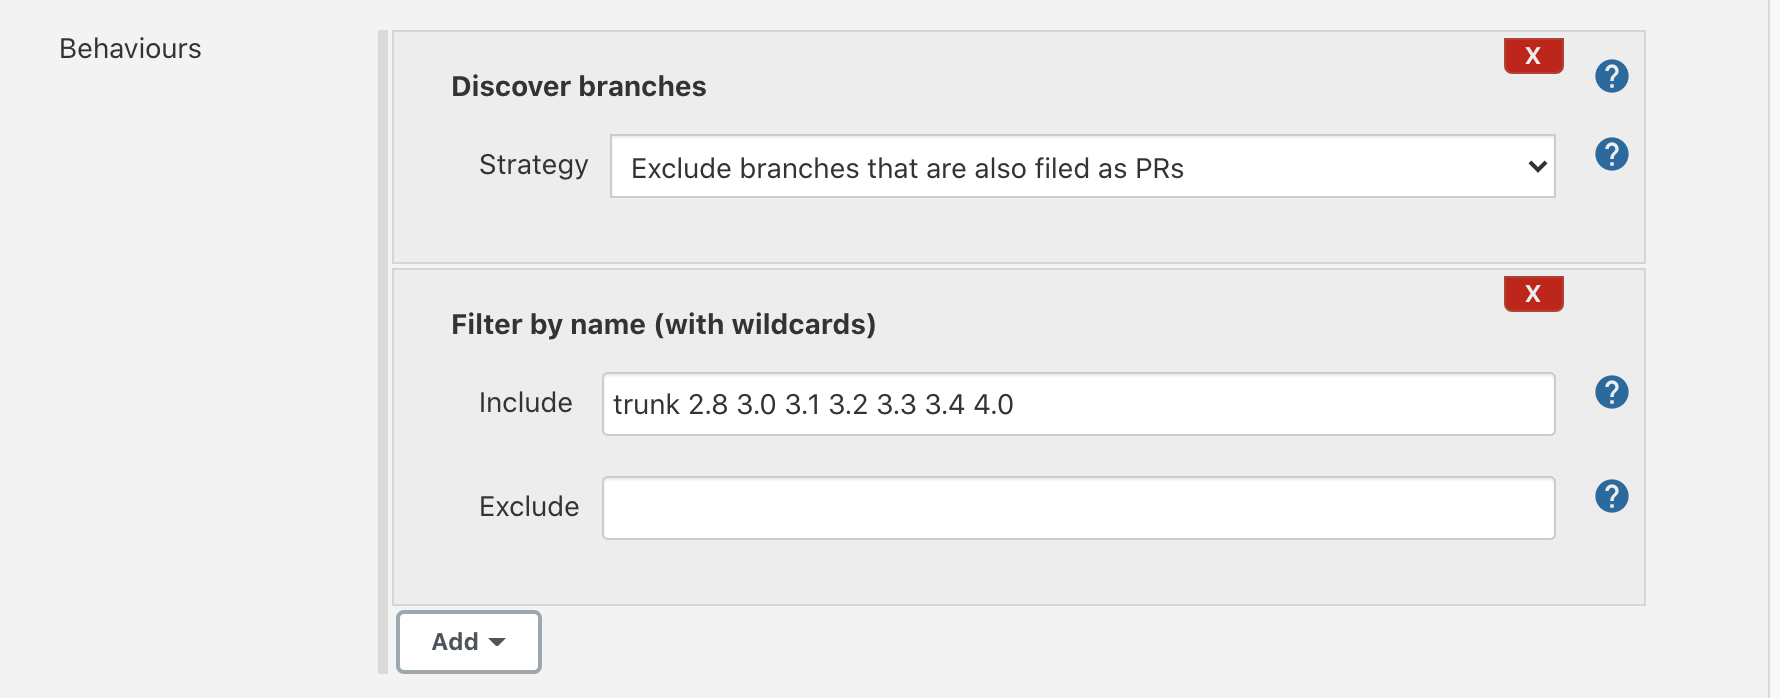
- Update the Jenkins configuration to include the newly created branch (if it's not there already) in the section shown in the following screenshot. If you don't have permission to create apache job, please ask Jun Rao to give you access.
Send email announcing the new branch:
To: dev@kafka.apache.org
Subject: New release branch 0.10.0

Hello Kafka developers and friends,

As promised, we now have a release branch for 0.10.0 release (with 0.10.0.0
as the version).
Trunk has been bumped to 0.10.1.0-SNAPSHOT.

I'll be going over the JIRAs to move every non-blocker from this release to
the next release.

From this point, most changes should go to trunk.
*Blockers (existing and new that we discover while testing the release)
will be double-committed. *Please discuss with your reviewer whether your
PR should go to trunk or to trunk+release so they can merge accordingly.

*Please help us test the release! *

Thanks!

$RM
Monitor Tests
In between the branch cut and the RC cut, it's good to set up and keep an eye on the tests.
At the time of RC publishing, you will be asked to ensure you get a green run of integration tests & system tests. Due to flakes, this isn't always possible - so it's necessary to triage the tests & recognize what are flakes.
The earlier you do this, the easier it'll be later - hence this paragraph suggests you set them up now after the branch cut & start monitoring.
- The link for unit/integration tests: `https://ci-builds.apache.org/job/Kafka/job/kafka/job/{MAJOR_RELEASE_VERSION}/` - e.g https://ci-builds.apache.org/job/Kafka/job/kafka/job/3.7/
- System tests: https://jenkins.confluent.io/job/system-test-kafka/job/3.7/<MAJOR_RELEASE_VERSION>/
- Notable, this is hosted by Confluent.
- If you, the RM, do not work for Confluent - contact someone from the company to set up the branch.
- If you, the RM, do work for Confluent - set up the branch following the internal instructions in the wiki.
- Notable, this is hosted by Confluent.
Create Release Artifacts
- Until is complete, you will have to manually verify the binary artifact's LICENSE file matches its own packaged dependencies. See that ticket for an example of how to do this.
- Set environment variable `
PUSH_REMOTE_NAME`to the remote you want to push to, e.g.,export PUSH_REMOTE_NAME=origin(default isapache-github). - Run the `release.py` script in the root of the kafka repository and follow the instructions. NOTE that if you are releasing a version prior to 1.0.x, you need to have minor edits on the script to change the three-digits pattern checking to four-digits pattern.
- This script will created a hidden directory called .release_work_dir. Don't delete this as you may need the contents later (for example the kafka-stream-x.x.x-test.jar)
- Troubleshooting:
- If any step fails, make sure you have everything set up as described in the Prerequisites section and are using the correct passphrase for each config. When in doubt, remove or comment out anything in your settings that is not specifically needed for the release – for example, alternate profiles or unrelated servers, mirrors, etc in your `
~/.m2/settings.xml` or `~/.gradle/gradle.properties` - Make sure you're running the script with Python3: sadly Python versions are not well managed especially on Macs, so you may want to explicitly invoke it with
$python3 release.py - Install any missing packages with
pip3, for example$pip3 install jira– if pip can't find this, verify it's looking in the right repo by commenting out/removing anyindex-urlsettings in your~/.pip/pip.conf - Try setting an explicit path for both Java8 and Java17, rather than relying on your JAVA_HOME since this may be modified in the background by other applications (such as IDEs)
- If any step fails, make sure you have everything set up as described in the Prerequisites section and are using the correct passphrase for each config. When in doubt, remove or comment out anything in your settings that is not specifically needed for the release – for example, alternate profiles or unrelated servers, mirrors, etc in your `
Create Docker Artifact (For versions >= 3.7.0)
- Once you have executed release.py script, you'll be able to generate an RC docker image.
- This document covers details of each workflow. Refer to this for detailed examples and better understanding.
- In Github Actions of Apache Kafka repository (here) you'll find Docker Build Test Workflow.
- Click on run workflow and select the RC branch for the branch that this workkflow needs to run.
- Provide the image type. Since you are creating an RC image for
apache/kafka- the image type you want is jvm. - Provide the url to the RC kafka binary tarball (scala 2.13 version) - e.g `https://home.apache.org/{your_username}/{rc_tag}/kafka_2.13-3.7.0.tgz`. This url will be used to generate the docker image.
- Provide the image type. Since you are creating an RC image for
- Run workflow and wait for it to finish. Once it finishes go back to the actions page and click on the workflow again. You'll find the uploaded artifacts. In case of jvm image type, they will be:
- report_jvm.html (the docker image test report)
- scan_report_jvm.txt (the docker image cve report).
- Share the link to the pipeline and the above artifacts with the community in the RC voting email thread.
- Next - create the RC docker image in apache/kafka. Go to the Github action Build and Push Release Candidate Docker Image.
- Here image type and kafka url will be same as provided in previous workflow.
- In addition - add the docker hub image name that needs to be pushed.
- It will be apache/kafka:{rc_tag}. Here
rc_tagis comprised of release version and rc version. For exampleapache/kafka:3.7.0-rc0, can be the first RC docker image for 3.7.0 release.
- It will be apache/kafka:{rc_tag}. Here
- Ensure that the RC docker image is visible on docker hub.
- Share the docker image with the community in the RC voting email thread
Website update process
Note: Unlike the Kafka sources (kafka repo), the content of the Apache Kafka website kafka.apache.org is backed by a separate git repository (kafka-site repo). Today, any changes to the content and docs must be kept manually in sync between the two repositories.
We should improve the release script to include these steps. In the meantime, for new releases:
- git clone git@github.com:apache/kafka-site.git
- git checkout asf-site
- Update the website content including docs:
- The gradle target
releaseTarGzgenerates the Kafka website content including the Kafka documentation (with the exception of a few pages like project-security.html, which are only tracked in the kafka-site repository). This build target also auto-generates the configuration docs of the Kafka broker/producer/consumer/etc. from their respective Java sources. The build output is stored in./core/build/distributions/kafka_2.13-2.8.0-site-docs.tgz. - Untar the file and rename the
site-docs/folder to28/(or, if the latter already exists, replace its contents). That's because the docs for a release are stored in a separate folder (e.g.,27/for Kafka v2.7 and28/for Kafka v2.8), which ensures the Kafka website includes the documentation for the current and all past Kafka releases.
- The gradle target
- Update the javadocs:
- Create the release Javadocs with the gradle target
aggregatedJavadoc (`./gradlew aggregatedJavadoc`) on JDK 17, with output under./build/docs/javadoc/. - Copy the
javadocfolder to28/(i.e., the full path is28/javadoc/). If this is bug fix release, do this after the vote has passed to avoid showing an unreleased version number in the published javadocs.- Note that this will upload the javadocs with a version named
{RELEASE_VERSION}-SNAPSHOT. Once you have an RC cut with a git tag, check out that git tag and re-generate the javadocs. That way it will not have the-SNAPSHOTsuffix anymore
- Note that this will upload the javadocs with a version named
- Create the release Javadocs with the gradle target
- Commit & push
Blog Post
- For minor and major releases, consider writing a blog. Since the Apache blogs platform is now sunset, we've added a blog section to the Kafka website. Unfortunately this requires writing it in HTML, see the blog.html file in kafka-site.
It's nice to thank as many people as we can identify. Please use "Find all contributors" script to generate the list of contributors.
- Consider incorporating any suggestions from the dev thread until release is announced
Announce the RC
- Send an email announcing the release candidate.
If need to roll a new RC
- Go to https://repository.apache.org/#stagingRepositories, find the uploaded artifacts and drop it.
- Go back to the beginning
 - don't forget to bump the RC number.
Update the Collaborators List
While waiting for the vote to pass, this is a good time to update the Collaborators (see https://github.com/apache/kafka-site/pull/510 for reference until the site update is published).
The process is documented in . If we complete that ticket, we can remove this step from the release process.
After the vote passes
- Remember: at least 3 days, 3 +1 from PMC members (committers are not enough!) and no -1.
Send a vote closing email:
To: dev@kafka.apache.org, kafka-clients@googlegroups.com, users@kafka.apache.org
Subject: [RESULTS] [VOTE] Release Kafka version 0.10.0.0

This vote passes with 7 +1 votes (3 bindings) and no 0 or -1 votes.

+1 votes
PMC Members:
* $Name
* $Name
* $Name

Committers:
* $Name
* $Name

Community:
* $Name
* $Name

0 votes
* No votes

-1 votes
* No votes

Vote thread:
http://markmail.org/message/faioizetvcils2zo

I'll continue with the release process and the release announcement will follow in the next few days.

$RM
- Create a new tag for the release, on the same commit as the voted rc tag and push it:
- Use "git show 0.10.0.0-rc6" to find the commit hash of the tag
- git tag -a 0.10.0.0 <commit hash>
- When asked to provide a message for the new tag, to preserve uniformity in release tags, add: Apache Kafka <version number> release. For example: Apache Kafka 0.10.0.0 release
- Run "git show 0.10.0.0" and confirm that the tag points to the correct commit hash.
- git push apache 0.10.0.0
- Merge the last version change / rc tag into the release branch and bump the version to 0.10.0.1-SNAPSHOT
- git checkout 0.10.0
- git merge 0.10.0.0-rc6
- Update version on the branch to 0.10.0.1-SNAPSHOT in the following places:
- docs/js/templateData.js
- gradle.properties
- kafka-merge-pr.py
- streams/quickstart/java/pom.xml
- streams/quickstart/java/src/main/resources/archetype-resources/pom.xml
- streams/quickstart/pom.xml
- tests/kafkatest/__init__.py (note: this version name can't follow the -SNAPSHOT convention due to python version naming restrictions, instead update it to 0.10.0.1.dev0)
tests/kafkatest/version.py
- Run "git status" and "git diff" and make sure that only the files above have changed with the intended changes. (For example, there's no .release_work_dir/ from a previous RC generation).
- git commit -a (the commit message could be "MINOR: Update 3.2 branch version to 3.2.1-SNAPSHOT")
- git push apache 0.10.0
Upload all artifacts, release notes, and docs (can be found in the .release_work_dir created by the release.py script) to https://dist.apache.org/repos/dist/release/kafka (a SVN repo, using Apache committer id/passwd).
Note that only PMC members can upload to the `release` directory. If the RM is not in the PMC, they can upload the files to https://dist.apache.org/repos/dist/dev/kafka instead and ask a PMC member to move them to the release directory.Set your Apache username as environment variable
APACHE_USERNAME=<apache_username>
Create a directory for the release. Assuming the release is 0.10.0.0:
svn mkdir --username $APACHE_USERNAME -m "Making directory for 0.10.0.0" https://dist.apache.org/repos/dist/release/kafka/0.10.0.0
Checkout the directory for the new release:
svn co --username $APACHE_USERNAME https://dist.apache.org/repos/dist/release/kafka/0.10.0.0 kafka-release-0-10-0-0
copy the release artifacts from the latest RC (the ones which were in your home.apache.org directory) to the new release directory, but exclude the `javadoc` directory since we don't publish that anymore to https://dist.apache.org/repos/dist/release/kafka
cd kafka-release-0-10-0-0
# note: there is a '~' sign in front of your APACHE_USERNAME
# this step will take minutes
wget --no-parent --recursive --reject "javadoc/*" "https://home.apache.org/~$APACHE_USERNAME/kafka-0.10.0.0-rc0/"
mv "home.apache.org/~$APACHE_USERNAME/kafka-0.10.0.0-rc0/*" .
rm -rf home.apache.org/
rm index.html*
Add the files to SVN
svn --username $APACHE_USERNAME add *
Commit the artifacts to subversion
svn commit --username $APACHE_USERNAME -m "Release 0.10.0.0"
For PMC members only - If RM is a committer, you can move the artifacts from dev repo to release repo with the following commands. If RM is a PMC member, this step can be ignored.
# Set your env variable for apache username

APACHE_USERNAME=<apache_username>

# Create the directory for release in release repo

svn mkdir --username $APACHE_USERNAME -m "Making directory for 0.10.0.0" https://dist.apache.org/repos/dist/release/kafka/0.10.0.0

# Checkout the directory for the new release

svn co --username $APACHE_USERNAME https://dist.apache.org/repos/dist/release/kafka/0.10.0.0 kafka-release-0-10-0-0

# Copy the artifacts from dev  repo to local

svn co --username $APACHE_USERNAME https://dist.apache.org/repos/dist/dev/kafka/0.10.0.0 kafka-dev-0-10-0-0

# Move files from one folder into another

mv kafka-dev-0-10-0-0/* kafka-release-0-10-0-0

# Add files to SVN and commit

cd kafka-release-0-10-0-0

svn --username $APACHE_USERNAME add *

svn commit --username $APACHE_USERNAME -m "Release 0.10.0.0"

# Update the PGP KEYS

cd

svn co --username $APACHE_USERNAME  --depth empty https://dist.apache.org/repos/dist/release/kafka/ kafka-pgp-0-10-0-0

cd kafka-pgp-0-10-0-0

svn update KEYS

wget http://kafka.apache.org/KEYS

mv KEYS.1 KEYS

svn commit -m "Update PGP keys"
- Make sure the KEYS file in the svn repo includes the committer who signed the release.
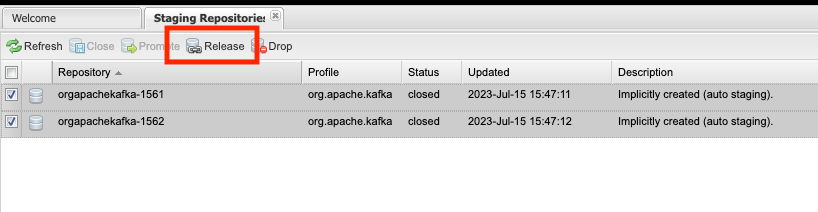
The KEYS must be in https://dist.apache.org/repos/dist/release/kafka/KEYS and not just in http://kafka.apache.org/KEYS. - Go to https://repository.apache.org/#stagingRepositories, find the uploaded artifacts and release them (this will push the artifacts to maven central). You will be asked to provide a description on a pop-up menu that will allow you to add Apache Kafka 0.10.0.0 (in previous descriptions you'd normally have appended the RC identifier as well).
- Wait for about a day for the artifacts to show up in apache mirror (releases, public group) and maven central (mvnrepository.com or maven.org).
- Release Docker Image:-
- Run Promote Release Candidate Docker Image github action.
- Here the RC Docker image will be the rc docker image that got voted and approved. For example if
apache/kafka:3.7.0-rc1got voted and approved, it will be the RC docker image that needs to be used. - Promoted image will be the final release name. For 3.7.0 release it will be
apache/kafka:3.7.0 - Run the workflow and verify that the new docker image is visible on docker hub
- If this is not a bug fix release, then ensure that you also release for
latesttag. Which means you need to run the above pipeline again and use promoted image asapache/kafka:latest
- In trunk update the following files with the current release number. This is needed for a feature as well as a bug-fix release (commit example)
- KAFKA-REPO-DIR/gradle/dependencies.gradle
- KAFKA-REPO-DIR/tests/docker/Dockerfile
- KAFKA-REPO-DIR/tests/kafkatest/version.py
- KAFKA-REPO-DIR/vagrant/base.sh
- Upload the new release and kafka-stream-x.x.x-test.jar (can be found in the .release_work_dir created by the release.py script) to the S3 bucket "kafka-packages". This is a S3 bucket owned by Confluent. If the RM is a committer from Confluent then follow the internal documentation for getting credentials. If the RM is not a committer from Confluent, please ask a committer from Confluent to do this for you.
Use the AWS console to upload the files in the bucket or the CLI if you have appropriate keys. Update these commands to use the current release version. For example:- aws s3 cp .release_work_dir/<rc-version>/kafka_2.12-3.0.0.tgz s3://kafka-packages
- aws s3 cp .release_work_dir/<rc-version>/kafka_2.13-3.0.0.tgz s3://kafka-packages
- aws s3 cp .release_work_dir/kafka/streams/build/libs/kafka-streams-3.0.0-test.jar s3://kafka-packages
Make sure to update the permissions on AWS S3 so they are readable by everyone
$ aws s3api put-object-acl --bucket kafka-packages --key kafka_2.13-3.0.0.tgz --acl public-read
$ aws s3api put-object-acl --bucket kafka-packages --key kafka_2.12-3.0.0.tgz --acl public-read
$ aws s3api put-object-acl --bucket kafka-packages --key kafka-streams-3.0.0-test.jar --acl public-read
- Update the website:
- git clone https://github.com/apache/kafka-site
- git checkout asf-site
- Verify that documentation.html (in kafka-site repo) is referring to the correct release and links.
- Verify that docs/documentation.html (in kafka repo) is similarly set up correctly.
- If it's a feature release:
- Update files (e.g. documentation.html, protocol.html, quickstart.html, intro.html) to include the link for the new version (e.g. 0100/documentation.html). The full list of files can be found by:
git grep "should always link the latest"| grep -v '^[0-9]'
The command grep -v '^[0-9]' excludes per-release files (e.g. ./10/documentation/streams/upgrade-guide.html) - Verify that related html files (excluding per-release files) have been updated to use the new release version by doing
git grep -Irn -A1 "should always link the latest" | grep -v '^[0-9]'
and checking that the new feature version is used. - Update files (e.g documentation.html, streams/quickstart.html) from the previous release (e.g current release is 2.8 so update files in the /27 folder) to change
'<!--//#include virtual="'...to'<!--#include virtual=".... You can find the files by runninggit grep '<!--//#include virtual='
from the directory of the previous feature release. This kafka-site PR is an example of the changes that need to be made.
- Update files (e.g. documentation.html, protocol.html, quickstart.html, intro.html) to include the link for the new version (e.g. 0100/documentation.html). The full list of files can be found by:
- Update downloads.html to include the new download links from mirrors and change last release to use archive. Also add a paragraph with a brief feature introduction for the release.
- git commit -am ".."
- git push origin asf-site
- Make sure the docs for the previous version are updated to display the "You're viewing documentation for an older version of Kafka" banner. This means un-commenting the banner out in two places: the previous version's branch of the kafka repo, and the previous version's directory in the kafka-site repo. See this commit for an example of which line displays this banner
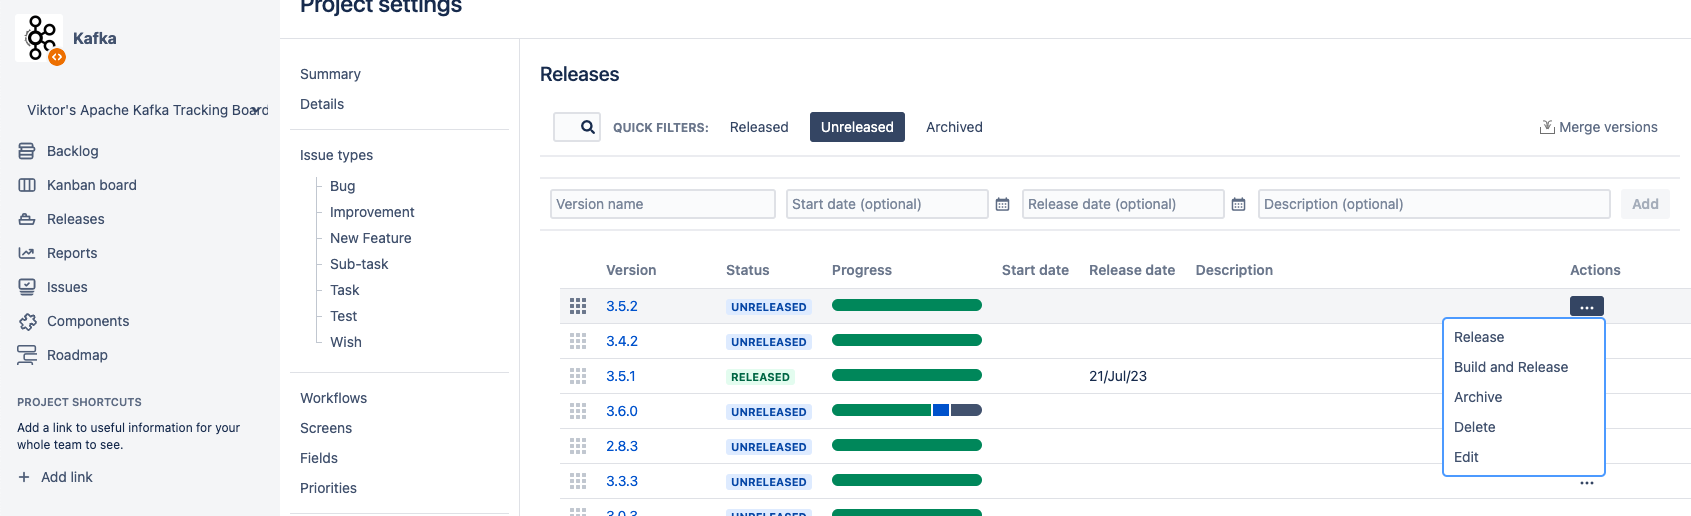
- Mark the version as released in Kafka JIRA (from JIRA administration panel, select versions and scroll mouse towards the end of the line for the particular version. From the dropdown list, select release and set the date).
- Send out an announcement email.
- The announcement email should be sent to announce@apache.org, users@kafka.apache.org, dev@kafka.apache.org, and kafka-clients@googlegroups.com
- You need to use your apache email address to send out the email (otherwise, it won't be delivered to announce@apache.org).
- If you use gmail, you can configure it to send outbound mail from your apache address. Go to Settings → Accounts and Import → Send mail as: , and use the config:
Server: mail-relay.apache.org Port: 587 (STARTTLS), 465 (SSL) User/Pass: {Your LDAP credentials} - For other mail clients, see https://infra.apache.org/committer-email.html
- If you use gmail, you can configure it to send outbound mail from your apache address. Go to Settings → Accounts and Import → Send mail as: , and use the config:
- You need to be subscribed to `kafka-clients@googlegroups.com` with your apache email address – otherwise it bounces back. Just send a message from your apache email to kafka-clients+subscribe@googlegroups.com and click `Join` in the confirmation email
- Make sure to send the email as plain text, if there is any html (including basic hyperlinks) the email will bounce from announce@apache.org. For gmail, removing formatting might not be enough. Make sure you've selected the option "Plain text mode".
- Double check that all the links in the email and on the downloads page work.
- Generate the release email:
- Run `./release.py release-email` script in the root of the kafka repository and follow the instructions to generate the announcement email template for the release to the mailing list.
Check and update the Scala versions, if necessary, in the release email.
- Once the release is announced, the PMC member who committed the release artifacts to the SVN dist repository should add the release data to https://reporter.apache.org/addrelease.html?kafka (they will get a notification asking them to do this after the svn commit).
- PMC member should double check if older releases should be archived (cf. http://www.apache.org/legal/release-policy.html#when-to-archive). This includes changing the relevant download links in the site's `download.html` to use the archive link.
- Cf. and
- For feature releases, file a JIRA for updating compatibility/upgrade system tests to test the newly released version. Example PRs:
- Broker and clients: https://github.com/apache/kafka/pull/12210
- Streams: https://github.com/apache/kafka/pull/12209
For feature releases, publish the blog post previously shared with the dev list.
After release
After releasing the new version, we need to update the versions in the following files.
- gradle/dependencies.gradle
- tests/docker/Dockerfile
- vagrant/base.sh
- tests/kafkatest/version.py (patch releases only update the latest version)
Here are some example PRs that update these files
- https://github.com/apache/kafka/commit/354db26b954c1df7c8c83748c466768399209b8c
- https://github.com/apache/kafka/commit/353141ed9294f11098984d137a3c244997405472
https://github.com/apache/kafka/commit/354c9ca0ce676a7c638da36e5174cf96a2b19533
It may also be worth tackling the compatibility/upgrade system tests as mentioned above.
Please file Jira tickets to remind teams to update their system tests (eg https://issues.apache.org/jira/browse/KAFKA-15672 – similar for others)
Useful Commands
Find all contributors for a release
# The commands below assume that new version is 3.5.1 and last version is 3.5.

## set variables

CURRENT_RELEASE_TAG=3.5.1
OLD_RELEASE_TAG=3.5.0

## get list of contributors (commit authors and co-authors) sorted in alphabetical order and separated by comma

git shortlog -sn --group=author --group=trailer:co-authored-by --group=trailer:Reviewers --no-merges ${OLD_RELEASE_TAG}..${CURRENT_RELEASE_TAG} | cut -f2 | sort --ignore-case | uniq | sed -e ':a' -e '$!N;s/\n/, /;ta' -e 's/,$//' -e 's/%$//'

## get count of list of unique contributors

git shortlog -sn --group=author --group=trailer:co-authored-by --group=trailer:Reviewers --no-merges ${OLD_RELEASE_TAG}..${CURRENT_RELEASE_TAG} | cut -f2 | sort --ignore-case | uniq | wc -l
2 Comments
Jun Rao
Thanks, Joe. Do steps 21-25 publish to maven central repo? If so, should these be done after vote is closed?
Joe Stein
21-25 publishes to apache staging repo only. Once the vote is closed successfully it is another button in nexus to push to "promote" the staged artifacts to maven central. This first step is important because it puts the artifacts in a maven repo for people to try out prior it to going to maven central and then ships exactly what was voted upon. After uploading you have to close what you uploaded for it to get staged to make sure there are no errors in the pom and such (which are not checked during the upload process) ... http://www.apache.org/dev/publishing-maven-artifacts.html#close-stage