THIS IS A TEST INSTANCE. ALL YOUR CHANGES WILL BE LOST!!!!
...
Simply open $OFBIZ_HOME/hot-deploy/ofbizdemo/widget/OfbizDemoScreens.xml file from ofbizdemo component (you just created)
Code Block language xml <?xmlversion="1.0"encoding="UTF-8"?> <screensxmlns<screens xmlns:xsi="http://www.w3.org/2001/XMLSchema-instance" xsi:noNamespaceSchemaLocation="http://ofbiz.apache.org/dtds/widget-screen.xsd"> <screen <screennamename="main"> <section> <actions> <set <setfieldfield="headerItem" value="main"/><!-- this highlights the selected menu-item with name "main" --> </actions> <widgets> <decorator-screennamescreen name="OfbizDemoCommonDecorator" location="${parameters.mainDecoratorLocation}"> <decorator-sectionnamesection name="body"> <label text="Hello World!! :)"/> </decorator-section> </decorator-screen> </widgets> </section> </screen> </screens>
We have only added the <label text="Hello World!! :)" />
- Now you will need to restart OFBiz by reloading data($ ./ant load-demo start). It's required as you have created a new component with some security data for you component (Setup by default in your component data directory as OfbizDemoSecurityGroupDemoData.xml) and as you will restart it, ofbizdemo component will also be loaded.
- As OFBiz restarted direct your browser to your application here http://localhost:8080/ofbizdemo
- You will be asked to login. Login with user: admin password: ofbiz.
- As you login you will see ofbizdemo application up with the hello world message you have put in screen as shown in below given image.
That's it, congratulations your first component is setup and running.
...
In our previous section, we have seen how to create the entities (tables), now it's time to create a form which will allow you to make entries in that entity.
Create a Service
Before preparing form, let's write a service to create records in database for OfbizDemo entity in service definition xml file ($OFBIZ_HOME/hot-deploy/ofbizdemo/servicedef/services.xml)
| Code Block | ||||
|---|---|---|---|---|
| ||||
<?xml version="1.0" encoding="UTF-8"?>
<services xmlns:xsi="http://www.w3.org/2001/XMLSchema-instance"
        xsi:noNamespaceSchemaLocation="http://ofbiz.apache.org/dtds/services.xsd">

    <description>OfbizDemo Services</description>
    <vendor></vendor>
    <version>1.0</version>

    <service name="createOfbizDemo" default-entity-name="OfbizDemo" engine="entity-auto" invoke="create" auth="true">
        <description>Create an Ofbiz Demo record</description>
        <auto-attributes include="pk" mode="OUT" optional="false"/>
        <auto-attributes include="nonpk" mode="IN" optional="false"/>
        <override name="comments" optional="true"/>
    </service>

</services> |
Now again have a look at $OFBIZ_HOME/hot-deploy/ofbizdemo/ofbiz-component.xml file. You already have resource entry made in it for loading services defined in this file as:
| Code Block | ||
|---|---|---|
| ||
<!-- service resources: model(s), eca(s) and group definitions --> <service-resource type="model" loader="main" location="servicedef/services.xml"/> |
For this service definition to load you will need to restart OFBiz. To test this service you directly go to webtools --> Run Service option here: https://localhost:8443/webtools/control/runService

| Info |
|---|
Running service via Web Tools: This a smart utility provided by framework to run your service. On submission of the form above, you will presented a form to enter IN parameters of the service. |
Create the add Form
Let's create our first form for this service and for that let's edit the existing file at location $OFBIZ_HOME/hot-deploy/ofbizdemo/widget/OfbizDemoForms.xml and add Create Form for OfbizDemo as shown below:
| Code Block | ||||
|---|---|---|---|---|
| ||||
<?xml version="1.0" encoding="UTF-8"?>
<forms xmlns:xsi="http://www.w3.org/2001/XMLSchema-instance"
        xsi:noNamespaceSchemaLocation="http://ofbiz.apache.org/dtds/widget-form.xsd">

    <form name="AddOfbizDemo" type="single" target="createOfbizDemo">
        <!-- We have this utility in OFBiz to render form based on service definition.
             Service attributes will automatically lookedup and will be shown on form
        -->
        <auto-fields-service service-name="createOfbizDemo"/>
        <field name="ofbizDemoTypeId" title="${uiLabelMap.CommonType}">
            <drop-down allow-empty="false" current-description="">
                <!---We have made this drop down options dynamic(Values from db) using this -->
                <entity-options description="${description}" key-field-name="ofbizDemoTypeId" entity-name="OfbizDemoType">
                    <entity-order-by field-name="description"/>
                </entity-options>
            </drop-down>
        </field>
        <field name="submitButton" title="${uiLabelMap.CommonAdd}"><submit button-type="button"/></field>
    </form>
</forms>
|
Here you can notice we have used auto-fields-service to auto generate the form based on service definition IN/OUT attributes.
Go to Screens xml file(OfbizDemoScreens.xml) add this form location in decorator body to your screen that you used to show the Hello World... text. As shown below
| Code Block | ||||
|---|---|---|---|---|
| ||||
 <?xml version="1.0" encoding="UTF-8"?>
<screens xmlns:xsi="http://www.w3.org/2001/XMLSchema-instance"
        xsi:noNamespaceSchemaLocation="http://ofbiz.apache.org/dtds/widget-screen.xsd">

    <screen name="main">
        <section>
            <actions>
                <set field="headerItem" value="main"/> <!-- this highlights the selected menu-item with name "main" -->
            </actions>
            <widgets>
                <decorator-screen name="main-decorator" location="${parameters.mainDecoratorLocation}">
                    <decorator-section name="body">
                        <screenlet title="Add Ofbiz Demo">
                            <include-form name="AddOfbizDemo" location="component://ofbizdemo/widget/OfbizDemoForms.xml"/>
                        </screenlet>
                    </decorator-section>
                </decorator-screen>
            </widgets>
        </section>
    </screen>
</screens> |
Controller Entry for Form
Before you go to the form and start creating OfbizDemo records from add form, you will need to make an entry in $OFBIZ_HOME/hot-deploy/ofbizdemo/webapp/ofbizdemo/WEB-INF/controller.xml file for the target service which will called when form is submitted. You can do it as shown below under Request Mappings in your ofbizdemo apps controller file:
| Code Block | ||
|---|---|---|
| ||
<request<request-map uri="createOfbizDemo"> <security https="true" auth="true"/> <event type="service" invoke="createOfbizDemo"/> <response name="success" type="view" value="main"/> </request-map> |
Everything set, let's have a look into to our recently create form http://localhost:8080/ofbizdemo
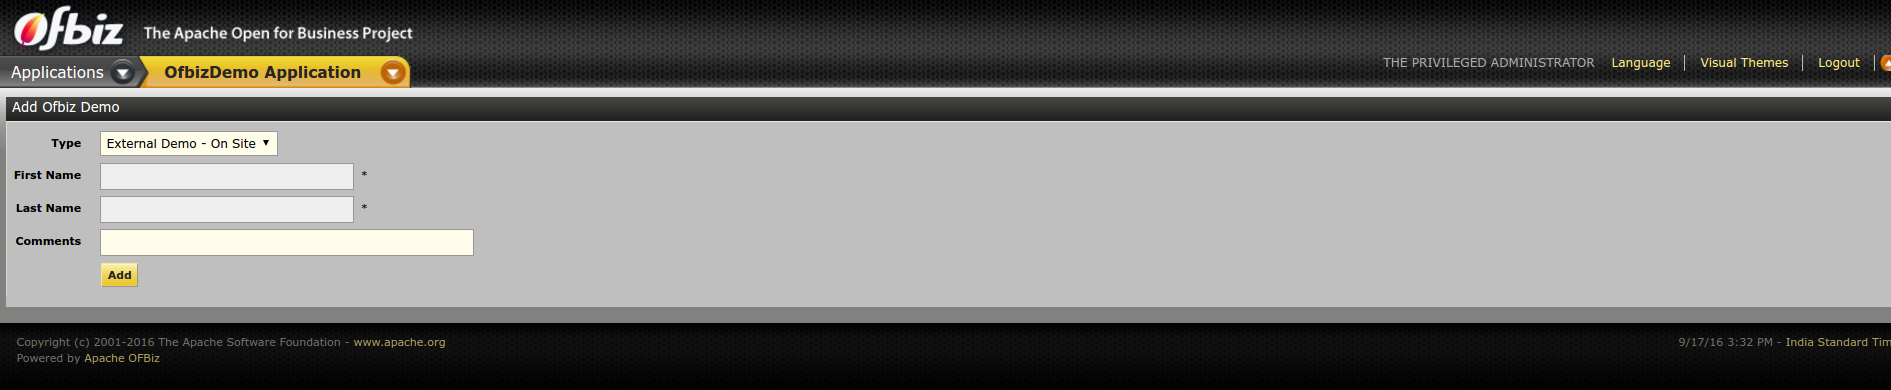
Primary key(ofbizDemoId) is not needed to be send in with the form, it will be auto sequenced by OFBiz in db records.
Create a Find Form
Let's create a find form for the entity OfbizDemo, so that you search OfbizDemos being created.
1.) Add the forms (FindOfbizDemo and ListOfbizDemo) in OfbizDemoForms.xml
...