DUE TO SPAM, SIGN-UP IS DISABLED. Goto Selfserve wiki signup and request an account.

Tutorials
There now follows the documentation on camel tutorials
We have a number of tutorials as listed below. The tutorials often comes with source code which is either available in the Camel Download or attached to the wiki page.
Notice
These tutorials listed below, is hosted at Apache. We offer the Articles page where we have a link collection for 3rd party Camel material, such as tutorials, blog posts, published articles, videos, pod casts, presentations, and so forth.
If you have written a Camel related article, then we are happy to provide a link to it. You can contact the Camel Team, for example using the Mailing Lists, (or post a tweet with the word Apache Camel).
- OAuth Tutorial
This tutorial demonstrates how to implement OAuth for a web application with Camel's gauth component. The sample application of this tutorial is also online at http://gauthcloud.appspot.com/
- Tutorial for Camel on Google App Engine
This tutorial demonstrates the usage of the Camel Components for Google App Engine. The sample application of this tutorial is also online at http://camelcloud.appspot.com/
- Tutorial on Spring Remoting with JMS
This tutorial is focused on different techniques with Camel for Client-Server communication.
- Report Incident - This tutorial introduces Camel steadily and is based on a real life integration problem
This is a very long tutorial beginning from the start; its for entry level to Camel. Its based on a real life integration, showing how Camel can be introduced in an existing solution. We do this in baby steps. The tutorial is currently work in progress, so check it out from time to time. The tutorial explains some of the inner building blocks Camel uses under the covers. This is good knowledge to have when you start using Camel on a higher abstract level where it can do wonders in a few lines of routing DSL.
- Using Camel with ServiceMix a tutorial on using Camel inside Apache ServiceMix.
- Better JMS Transport for CXF Webservice using Apache Camel Describes how to use the Camel Transport for CXF to attach a CXF Webservice to a JMS Queue
- Tutorial how to use good old Axis 1.4 with Camel
This tutorial shows that Camel does work with the good old frameworks such as AXIS that is/was widely used for WebService.
- Tutorial on using Camel in a Web Application
This tutorial gives an overview of how to use Camel inside Tomcat, Jetty or any other servlet engine
- Tutorial on Camel 1.4 for Integration
Another real-life scenario. The company sells widgets, with a somewhat unique business process (their customers periodically report what they've purchased in order to get billed). However every customer uses a different data format and protocol. This tutorial goes through the process of integrating (and testing!) several customers and their electronic reporting of the widgets they've bought, along with the company's response.
- Tutorial how to build a Service Oriented Architecture using Camel with OSGI - Updated 20/11/2009
The tutorial has been designed in two parts. The first part introduces basic concept to create a simple SOA solution using Camel and OSGI and deploy it in a OSGI Server like Apache Felix Karaf and Spring DM Server while the second extends the ReportIncident tutorial part 4 to show How we can separate the different layers (domain, service, ...) of an application and deploy them in separate bundles. The Web Application has also be modified in order to communicate to the OSGI bundles.
- Several of the vendors on the Commercial Camel Offerings page also offer various tutorials, webinars, examples, etc.... that may be useful.
Tutorial on Spring Remoting with JMS
This tutorial was kindly donated to Apache Camel by Martin Gilday.
Preface
This tutorial aims to guide the reader through the stages of creating a project which uses Camel to facilitate the routing of messages from a JMS queue to a Spring service. The route works in a synchronous fashion returning a response to the client.
Prerequisites
This tutorial uses Maven to setup the Camel project and for dependencies for artifacts.
Distribution
This sample is distributed with the Camel distribution as examples/camel-example-spring-jms.
About
This tutorial is a simple example that demonstrates more the fact how well Camel is seamless integrated with Spring to leverage the best of both worlds. This sample is client server solution using JMS messaging as the transport. The sample has two flavors of servers and also for clients demonstrating different techniques for easy communication.
The Server is a JMS message broker that routes incoming messages to a business service that does computations on the received message and returns a response.
The EIP patterns used in this sample are:
Pattern | Description |
|---|---|
We need a channel so the Clients can communicate with the server. | |
The information is exchanged using the Camel Message interface. | |
This is where Camel shines as the message exchange between the Server and the Clients are text based strings with numbers. However our business service uses int for numbers. So Camel can do the message translation automatically. | |
It should be easy to send messages to the Server from the the clients. This is achieved with Camel's powerful Endpoint pattern that even can be more powerful combined with Spring remoting. The tutorial has clients using each kind of technique for this. | |
The client and server exchange data using point to point using a JMS queue. | |
The JMS broker is event driven and is invoked when the client sends a message to the server. |
We use the following Camel components:
Component | Description |
|---|---|
We use Apache ActiveMQ as the JMS broker on the Server side | |
We use the bean binding to easily route the messages to our business service. This is a very powerful component in Camel. | |
In the AOP enabled Server we store audit trails as files. | |
Used for the JMS messaging |
Create the Camel Project
For the purposes of the tutorial a single Maven project will be used for both the client and server. Ideally you would break your application down into the appropriate components.
Update the POM with Dependencies
First we need to have dependencies for the core Camel jars, spring, jms components, and finally ActiveMQ as the message broker.
Writing the Server
Create the Spring Service
For this example the Spring service (our business service) on the server will be a simple multiplier which trebles in the received value.
Define the Camel Routes
Configure Spring
The Spring config file is placed under META-INF/spring as this is the default location used by the Camel Maven Plugin, which we will later use to run our server.
First we need to do the standard scheme declarations in the top. In the camel-server.xml we are using spring beans as the default bean: namespace and springs context:. For configuring ActiveMQ we use broker: and for Camel we of course have camel:. Notice that we don't use version numbers for the camel-spring schema. At runtime the schema is resolved in the Camel bundle. If we use a specific version number such as 1.4 then its IDE friendly as it would be able to import it and provide smart completion etc. See Xml Reference for further details.
Notice that we also have enabled the JMXAgent so we will be able to introspect the Camel Server with a JMX Console.from="jmsbroker:queue:numbers).to("multiplier");
We use the vm protocol to connect to the ActiveMQ server as its embedded in this application.
component-scan | Defines the package to be scanned for Spring stereotype annotations, in this case, to load the "multiplier" bean |
camel-context | Defines the package to be scanned for Camel routes. Will find the |
jms bean | Creates the Camel JMS component |
Run the Server
The Server is started using the org.apache.camel.spring.Main class that can start camel-spring application out-of-the-box. The Server can be started in several flavors:
- as a standard java main application - just start the
org.apache.camel.spring.Mainclass - using maven jave:exec
- using camel:run
In this sample as there are two servers (with and without AOP) we have prepared some profiles in maven to start the Server of your choice.
The server is started with:
mvn compile exec:java -PCamelServer
Writing The Clients
This sample has three clients demonstrating different Camel techniques for communication
- CamelClient using the ProducerTemplate for Spring template style coding
- CamelRemoting using Spring Remoting
- CamelEndpoint using the Message Endpoint EIP pattern using a neutral Camel API
Client Using The ProducerTemplate
We will initially create a client by directly using ProducerTemplate. We will later create a client which uses Spring remoting to hide the fact that messaging is being used.
camelContext | The Camel context is defined but does not contain any routes |
template | The |
jms bean | This initialises the Camel JMS component, allowing us to place messages onto the queue |
And the CamelClient source code:ProducerTemplate is retrieved from a Spring ApplicationContext and used to manually place a message on the "numbers" JMS queue. The requestBody method will use the exchange pattern InOut, which states that the call should be synchronous, and that the caller expects a response.
Before running the client be sure that both the ActiveMQ broker and the CamelServer are running.
Client Using Spring Remoting
Spring Remoting "eases the development of remote-enabled services". It does this by allowing you to invoke remote services through your regular Java interface, masking that a remote service is being called.
The proxy will create a proxy service bean for you to use to make the remote invocations. The serviceInterface property details which Java interface is to be implemented by the proxy. The serviceUrl defines where messages sent to this proxy bean will be directed. Here we define the JMS endpoint with the "numbers" queue we used when working with Camel template directly. The value of the id property is the name that will be the given to the bean when it is exposed through the Spring ApplicationContext. We will use this name to retrieve the service in our client. I have named the bean multiplierProxy simply to highlight that it is not the same multiplier bean as is being used by CamelServer. They are in completely independent contexts and have no knowledge of each other. As you are trying to mask the fact that remoting is being used in a real application you would generally not include proxy in the name.
And the Java client source code:
- The Spring context is created with the new camel-client-remoting.xml
- We retrieve the proxy bean instead of a
ProducerTemplate. In a non-trivial example you would have the bean injected as in the standard Spring manner. - The multiply method is then called directly. In the client we are now working to an interface. There is no mention of Camel or JMS inside our Java code.
Client Using Message Endpoint EIP Pattern
This client uses the Message Endpoint EIP pattern to hide the complexity to communicate to the Server. The Client uses the same simple API to get hold of the endpoint, create an exchange that holds the message, set the payload and create a producer that does the send and receive. All done using the same neutral Camel API for all the components in Camel. So if the communication was socket TCP based you just get hold of a different endpoint and all the java code stays the same. That is really powerful.
Okay enough talk, show me the code!"mina:tcp://localhost:61610" then its just a matter of getting hold of this endpoint instead of the JMS and all the rest of the java code is exactly the same.
Run the Clients
The Clients is started using their main class respectively.
- as a standard java main application - just start their main class
- using maven jave:exec
In this sample we start the clients using maven:
mvn compile exec:java -PCamelClient
mvn compile exec:java -PCamelClientRemoting
mvn compile exec:java -PCamelClientEndpoint
Also see the Maven pom.xml file how the profiles for the clients is defined.
Using the Camel Maven Plugin
The Camel Maven Plugin allows you to run your Camel routes directly from Maven. This negates the need to create a host application, as we did with Camel server, simply to start up the container. This can be very useful during development to get Camel routes running quickly.
All that is required is a new plugin definition in your Maven POM. As we have already placed our Camel config in the default location (camel-server.xml has been placed in META-INF/spring/) we do not need to tell the plugin where the route definitions are located. Simply run mvn camel:run.
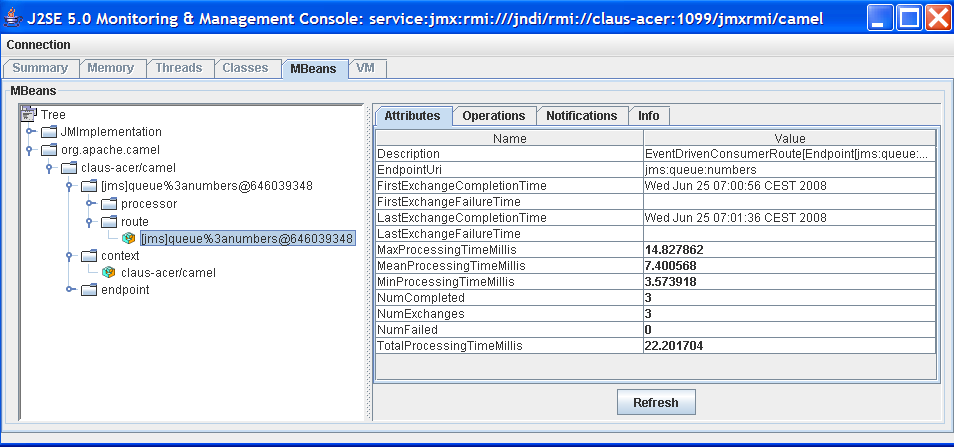
Using Camel JMX
Camel has extensive support for JMX and allows us to inspect the Camel Server at runtime. As we have enabled the JMXAgent in our tutorial we can fire up the jconsole and connect to the following service URI: service:jmx:rmi:///jndi/rmi://localhost:1099/jmxrmi/camel. Notice that Camel will log at INFO level the JMX Connector URI:
In the screenshot below we can see the route and its performance metrics:
See Also
Tutorial - camel-example-reportincident
Introduction
Creating this tutorial was inspired by a real life use-case I discussed over the phone with a colleague. He was working at a client whom uses a heavy-weight integration platform from a very large vendor. He was in talks with developer shops to implement a new integration on this platform. His trouble was the shop tripled the price when they realized the platform of choice. So I was wondering how we could do this integration with Camel. Can it be done, without tripling the cost  .
.
This tutorial is written during the development of the integration. I have decided to start off with a sample that isn't Camel's but standard Java and then plugin Camel as we goes. Just as when people needed to learn Spring you could consume it piece by piece, the same goes with Camel.
The target reader is person whom hasn't experience or just started using Camel.
Motivation for this tutorial
I wrote this tutorial motivated as Camel lacked an example application that was based on the web application deployment model. The entire world hasn't moved to pure OSGi deployments yet.
The full source code for this tutorial as complete is part of the Apache Camel distribution in the examples/camel-example-reportincident directory
The use-case
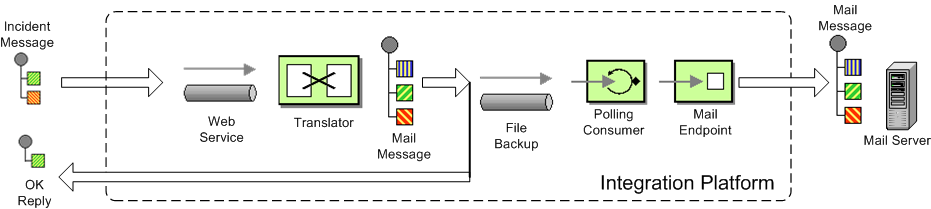
The goal is to allow staff to report incidents into a central administration. For that they use client software where they report the incident and submit it to the central administration. As this is an integration in a transition phase the administration should get these incidents by email whereas they are manually added to the database. The client software should gather the incident and submit the information to the integration platform that in term will transform the report into an email and send it to the central administrator for manual processing.
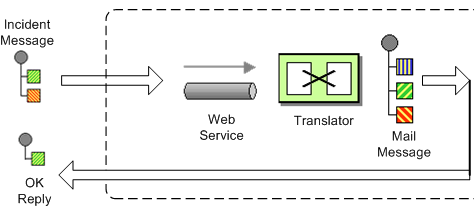
The figure below illustrates this process. The end users reports the incidents using the client applications. The incident is sent to the central integration platform as webservice. The integration platform will process the incident and send an OK acknowledgment back to the client. Then the integration will transform the message to an email and send it to the administration mail server. The users in the administration will receive the emails and take it from there.

In EIP patterns
We distill the use case as EIP patterns:
Parts
This tutorial is divided into sections and parts:
Section A: Existing Solution, how to slowly use Camel
Part 1 - This first part explain how to setup the project and get a webservice exposed using Apache CXF. In fact we don't touch Camel yet.
Part 2 - Now we are ready to introduce Camel piece by piece (without using Spring or any XML configuration file) and create the full feature integration. This part will introduce different Camel's concepts and How we can build our solution using them like :
- CamelContext
- Endpoint, Exchange & Producer
- Components : Log, File
Part 3 - Continued from part 2 where we implement that last part of the solution with the event driven consumer and how to send the email through the Mail component.
Section B: The Camel Solution
Part 4 - We now turn into the path of Camel where it excels - the routing.
Part 5 - Is about how embed Camel with Spring and using CXF endpoints directly in Camel
Part 6 - Showing a alternative solution primarily using XML instead of Java code
Using Axis 2
See this blog entry by Sagara demonstrating how to use Apache Axis 2 instead of Apache CXF as the web service framework.
Links
Part 1
Prerequisites
This tutorial uses the following frameworks:
- Maven 3.0.4
- Apache Camel 2.10.0
- Apache CXF 2.6.1
- Spring 3.0.7
Note: The sample project can be downloaded, see the resources section.
Initial Project Setup
We want the integration to be a standard .war application that can be deployed in any web container such as Tomcat, Jetty or even heavy weight application servers such as WebLogic or WebSphere. There fore we start off with the standard Maven webapp project that is created with the following long archetype command:
mvn archetype:create -DgroupId=org.apache.camel -DartifactId=camel-example-reportincident -DarchetypeArtifactId=maven-archetype-webapp
Notice that the groupId etc. doens't have to be org.apache.camel it can be com.mycompany.whatever. But I have used these package names as the example is an official part of the Camel distribution.
Then we have the basic maven folder layout. We start out with the webservice part where we want to use Apache CXF for the webservice stuff. So we add this to the pom.xml
    <properties>
        <cxf-version>2.6.1</cxf-version>
    </properties>

    <dependency>
        <groupId>org.apache.cxf</groupId>
        <artifactId>cxf-rt-core</artifactId>
        <version>${cxf-version}</version>
    </dependency>
    <dependency>
        <groupId>org.apache.cxf</groupId>
        <artifactId>cxf-rt-frontend-jaxws</artifactId>
        <version>${cxf-version}</version>
    </dependency>
    <dependency>
        <groupId>org.apache.cxf</groupId>
        <artifactId>cxf-rt-transports-http</artifactId>
        <version>${cxf-version}</version>
    </dependency>
Developing the WebService
As we want to develop webservice with the contract first approach we create our .wsdl file. As this is a example we have simplified the model of the incident to only include 8 fields. In real life the model would be a bit more complex, but not to much.
We put the wsdl file in the folder src/main/webapp/WEB-INF/wsdl and name the file report_incident.wsdl.
<?xml version="1.0" encoding="ISO-8859-1"?>
<wsdl:definitions xmlns:soap="http://schemas.xmlsoap.org/wsdl/soap/"
	xmlns:tns="http://reportincident.example.camel.apache.org"
	xmlns:xs="http://www.w3.org/2001/XMLSchema"
	xmlns:http="http://schemas.xmlsoap.org/wsdl/http/"
	xmlns:wsdl="http://schemas.xmlsoap.org/wsdl/"
	targetNamespace="http://reportincident.example.camel.apache.org">

	<!-- Type definitions for input- and output parameters for webservice -->
	<wsdl:types>
	<xs:schema targetNamespace="http://reportincident.example.camel.apache.org">
			<xs:element name="inputReportIncident">
				<xs:complexType>
					<xs:sequence>
						<xs:element type="xs:string"  name="incidentId"/>
						<xs:element type="xs:string"  name="incidentDate"/>
						<xs:element type="xs:string"  name="givenName"/>
						<xs:element type="xs:string"  name="familyName"/>
						<xs:element type="xs:string"  name="summary"/>
						<xs:element type="xs:string"  name="details"/>
						<xs:element type="xs:string"  name="email"/>
						<xs:element type="xs:string"  name="phone"/>
					</xs:sequence>
				</xs:complexType>
			</xs:element>
			<xs:element name="outputReportIncident">
				<xs:complexType>
					<xs:sequence>
						<xs:element type="xs:string" name="code"/>
					</xs:sequence>
				</xs:complexType>
			</xs:element>
		</xs:schema>
	</wsdl:types>

	<!-- Message definitions for input and output -->
	<wsdl:message name="inputReportIncident">
		<wsdl:part name="parameters" element="tns:inputReportIncident"/>
	</wsdl:message>
	<wsdl:message name="outputReportIncident">
		<wsdl:part name="parameters" element="tns:outputReportIncident"/>
	</wsdl:message>

	<!-- Port (interface) definitions -->
	<wsdl:portType name="ReportIncidentEndpoint">
		<wsdl:operation name="ReportIncident">
			<wsdl:input message="tns:inputReportIncident"/>
			<wsdl:output message="tns:outputReportIncident"/>
		</wsdl:operation>
	</wsdl:portType>

	<!-- Port bindings to transports and encoding - HTTP, document literal encoding is used -->
	<wsdl:binding name="ReportIncidentBinding" type="tns:ReportIncidentEndpoint">
		<soap:binding transport="http://schemas.xmlsoap.org/soap/http"/>
		<wsdl:operation name="ReportIncident">
			<soap:operation
				soapAction="http://reportincident.example.camel.apache.org/ReportIncident"
				style="document"/>
			<wsdl:input>
				<soap:body parts="parameters" use="literal"/>
			</wsdl:input>
			<wsdl:output>
				<soap:body parts="parameters" use="literal"/>
			</wsdl:output>
		</wsdl:operation>
	</wsdl:binding>

	<!-- Service definition -->
	<wsdl:service name="ReportIncidentService">
		<wsdl:port name="ReportIncidentPort" binding="tns:ReportIncidentBinding">
			<soap:address location="http://reportincident.example.camel.apache.org"/>
		</wsdl:port>
	</wsdl:service>

</wsdl:definitions>
CXF wsdl2java
Then we integration the CXF wsdl2java generator in the pom.xml so we have CXF generate the needed POJO classes for our webservice contract.
However at first we must configure maven to live in the modern world of Java 1.6 so we must add this to the pom.xml
			<!-- to compile with 1.6 -->
			<plugin>
				<groupId>org.apache.maven.plugins</groupId>
				<artifactId>maven-compiler-plugin</artifactId>
				<configuration>
					<source>1.6</source>
					<target>1.6</target>
				</configuration>
			</plugin>
And then we can add the CXF wsdl2java code generator that will hook into the compile goal so its automatic run all the time:
			<!-- CXF wsdl2java generator, will plugin to the compile goal -->
			<plugin>
				<groupId>org.apache.cxf</groupId>
				<artifactId>cxf-codegen-plugin</artifactId>
				<version>${cxf-version}</version>
				<executions>
					<execution>
						<id>generate-sources</id>
						<phase>generate-sources</phase>
						<configuration>
							<sourceRoot>${basedir}/target/generated/src/main/java</sourceRoot>
							<wsdlOptions>
								<wsdlOption>
									<wsdl>${basedir}/src/main/webapp/WEB-INF/wsdl/report_incident.wsdl</wsdl>
								</wsdlOption>
							</wsdlOptions>
						</configuration>
						<goals>
							<goal>wsdl2java</goal>
						</goals>
					</execution>
				</executions>
			</plugin>
You are now setup and should be able to compile the project. So running the mvn compile should run the CXF wsdl2java and generate the source code in the folder &{basedir}/target/generated/src/main/java that we specified in the pom.xml above. Since its in the target/generated/src/main/java maven will pick it up and include it in the build process.
Configuration of the web.xml
Next up is to configure the web.xml to be ready to use CXF so we can expose the webservice.
As Spring is the center of the universe, or at least is a very important framework in today's Java land we start with the listener that kick-starts Spring. This is the usual piece of code:
	<!-- the listener that kick-starts Spring -->
	<listener>
		<listener-class>org.springframework.web.context.ContextLoaderListener</listener-class>
	</listener>
And then we have the CXF part where we define the CXF servlet and its URI mappings to which we have chosen that all our webservices should be in the path /webservices/
	<!-- CXF servlet -->
	<servlet>
		<servlet-name>CXFServlet</servlet-name>
		<servlet-class>org.apache.cxf.transport.servlet.CXFServlet</servlet-class>
		<load-on-startup>1</load-on-startup>
	</servlet>

	<!-- all our webservices are mapped under this URI pattern -->
	<servlet-mapping>
		<servlet-name>CXFServlet</servlet-name>
		<url-pattern>/webservices/*</url-pattern>
	</servlet-mapping>
Then the last piece of the puzzle is to configure CXF, this is done in a spring XML that we link to fron the web.xml by the standard Spring contextConfigLocation property in the web.xml
	<!-- location of spring xml files -->
	<context-param>
		<param-name>contextConfigLocation</param-name>
		<param-value>classpath:cxf-config.xml</param-value>
	</context-param>
We have named our CXF configuration file cxf-config.xml and its located in the root of the classpath. In Maven land that is we can have the cxf-config.xml file in the src/main/resources folder. We could also have the file located in the WEB-INF folder for instance <param-value>/WEB-INF/cxf-config.xml</param-value>.
Getting rid of the old jsp world
The maven archetype that created the basic folder structure also created a sample .jsp file index.jsp. This file src/main/webapp/index.jsp should be deleted.
Configuration of CXF
The cxf-config.xml is as follows:
<beans xmlns="http://www.springframework.org/schema/beans"
       xmlns:xsi="http://www.w3.org/2001/XMLSchema-instance"
       xmlns:jaxws="http://cxf.apache.org/jaxws"
       xsi:schemaLocation="
            http://www.springframework.org/schema/beans http://www.springframework.org/schema/beans/spring-beans.xsd
            http://cxf.apache.org/jaxws http://cxf.apache.org/schemas/jaxws.xsd">

    <import resource="classpath:META-INF/cxf/cxf.xml"/>
    <import resource="classpath:META-INF/cxf/cxf-extension-soap.xml"/>
    <import resource="classpath:META-INF/cxf/cxf-servlet.xml"/>

    <!-- implementation of the webservice -->
    <bean id="reportIncidentEndpoint" class="org.apache.camel.example.reportincident.ReportIncidentEndpointImpl"/>

    <!-- export the webservice using jaxws -->
    <jaxws:endpoint id="reportIncident"
                    implementor="#reportIncidentEndpoint"
                    address="/incident"
                    wsdlLocation="/WEB-INF/wsdl/report_incident.wsdl"
                    endpointName="s:ReportIncidentPort"
                    serviceName="s:ReportIncidentService"
                    xmlns:s="http://reportincident.example.camel.apache.org"/>

</beans>
The configuration is standard CXF and is documented at the Apache CXF website.
The 3 import elements is needed by CXF and they must be in the file.
Noticed that we have a spring bean reportIncidentEndpoint that is the implementation of the webservice endpoint we let CXF expose.
Its linked from the jaxws element with the implementator attribute as we use the # mark to identify its a reference to a spring bean. We could have stated the classname directly as implementor="org.apache.camel.example.reportincident.ReportIncidentEndpoint" but then we lose the ability to let the ReportIncidentEndpoint be configured by spring.
The address attribute defines the relative part of the URL of the exposed webservice. wsdlLocation is an optional parameter but for persons like me that likes contract-first we want to expose our own .wsdl contracts and not the auto generated by the frameworks, so with this attribute we can link to the real .wsdl file. The last stuff is needed by CXF as you could have several services so it needs to know which this one is. Configuring these is quite easy as all the information is in the wsdl already.
Implementing the ReportIncidentEndpoint
Phew after all these meta files its time for some java code so we should code the implementor of the webservice. So we fire up mvn compile to let CXF generate the POJO classes for our webservice and we are ready to fire up a Java editor.
You can use mvn idea:idea or mvn eclipse:eclipse to create project files for these editors so you can load the project. However IDEA has been smarter lately and can load a pom.xml directly.
As we want to quickly see our webservice we implement just a quick and dirty as it can get. At first beware that since its jaxws and Java 1.5 we get annotations for the money, but they reside on the interface so we can remove them from our implementations so its a nice plain POJO again:
package org.apache.camel.example.reportincident;

/**
 * The webservice we have implemented.
 */
public class ReportIncidentEndpointImpl implements ReportIncidentEndpoint {

    public OutputReportIncident reportIncident(InputReportIncident parameters) {
        System.out.println("Hello ReportIncidentEndpointImpl is called from " + parameters.getGivenName());

        OutputReportIncident out = new OutputReportIncident();
        out.setCode("OK");
        return out;
    }

}
We just output the person that invokes this webservice and returns a OK response. This class should be in the maven source root folder src/main/java under the package name org.apache.camel.example.reportincident. Beware that the maven archetype tool didn't create the src/main/java folder, so you should create it manually.
To test if we are home free we run mvn clean compile.
Running our webservice
Now that the code compiles we would like to run it inside a web container, for this purpose we make use of Jetty which we will bootstrap using it's plugin org.mortbay.jetty:maven-jetty-plugin:
       <build>
           <plugins>
               ...
               <!-- so we can run mvn jetty:run -->
               <plugin>
                   <groupId>org.mortbay.jetty</groupId>
                   <artifactId>maven-jetty-plugin</artifactId>
                   <version>${jetty-version}</version>
               </plugin>
Notice: We make use of the Jetty version being defined inside the Camel's Parent POM.
So to see if everything is in order we fire up jetty with mvn jetty:run and if everything is okay you should be able to access http://localhost:8080.
Jetty is smart that it will list the correct URI on the page to our web application, so just click on the link. This is smart as you don't have to remember the exact web context URI for your application - just fire up the default page and Jetty will help you.
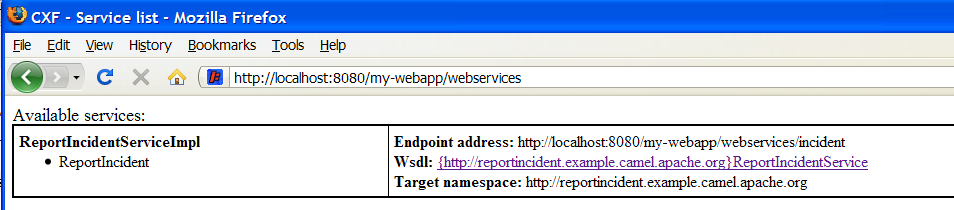
So where is the damn webservice then? Well as we did configure the web.xml to instruct the CXF servlet to accept the pattern /webservices/* we should hit this URL to get the attention of CXF: http://localhost:8080/camel-example-reportincident/webservices.
Hitting the webservice
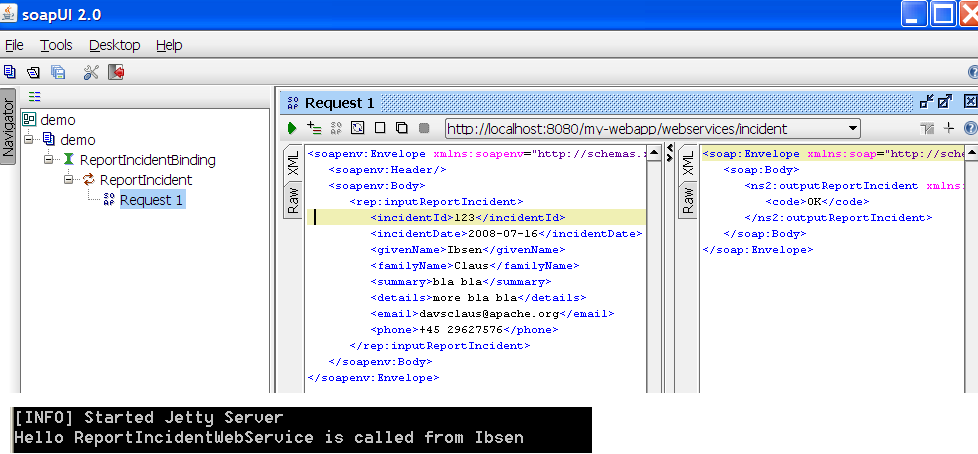
Now we have the webservice running in a standard .war application in a standard web container such as Jetty we would like to invoke the webservice and see if we get our code executed. Unfortunately this isn't the easiest task in the world - its not so easy as a REST URL, so we need tools for this. So we fire up our trusty webservice tool SoapUI and let it be the one to fire the webservice request and see the response.
Using SoapUI we sent a request to our webservice and we got the expected OK response and the console outputs the System.out so we are ready to code.
Remote Debugging
Okay a little sidestep but wouldn't it be cool to be able to debug your code when its fired up under Jetty? As Jetty is started from maven, we need to instruct maven to use debug mode.
Se we set the MAVEN_OPTS environment to start in debug mode and listen on port 5005.
MAVEN_OPTS=-Xmx512m -XX:MaxPermSize=128m -Xdebug -Xrunjdwp:transport=dt_socket,server=y,suspend=n,address=5005
Then you need to restart Jetty so its stopped with ctrl + c. Remember to start a new shell to pickup the new environment settings. And start jetty again.
Then we can from our IDE attach a remote debugger and debug as we want.
First we configure IDEA to attach to a remote debugger on port 5005:
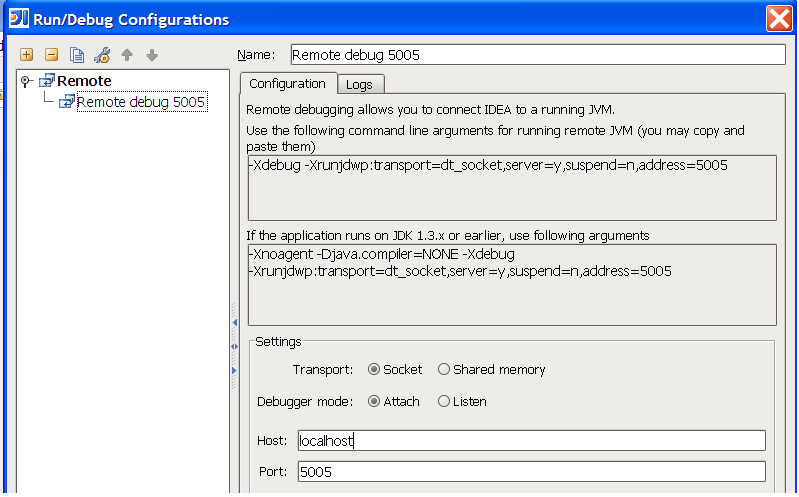
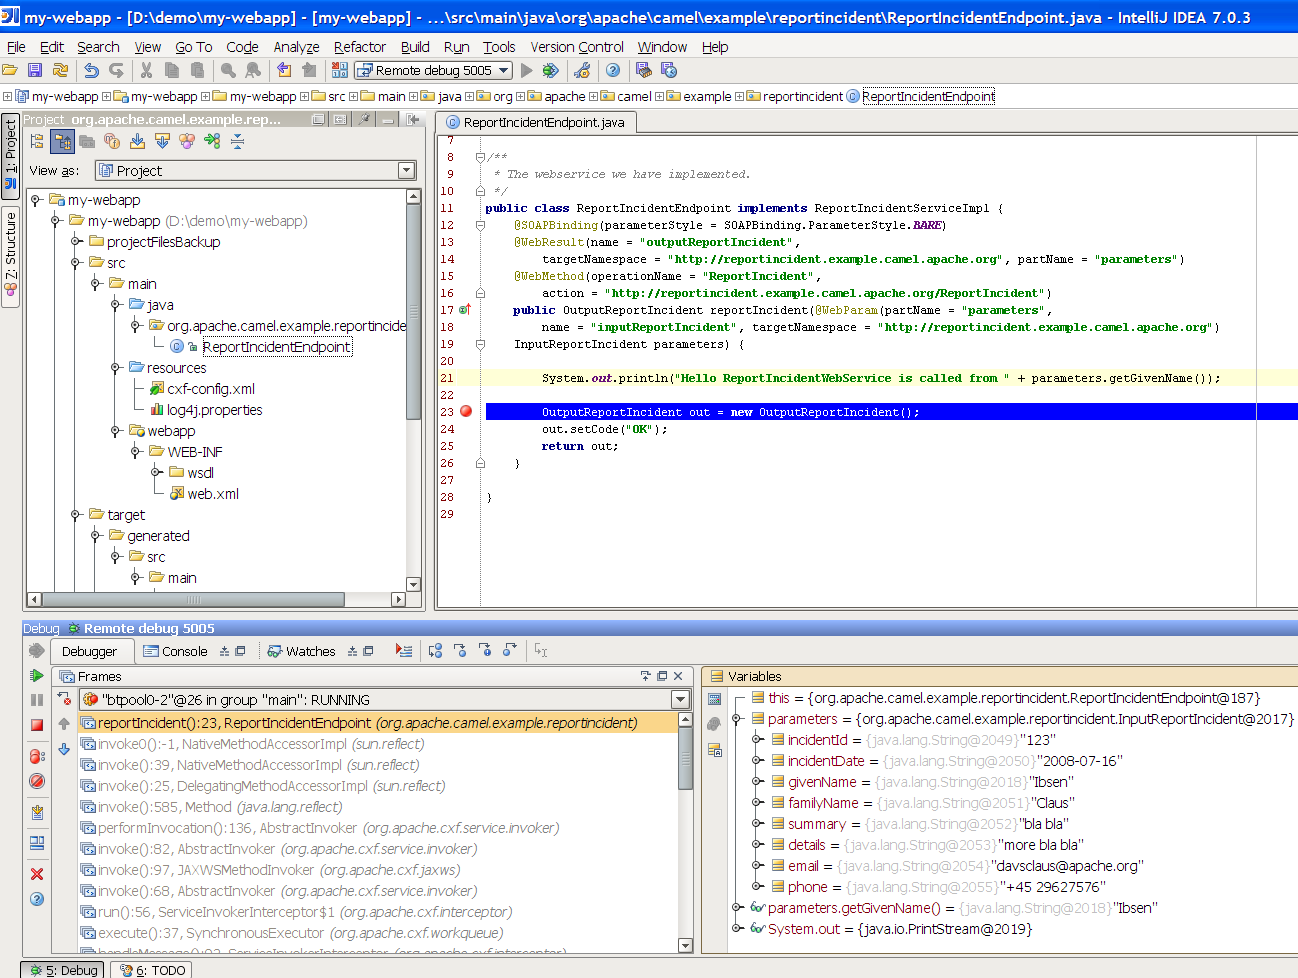
Then we set a breakpoint in our code ReportIncidentEndpoint and hit the SoapUI once again and we are breaked at the breakpoint where we can inspect the parameters:
Adding a unit test
Oh so much hard work just to hit a webservice, why can't we just use an unit test to invoke our webservice? Yes of course we can do this, and that's the next step.
First we create the folder structure src/test/java and src/test/resources. We then create the unit test in the src/test/java folder.
package org.apache.camel.example.reportincident;

import junit.framework.TestCase;

/**
 * Plain JUnit test of our webservice.
 */
public class ReportIncidentEndpointTest extends TestCase {

}
Here we have a plain old JUnit class. As we want to test webservices we need to start and expose our webservice in the unit test before we can test it. And JAXWS has pretty decent methods to help us here, the code is simple as:
    import javax.xml.ws.Endpoint;
    ...

    private static String ADDRESS = "http://localhost:9090/unittest";

    protected void startServer() throws Exception {
        // We need to start a server that exposes or webservice during the unit testing
        // We use jaxws to do this pretty simple
        ReportIncidentEndpointImpl server = new ReportIncidentEndpointImpl();
        Endpoint.publish(ADDRESS, server);
    }
The Endpoint class is the javax.xml.ws.Endpoint that under the covers looks for a provider and in our case its CXF - so its CXF that does the heavy lifting of exposing out webservice on the given URL address. Since our class ReportIncidentEndpointImpl implements the interface ReportIncidentEndpoint that is decorated with all the jaxws annotations it got all the information it need to expose the webservice. Below is the CXF wsdl2java generated interface:
/*
 *
 */

package org.apache.camel.example.reportincident;

import javax.jws.WebMethod;
import javax.jws.WebParam;
import javax.jws.WebResult;
import javax.jws.WebService;
import javax.jws.soap.SOAPBinding;
import javax.jws.soap.SOAPBinding.ParameterStyle;
import javax.xml.bind.annotation.XmlSeeAlso;

/**
 * This class was generated by Apache CXF 2.1.1
 * Wed Jul 16 12:40:31 CEST 2008
 * Generated source version: 2.1.1
 *
 */

 /*
  *
  */


@WebService(targetNamespace = "http://reportincident.example.camel.apache.org", name = "ReportIncidentEndpoint")
@XmlSeeAlso({ObjectFactory.class})
@SOAPBinding(parameterStyle = SOAPBinding.ParameterStyle.BARE)

public interface ReportIncidentEndpoint {

/*
 *
 */

    @SOAPBinding(parameterStyle = SOAPBinding.ParameterStyle.BARE)
    @WebResult(name = "outputReportIncident", targetNamespace = "http://reportincident.example.camel.apache.org", partName = "parameters")
    @WebMethod(operationName = "ReportIncident", action = "http://reportincident.example.camel.apache.org/ReportIncident")
    public OutputReportIncident reportIncident(
        @WebParam(partName = "parameters", name = "inputReportIncident", targetNamespace = "http://reportincident.example.camel.apache.org")
        InputReportIncident parameters
    );
}
Next up is to create a webservice client so we can invoke our webservice. For this we actually use the CXF framework directly as its a bit more easier to create a client using this framework than using the JAXWS style. We could have done the same for the server part, and you should do this if you need more power and access more advanced features.
    import org.apache.cxf.jaxws.JaxWsProxyFactoryBean;
    ...

    protected ReportIncidentEndpoint createCXFClient() {
        // we use CXF to create a client for us as its easier than JAXWS and works
        JaxWsProxyFactoryBean factory = new JaxWsProxyFactoryBean();
        factory.setServiceClass(ReportIncidentEndpoint.class);
        factory.setAddress(ADDRESS);
        return (ReportIncidentEndpoint) factory.create();
    }
So now we are ready for creating a unit test. We have the server and the client. So we just create a plain simple unit test method as the usual junit style:
    public void testRendportIncident() throws Exception {
        startServer();

        ReportIncidentEndpoint client = createCXFClient();

        InputReportIncident input = new InputReportIncident();
        input.setIncidentId("123");
        input.setIncidentDate("2008-07-16");
        input.setGivenName("Claus");
        input.setFamilyName("Ibsen");
        input.setSummary("bla bla");
        input.setDetails("more bla bla");
        input.setEmail("davsclaus@apache.org");
        input.setPhone("+45 2962 7576");

        OutputReportIncident out = client.reportIncident(input);
        assertEquals("Response code is wrong", "OK", out.getCode());
    }
Now we are nearly there. But if you run the unit test with mvn test then it will fail. Why!!! Well its because that CXF needs is missing some dependencies during unit testing. In fact it needs the web container, so we need to add this to our pom.xml.
    <!-- cxf web container for unit testing -->
    <dependency>
        <groupId>org.apache.cxf</groupId>
        <artifactId>cxf-rt-transports-http-jetty</artifactId>
        <version>${cxf-version}</version>
        <scope>test</scope>
    </dependency>
Well what is that, CXF also uses Jetty for unit test - well its just shows how agile, embedable and popular Jetty is.
So lets run our junit test with, and it reports:
mvn test
Tests run: 1, Failures: 0, Errors: 0, Skipped: 0
[INFO] BUILD SUCCESSFUL
Yep thats it for now. We have a basic project setup.
End of part 1
Thanks for being patient and reading all this more or less standard Maven, Spring, JAXWS and Apache CXF stuff. Its stuff that is well covered on the net, but I wanted a full fledged tutorial on a maven project setup that is web service ready with Apache CXF. We will use this as a base for the next part where we demonstrate how Camel can be digested slowly and piece by piece just as it was back in the times when was introduced and was learning the Spring framework that we take for granted today.
#Resources
Links
Part 3
Recap
Lets just recap on the solution we have now:
public class ReportIncidentEndpointImpl implements ReportIncidentEndpoint {

    private CamelContext camel;
    private ProducerTemplate template;

    public ReportIncidentEndpointImpl() throws Exception {
        // create the camel context that is the "heart" of Camel
        camel = new DefaultCamelContext();

        // get the ProducerTemplate thst is a Spring'ish xxxTemplate based producer for very
        // easy sending exchanges to Camel.
        template = camel.createProducerTemplate();

        // start Camel
        camel.start();
    }

    /**
     * This is the last solution displayed that is the most simple
     */
    public OutputReportIncident reportIncident(InputReportIncident parameters) {
        // transform the request into a mail body
        Object mailBody = template.sendBody("velocity:MailBody.vm", parameters);

        // store the mail body in a file
        String filename = "mail-incident-" + parameters.getIncidentId() + ".txt";
        template.sendBodyAndHeader("file://target/subfolder", mailBody, FileComponent.HEADER_FILE_NAME, filename);

        // return an OK reply
        OutputReportIncident out = new OutputReportIncident();
        out.setCode("OK");
        return out;
    }

}
This completes the first part of the solution: receiving the message using webservice, transform it to a mail body and store it as a text file.
What is missing is the last part that polls the text files and send them as emails. Here is where some fun starts, as this requires usage of the Event Driven Consumer EIP pattern to react when new files arrives. So lets see how we can do this in Camel. There is a saying: Many roads lead to Rome, and that is also true for Camel - there are many ways to do it in Camel.
Adding the Event Driven Consumer
We want to add the consumer to our integration that listen for new files, we do this by creating a private method where the consumer code lives. We must register our consumer in Camel before its started so we need to add, and there fore we call the method addMailSenderConsumer in the constructor below:
    public ReportIncidentEndpointImpl() throws Exception {
        // create the camel context that is the "heart" of Camel
        camel = new DefaultCamelContext();

        // get the ProducerTemplate thst is a Spring'ish xxxTemplate based producer for very
        // easy sending exchanges to Camel.
        template = camel.createProducerTemplate();

        // add the event driven consumer that will listen for mail files and process them
        addMailSendConsumer();

        // start Camel
        camel.start();
    }
The consumer needs to be consuming from an endpoint so we grab the endpoint from Camel we want to consume. It's file://target/subfolder. Don't be fooled this endpoint doesn't have to 100% identical to the producer, i.e. the endpoint we used in the previous part to create and store the files. We could change the URL to include some options, and to make it more clear that it's possible we setup a delay value to 10 seconds, and the first poll starts after 2 seconds. This is done by adding ?consumer.delay=10000&consumer.initialDelay=2000 to the URL.
URL Configuration
The URL configuration in Camel endpoints is just like regular URL we know from the Internet. You use ? and & to set the options.
When we have the endpoint we can create the consumer (just as in part 1 where we created a producer}. Creating the consumer requires a Processor where we implement the java code what should happen when a message arrives. To get the mail body as a String object we can use the getBody method where we can provide the type we want in return.
Camel Type Converter
Why don't we just cast it as we always do in Java? Well the biggest advantage when you provide the type as a parameter you tell Camel what type you want and Camel can automatically convert it for you, using its flexible Type Converter mechanism. This is a great advantage, and you should try to use this instead of regular type casting.
Sending the email is still left to be implemented, we will do this later. And finally we must remember to start the consumer otherwise its not active and won't listen for new files.
    private void addMailSendConsumer() throws Exception {
        // Grab the endpoint where we should consume. Option - the first poll starts after 2 seconds
        Endpoint endpint = camel.getEndpoint("file://target/subfolder?consumer.initialDelay=2000");

        // create the event driven consumer
        // the Processor is the code what should happen when there is an event
        // (think it as the onMessage method)
        Consumer consumer = endpint.createConsumer(new Processor() {
            public void process(Exchange exchange) throws Exception {
                // get the mail body as a String
                String mailBody = exchange.getIn().getBody(String.class);

                // okay now we are read to send it as an email
                System.out.println("Sending email..." + mailBody);
            }
        });

        // star the consumer, it will listen for files
        consumer.start();
    }
Before we test it we need to be aware that our unit test is only catering for the first part of the solution, receiving the message with webservice, transforming it using Velocity and then storing it as a file - it doesn't test the Event Driven Consumer we just added. As we are eager to see it in action, we just do a common trick adding some sleep in our unit test, that gives our Event Driven Consumer time to react and print to System.out. We will later refine the test:
    public void testRendportIncident() throws Exception {
       ...

        OutputReportIncident out = client.reportIncident(input);
        assertEquals("Response code is wrong", "OK", out.getCode());

        // give the event driven consumer time to react
        Thread.sleep(10 * 1000);
    }
We run the test with mvn clean test and have eyes fixed on the console output.
During all the output in the console, we see that our consumer has been triggered, as we want.
2008-07-19 12:09:24,140 [mponent@1f12c4e] DEBUG FileProcessStrategySupport - Locking the file: target\subfolder\mail-incident-123.txt ...
Sending email...Incident 123 has been reported on the 2008-07-16 by Claus Ibsen.

The person can be contact by:
- email: davsclaus@apache.org
- phone: +45 2962 7576

Summary: bla bla

Details:
more bla bla

This is an auto generated email. You can not reply.
2008-07-19 12:09:24,156 [mponent@1f12c4e] DEBUG FileConsumer - Done processing file: target\subfolder\mail-incident-123.txt. Status is: OK
Sending the email
Sending the email requires access to a SMTP mail server, but the implementation code is very simple:
    private void sendEmail(String body) {
        // send the email to your mail server
        String url = "smtp://someone@localhost?password=secret&to=incident@mycompany.com";
        template.sendBodyAndHeader(url, body, "subject", "New incident reported");
    }
And just invoke the method from our consumer:
    // okay now we are read to send it as an email
    System.out.println("Sending email...");
    sendEmail(mailBody);
    System.out.println("Email sent");
Unit testing mail
For unit testing the consumer part we will use a mock mail framework, so we add this to our pom.xml:
        <!-- unit testing mail using mock -->
        <dependency>
            <groupId>org.jvnet.mock-javamail</groupId>
            <artifactId>mock-javamail</artifactId>
            <version>1.7</version>
            <scope>test</scope>
        </dependency>
Then we prepare our integration to run with or without the consumer enabled. We do this to separate the route into the two parts:
- receive the webservice, transform and save mail file and return OK as repose
- the consumer that listen for mail files and send them as emails
So we change the constructor code a bit:
    public ReportIncidentEndpointImpl() throws Exception {
        init(true);
    }

    public ReportIncidentEndpointImpl(boolean enableConsumer) throws Exception {
        init(enableConsumer);
    }

    private void init(boolean enableConsumer) throws Exception {
        // create the camel context that is the "heart" of Camel
        camel = new DefaultCamelContext();

        // get the ProducerTemplate thst is a Spring'ish xxxTemplate based producer for very
        // easy sending exchanges to Camel.
        template = camel.createProducerTemplate();

        // add the event driven consumer that will listen for mail files and process them
        if (enableConsumer) {
            addMailSendConsumer();
        }

        // start Camel
        camel.start();
    }
Then remember to change the ReportIncidentEndpointTest to pass in false in the ReportIncidentEndpointImpl constructor.
And as always run mvn clean test to be sure that the latest code changes works.
Adding new unit test
We are now ready to add a new unit test that tests the consumer part so we create a new test class that has the following code structure:
/**
 * Plain JUnit test of our consumer.
 */
public class ReportIncidentConsumerTest extends TestCase {

    private ReportIncidentEndpointImpl endpoint;

    public void testConsumer() throws Exception {
        // we run this unit test with the consumer, hence the true parameter
        endpoint = new ReportIncidentEndpointImpl(true);
   }

}
As we want to test the consumer that it can listen for files, read the file content and send it as an email to our mailbox we will test it by asserting that we receive 1 mail in our mailbox and that the mail is the one we expect. To do so we need to grab the mailbox with the mockmail API. This is done as simple as:
    public void testConsumer() throws Exception {
        // we run this unit test with the consumer, hence the true parameter
        endpoint = new ReportIncidentEndpointImpl(true);

        // get the mailbox
        Mailbox box = Mailbox.get("incident@mycompany.com");
        assertEquals("Should not have mails", 0, box.size());
How do we trigger the consumer? Well by creating a file in the folder it listen for. So we could use plain java.io.File API to create the file, but wait isn't there an smarter solution? ... yes Camel of course. Camel can do amazing stuff in one liner codes with its ProducerTemplate, so we need to get a hold of this baby. We expose this template in our ReportIncidentEndpointImpl but adding this getter:
    protected ProducerTemplate getTemplate() {
        return template;
    }
Then we can use the template to create the file in one code line:
        // drop a file in the folder that the consumer listen
        // here is a trick to reuse Camel! so we get the producer template and just
        // fire a message that will create the file for us
        endpoint.getTemplate().sendBodyAndHeader("file://target/subfolder?append=false", "Hello World",
            FileComponent.HEADER_FILE_NAME, "mail-incident-test.txt");
Then we just need to wait a little for the consumer to kick in and do its work and then we should assert that we got the new mail. Easy as just:
        // let the consumer have time to run
        Thread.sleep(3 * 1000);

        // get the mock mailbox and check if we got mail ;)
        assertEquals("Should have got 1 mail", 1, box.size());
        assertEquals("Subject wrong", "New incident reported", box.get(0).getSubject());
        assertEquals("Mail body wrong", "Hello World", box.get(0).getContent());
    }
The final class for the unit test is:
/**
 * Plain JUnit test of our consumer.
 */
public class ReportIncidentConsumerTest extends TestCase {

    private ReportIncidentEndpointImpl endpoint;

    public void testConsumer() throws Exception {
        // we run this unit test with the consumer, hence the true parameter
        endpoint = new ReportIncidentEndpointImpl(true);

        // get the mailbox
        Mailbox box = Mailbox.get("incident@mycompany.com");
        assertEquals("Should not have mails", 0, box.size());

        // drop a file in the folder that the consumer listen
        // here is a trick to reuse Camel! so we get the producer template and just
        // fire a message that will create the file for us
        endpoint.getTemplate().sendBodyAndHeader("file://target/subfolder?append=false", "Hello World",
            FileComponent.HEADER_FILE_NAME, "mail-incident-test.txt");

        // let the consumer have time to run
        Thread.sleep(3 * 1000);

        // get the mock mailbox and check if we got mail ;)
        assertEquals("Should have got 1 mail", 1, box.size());
        assertEquals("Subject wrong", "New incident reported", box.get(0).getSubject());
        assertEquals("Mail body wrong", "Hello World", box.get(0).getContent());
    }

}
End of part 3
Okay we have reached the end of part 3. For now we have only scratched the surface of what Camel is and what it can do. We have introduced Camel into our integration piece by piece and slowly added more and more along the way. And the most important is: you as the developer never lost control. We hit a sweet spot in the webservice implementation where we could write our java code. Adding Camel to the mix is just to use it as a regular java code, nothing magic. We were in control of the flow, we decided when it was time to translate the input to a mail body, we decided when the content should be written to a file. This is very important to not lose control, that the bigger and heavier frameworks tend to do. No names mentioned, but boy do developers from time to time dislike these elephants. And Camel is no elephant.
I suggest you download the samples from part 1 to 3 and try them out. It is great basic knowledge to have in mind when we look at some of the features where Camel really excel - the routing domain language.
From part 1 to 3 we touched concepts such as::
- Endpoint
- URI configuration
- Consumer
- Producer
- Event Driven Consumer
- Component
- CamelContext
- ProducerTemplate
- Processor
- Type Converter
Links
Part 4
Introduction
This section is about regular Camel. The examples presented here in this section is much more in common of all the examples we have in the Camel documentation.
If you have been reading the previous 3 parts then, this quote applies:
you must unlearn what you have learned
Master Yoda, Star Wars IV
So we start all over again!
Routing
Camel is particular strong as a light-weight and agile routing and mediation framework. In this part we will introduce the routing concept and how we can introduce this into our solution.
Looking back at the figure from the Introduction page we want to implement this routing. Camel has support for expressing this routing logic using Java as a DSL (Domain Specific Language). In fact Camel also has DSL for XML and Scala. In this part we use the Java DSL as its the most powerful and all developers know Java. Later we will introduce the XML version that is very well integrated with Spring.
Before we jump into it, we want to state that this tutorial is about Developers not loosing control. In my humble experience one of the key fears of developers is that they are forced into a tool/framework where they loose control and/or power, and the possible is now impossible. So in this part we stay clear with this vision and our starting point is as follows:
- We have generated the webservice source code using the CXF wsdl2java generator and we have our ReportIncidentEndpointImpl.java file where we as a Developer feels home and have the power.
So the starting point is:
/**
 * The webservice we have implemented.
 */
public class ReportIncidentEndpointImpl implements ReportIncidentEndpoint {

    /**
     * This is the last solution displayed that is the most simple
     */
    public OutputReportIncident reportIncident(InputReportIncident parameters) {
        // WE ARE HERE !!!
        return null;
    }

}
Yes we have a simple plain Java class where we have the implementation of the webservice. The cursor is blinking at the WE ARE HERE block and this is where we feel home. More or less any Java Developers have implemented webservices using a stack such as: Apache AXIS, Apache CXF or some other quite popular framework. They all allow the developer to be in control and implement the code logic as plain Java code. Camel of course doesn't enforce this to be any different. Okay the boss told us to implement the solution from the figure in the Introduction page and we are now ready to code.
RouteBuilder
RouteBuilder is the hearth in Camel of the Java DSL routing. This class does all the heavy lifting of supporting EIP verbs for end-users to express the routing. It does take a little while to get settled and used to, but when you have worked with it for a while you will enjoy its power and realize it is in fact a little language inside Java itself. Camel is the only integration framework we are aware of that has Java DSL, all the others are usually only XML based.
As an end-user you usually use the RouteBuilder as of follows:
- create your own Route class that extends RouteBuilder
- implement your routing DSL in the configure method
So we create a new class ReportIncidentRoutes and implement the first part of the routing:
import org.apache.camel.builder.RouteBuilder;

public class ReportIncidentRoutes extends RouteBuilder {

    public void configure() throws Exception {
        // direct:start is a internal queue to kick-start the routing in our example
        // we use this as the starting point where you can send messages to direct:start
        from("direct:start")
            // to is the destination we send the message to our velocity endpoint
            // where we transform the mail body
            .to("velocity:MailBody.vm");
    }

}
What to notice here is the configure method. Here is where all the action is. Here we have the Java DSL langauge, that is expressed using the fluent builder syntax that is also known from Hibernate when you build the dynamic queries etc. What you do is that you can stack methods separating with the dot.
In the example above we have a very common routing, that can be distilled from pseudo verbs to actual code with:
- from A to B
- From Endpoint A To Endpoint B
- from("endpointA").to("endpointB")
- from("direct:start").to("velocity:MailBody.vm");
from("direct:start") is the consumer that is kick-starting our routing flow. It will wait for messages to arrive on the direct queue and then dispatch the message.
to("velocity:MailBody.vm") is the producer that will receive a message and let Velocity generate the mail body response.
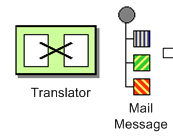
So what we have implemented so far with our ReportIncidentRoutes RouteBuilder is this part of the picture:
Adding the RouteBuilder
Now we have our RouteBuilder we need to add/connect it to our CamelContext that is the hearth of Camel. So turning back to our webservice implementation class ReportIncidentEndpointImpl we add this constructor to the code, to create the CamelContext and add the routes from our route builder and finally to start it.
    private CamelContext context;

    public ReportIncidentEndpointImpl() throws Exception {
        // create the context
        context = new DefaultCamelContext();

        // append the routes to the context
        context.addRoutes(new ReportIncidentRoutes());

        // at the end start the camel context
        context.start();
    }
Okay how do you use the routes then? Well its just as before we use a ProducerTemplate to send messages to Endpoints, so we just send to the direct:start endpoint and it will take it from there.
So we implement the logic in our webservice operation:
    /**
     * This is the last solution displayed that is the most simple
     */
    public OutputReportIncident reportIncident(InputReportIncident parameters) {
        Object mailBody = context.createProducerTemplate().sendBody("direct:start", parameters);
        System.out.println("Body:" + mailBody);

        // return an OK reply
        OutputReportIncident out = new OutputReportIncident();
        out.setCode("OK");
        return out;
    }
Notice that we get the producer template using the createProducerTemplate method on the CamelContext. Then we send the input parameters to the direct:start endpoint and it will route it to the velocity endpoint that will generate the mail body. Since we use direct as the consumer endpoint (=from) and its a synchronous exchange we will get the response back from the route. And the response is of course the output from the velocity endpoint.
About creating ProducerTemplate
In the example above we create a new ProducerTemplate when the reportIncident method is invoked. However in reality you should only create the template once and re-use it. See this FAQ entry.
We have now completed this part of the picture:
Unit testing
Now is the time we would like to unit test what we got now. So we call for camel and its great test kit. For this to work we need to add it to the pom.xml
        <dependency>
            <groupId>org.apache.camel</groupId>
            <artifactId>camel-core</artifactId>
            <version>1.4.0</version>
            <scope>test</scope>
            <type>test-jar</type>
        </dependency>
After adding it to the pom.xml you should refresh your Java Editor so it pickups the new jar. Then we are ready to create out unit test class.
We create this unit test skeleton, where we extend this class ContextTestSupport
package org.apache.camel.example.reportincident;

import org.apache.camel.ContextTestSupport;
import org.apache.camel.builder.RouteBuilder;

/**
 * Unit test of our routes
 */
public class ReportIncidentRoutesTest extends ContextTestSupport {

}
ContextTestSupport is a supporting unit test class for much easier unit testing with Apache Camel. The class is extending JUnit TestCase itself so you get all its glory. What we need to do now is to somehow tell this unit test class that it should use our route builder as this is the one we gonna test. So we do this by implementing the createRouteBuilder method.
    @Override
    protected RouteBuilder createRouteBuilder() throws Exception {
        return new ReportIncidentRoutes();
    }
That is easy just return an instance of our route builder and this unit test will use our routes.
It is quite common in Camel itself to unit test using routes defined as an anonymous inner class, such as illustrated below:
    protected RouteBuilder createRouteBuilder() throws Exception {
        return new RouteBuilder() {
            public void configure() throws Exception {
                // TODO: Add your routes here, such as:
                from("jms:queue:inbox").to("file://target/out");
            }
        };
    }
The same technique is of course also possible for end-users of Camel to create parts of your routes and test them separately in many test classes.
However in this tutorial we test the real route that is to be used for production, so we just return an instance of the real one.
We then code our unit test method that sends a message to the route and assert that its transformed to the mail body using the Velocity template.
    public void testTransformMailBody() throws Exception {
        // create a dummy input with some input data
        InputReportIncident parameters = createInput();

        // send the message (using the sendBody method that takes a parameters as the input body)
        // to "direct:start" that kick-starts the route
        // the response is returned as the out object, and its also the body of the response
        Object out = context.createProducerTemplate().sendBody("direct:start", parameters);

        // convert the response to a string using camel converters. However we could also have casted it to
        // a string directly but using the type converters ensure that Camel can convert it if it wasn't a string
        // in the first place. The type converters in Camel is really powerful and you will later learn to
        // appreciate them and wonder why its not build in Java out-of-the-box
        String body = context.getTypeConverter().convertTo(String.class, out);

        // do some simple assertions of the mail body
        assertTrue(body.startsWith("Incident 123 has been reported on the 2008-07-16 by Claus Ibsen."));
    }

    /**
     * Creates a dummy request to be used for input
     */
    protected InputReportIncident createInput() {
        InputReportIncident input = new InputReportIncident();
        input.setIncidentId("123");
        input.setIncidentDate("2008-07-16");
        input.setGivenName("Claus");
        input.setFamilyName("Ibsen");
        input.setSummary("bla bla");
        input.setDetails("more bla bla");
        input.setEmail("davsclaus@apache.org");
        input.setPhone("+45 2962 7576");
        return input;
    }
Adding the File Backup
The next piece of puzzle that is missing is to store the mail body as a backup file. So we turn back to our route and the EIP patterns. We use the Pipes and Filters pattern here to chain the routing as:
    public void configure() throws Exception {
        from("direct:start")
            .to("velocity:MailBody.vm")
            // using pipes-and-filters we send the output from the previous to the next
            .to("file://target/subfolder");
     }
Notice that we just add a 2nd .to on the newline. Camel will default use the Pipes and Filters pattern here when there are multi endpoints chained liked this. We could have used the pipeline verb to let out stand out that its the Pipes and Filters pattern such as:
        from("direct:start")
            // using pipes-and-filters we send the output from the previous to the next
            .pipeline("velocity:MailBody.vm", "file://target/subfolder");
But most people are using the multi .to style instead.
We re-run out unit test and verifies that it still passes:
Running org.apache.camel.example.reportincident.ReportIncidentRoutesTest
Tests run: 1, Failures: 0, Errors: 0, Skipped: 0, Time elapsed: 1.157 sec
But hey we have added the file producer endpoint and thus a file should also be created as the backup file. If we look in the target/subfolder we can see that something happened.
On my humble laptop it created this folder: target\subfolder\ID-claus-acer. So the file producer create a sub folder named ID-claus-acer what is this? Well Camel auto generates an unique filename based on the unique message id if not given instructions to use a fixed filename. In fact it creates another sub folder and name the file as: target\subfolder\ID-claus-acer\3750-1219148558921\1-0 where 1-0 is the file with the mail body. What we want is to use our own filename instead of this auto generated filename. This is archived by adding a header to the message with the filename to use. So we need to add this to our route and compute the filename based on the message content.
Setting the filename
For starters we show the simple solution and build from there. We start by setting a constant filename, just to verify that we are on the right path, to instruct the file producer what filename to use. The file producer uses a special header FileComponent.HEADER_FILE_NAME to set the filename.
What we do is to send the header when we "kick-start" the routing as the header will be propagated from the direct queue to the file producer. What we need to do is to use the ProducerTemplate.sendBodyAndHeader method that takes both a body and a header. So we change out webservice code to include the filename also:
    public OutputReportIncident reportIncident(InputReportIncident parameters) {
        // create the producer template to use for sending messages
        ProducerTemplate producer = context.createProducerTemplate();
        // send the body and the filename defined with the special header key
        Object mailBody = producer.sendBodyAndHeader("direct:start", parameters, FileComponent.HEADER_FILE_NAME, "incident.txt");
        System.out.println("Body:" + mailBody);

        // return an OK reply
        OutputReportIncident out = new OutputReportIncident();
        out.setCode("OK");
        return out;
    }
However we could also have used the route builder itself to configure the constant filename as shown below:
    public void configure() throws Exception {
        from("direct:start")
            .to("velocity:MailBody.vm")
            // set the filename to a constant before the file producer receives the message
            .setHeader(FileComponent.HEADER_FILE_NAME, constant("incident.txt"))
            .to("file://target/subfolder");
     }
But Camel can be smarter and we want to dynamic set the filename based on some of the input parameters, how can we do this?
Well the obvious solution is to compute and set the filename from the webservice implementation, but then the webservice implementation has such logic and we want this decoupled, so we could create our own POJO bean that has a method to compute the filename. We could then instruct the routing to invoke this method to get the computed filename. This is a string feature in Camel, its Bean binding. So lets show how this can be done:
Using Bean Language to compute the filename
First we create our plain java class that computes the filename, and it has 100% no dependencies to Camel what so ever.
/**
 * Plain java class to be used for filename generation based on the reported incident
 */
public class FilenameGenerator {

    public String generateFilename(InputReportIncident input) {
        // compute the filename
        return "incident-" + input.getIncidentId() + ".txt";
    }

}
The class is very simple and we could easily create unit tests for it to verify that it works as expected. So what we want now is to let Camel invoke this class and its generateFilename with the input parameters and use the output as the filename. Pheeeww is this really possible out-of-the-box in Camel? Yes it is. So lets get on with the show. We have the code that computes the filename, we just need to call it from our route using the Bean Language:
    public void configure() throws Exception {
        from("direct:start")
            // set the filename using the bean language and call the FilenameGenerator class.
            // the 2nd null parameter is optional methodname, to be used to avoid ambiguity.
            // if not provided Camel will try to figure out the best method to invoke, as we
            // only have one method this is very simple
            .setHeader(FileComponent.HEADER_FILE_NAME, BeanLanguage.bean(FilenameGenerator.class, null))
            .to("velocity:MailBody.vm")
            .to("file://target/subfolder");
    }
Notice that we use the bean language where we supply the class with our bean to invoke. Camel will instantiate an instance of the class and invoke the suited method. For completeness and ease of code readability we add the method name as the 2nd parameter
.setHeader(FileComponent.HEADER_FILE_NAME, BeanLanguage.bean(FilenameGenerator.class, "generateFilename"))
Then other developers can understand what the parameter is, instead of null.
Now we have a nice solution, but as a sidetrack I want to demonstrate the Camel has other languages out-of-the-box, and that scripting language is a first class citizen in Camel where it etc. can be used in content based routing. However we want it to be used for the filename generation.
Using a script language to set the filename
We could do as in the previous parts where we send the computed filename as a message header when we "kick-start" the route. But we want to learn new stuff so we look for a different solution using some of Camels many Languages. As OGNL is a favorite language of mine (used by WebWork) so we pick this baby for a Camel ride. For starters we must add it to our pom.xml:
        <dependency>
            <groupId>org.apache.camel</groupId>
            <artifactId>camel-ognl</artifactId>
            <version>${camel-version}</version>
        </dependency>
And remember to refresh your editor so you got the new .jars.
We want to construct the filename based on this syntax: mail-incident-#ID#.txt where #ID# is the incident id from the input parameters. As OGNL is a language that can invoke methods on bean we can invoke the getIncidentId() on the message body and then concat it with the fixed pre and postfix strings.
In OGNL glory this is done as:
"'mail-incident-' + request.body.incidentId + '.txt'"
where request.body.incidentId computes to:
- request is the IN message. See the OGNL for other predefined objects available
- body is the body of the in message
- incidentId will invoke the
getIncidentId()method on the body.
The rest is just more or less regular plain code where we can concat strings.
Now we got the expression to dynamic compute the filename on the fly we need to set it on our route so we turn back to our route, where we can add the OGNL expression:
    public void configure() throws Exception {
        from("direct:start")
            // we need to set the filename and uses OGNL for this
            .setHeader(FileComponent.HEADER_FILE_NAME, OgnlExpression.ognl("'mail-incident-' + request.body.incidentId + '.txt'"))
            // using pipes-and-filters we send the output from the previous to the next
            .pipeline("velocity:MailBody.vm", "file://target/subfolder");
    }
And since we are on Java 1.5 we can use the static import of ognl so we have:
import static org.apache.camel.language.ognl.OgnlExpression.ognl;
...
    .setHeader(FileComponent.HEADER_FILE_NAME, ognl("'mail-incident-' + request.body.incidentId + '.txt'"))
Notice the import static also applies for all the other languages, such as the Bean Language we used previously.
Whatever worked for you we have now implemented the backup of the data files:
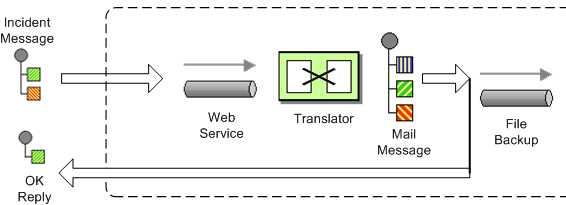
Sending the email
What we need to do before the solution is completed is to actually send the email with the mail body we generated and stored as a file. In the previous part we did this with a File consumer, that we manually added to the CamelContext. We can do this quite easily with the routing.
import org.apache.camel.builder.RouteBuilder;

public class ReportIncidentRoutes extends RouteBuilder {

    public void configure() throws Exception {
        // first part from the webservice -> file backup
        from("direct:start")
            .setHeader(FileComponent.HEADER_FILE_NAME, bean(FilenameGenerator.class, "generateFilename"))
            .to("velocity:MailBody.vm")
            .to("file://target/subfolder");

        // second part from the file backup -> send email
        from("file://target/subfolder")
            // set the subject of the email
            .setHeader("subject", constant("new incident reported"))
            // send the email
            .to("smtp://someone@localhost?password=secret&to=incident@mycompany.com");
    }

}
The last 3 lines of code does all this. It adds a file consumer from("file://target/subfolder"), sets the mail subject, and finally send it as an email.
The DSL is really powerful where you can express your routing integration logic.
So we completed the last piece in the picture puzzle with just 3 lines of code.
We have now completed the integration:
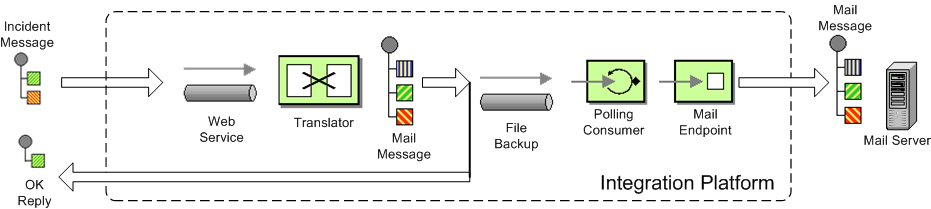
Conclusion
We have just briefly touched the routing in Camel and shown how to implement them using the fluent builder syntax in Java. There is much more to the routing in Camel than shown here, but we are learning step by step. We continue in part 5. See you there.
Links
Tutorial using Axis 1.4 with Apache Camel
Removed from distribution
This example has been removed from Camel 2.9 onwards. Apache Axis 1.4 is a very old and unsupported framework. We encourage users to use CXF instead of Axis.
Prerequisites
This tutorial uses Maven 2 to setup the Camel project and for dependencies for artifacts.
Distribution
This sample is distributed with the Camel 1.5 distribution as examples/camel-example-axis.
Introduction
Apache Axis is/was widely used as a webservice framework. So in line with some of the other tutorials to demonstrate how Camel is not an invasive framework but is flexible and integrates well with existing solution.
We have an existing solution that exposes a webservice using Axis 1.4 deployed as web applications. This is a common solution. We use contract first so we have Axis generated source code from an existing wsdl file. Then we show how we introduce Spring and Camel to integrate with Axis.
This tutorial uses the following frameworks:
- Maven 2.0.9
- Apache Camel 1.5.0
- Apache Axis 1.4
- Spring 2.5.5
Setting up the project to run Axis
This first part is about getting the project up to speed with Axis. We are not touching Camel or Spring at this time.
Maven 2
Axis dependencies is available for maven 2 so we configure our pom.xml as:
        <dependency>
            <groupId>org.apache.axis</groupId>
            <artifactId>axis</artifactId>
            <version>1.4</version>
        </dependency>

        <dependency>
            <groupId>org.apache.axis</groupId>
            <artifactId>axis-jaxrpc</artifactId>
            <version>1.4</version>
        </dependency>

        <dependency>
            <groupId>org.apache.axis</groupId>
            <artifactId>axis-saaj</artifactId>
            <version>1.4</version>
        </dependency>

	<dependency>
	    <groupId>axis</groupId>
	    <artifactId>axis-wsdl4j</artifactId>
	    <version>1.5.1</version>
	</dependency>

	<dependency>
	    <groupId>commons-discovery</groupId>
	    <artifactId>commons-discovery</artifactId>
	    <version>0.4</version>
	</dependency>

        <dependency>
            <groupId>log4j</groupId>
            <artifactId>log4j</artifactId>
            <version>1.2.14</version>
        </dependency>
Then we need to configure maven to use Java 1.5 and the Axis maven plugin that generates the source code based on the wsdl file:
<!-- to compile with 1.5 -->
	<plugin>
		<groupId>org.apache.maven.plugins</groupId>
		<artifactId>maven-compiler-plugin</artifactId>
		<configuration>
			<source>1.5</source>
			<target>1.5</target>
		</configuration>
	</plugin>

            <plugin>
               <groupId>org.codehaus.mojo</groupId>
               <artifactId>axistools-maven-plugin</artifactId>
               <configuration>
	          <sourceDirectory>src/main/resources/</sourceDirectory>
                  <packageSpace>com.mycompany.myschema</packageSpace>
                  <testCases>false</testCases>
                  <serverSide>true</serverSide>
                  <subPackageByFileName>false</subPackageByFileName>
               </configuration>
               <executions>
                 <execution>
                   <goals>
                     <goal>wsdl2java</goal>
                   </goals>
                 </execution>
               </executions>
            </plugin>
wsdl
We use the same .wsdl file as the Tutorial-Example-ReportIncident and copy it to src/main/webapp/WEB-INF/wsdl
<?xml version="1.0" encoding="ISO-8859-1"?>
<wsdl:definitions xmlns:soap="http://schemas.xmlsoap.org/wsdl/soap/"
	xmlns:tns="http://reportincident.example.camel.apache.org"
	xmlns:xs="http://www.w3.org/2001/XMLSchema"
	xmlns:http="http://schemas.xmlsoap.org/wsdl/http/"
	xmlns:wsdl="http://schemas.xmlsoap.org/wsdl/"
	targetNamespace="http://reportincident.example.camel.apache.org">

	<!-- Type definitions for input- and output parameters for webservice -->
	<wsdl:types>
	<xs:schema targetNamespace="http://reportincident.example.camel.apache.org">
			<xs:element name="inputReportIncident">
				<xs:complexType>
					<xs:sequence>
						<xs:element type="xs:string"  name="incidentId"/>
						<xs:element type="xs:string"  name="incidentDate"/>
						<xs:element type="xs:string"  name="givenName"/>
						<xs:element type="xs:string"  name="familyName"/>
						<xs:element type="xs:string"  name="summary"/>
						<xs:element type="xs:string"  name="details"/>
						<xs:element type="xs:string"  name="email"/>
						<xs:element type="xs:string"  name="phone"/>
					</xs:sequence>
				</xs:complexType>
			</xs:element>
			<xs:element name="outputReportIncident">
				<xs:complexType>
					<xs:sequence>
						<xs:element type="xs:string" name="code"/>
					</xs:sequence>
				</xs:complexType>
			</xs:element>
		</xs:schema>
	</wsdl:types>

	<!-- Message definitions for input and output -->
	<wsdl:message name="inputReportIncident">
		<wsdl:part name="parameters" element="tns:inputReportIncident"/>
	</wsdl:message>
	<wsdl:message name="outputReportIncident">
		<wsdl:part name="parameters" element="tns:outputReportIncident"/>
	</wsdl:message>

	<!-- Port (interface) definitions -->
	<wsdl:portType name="ReportIncidentEndpoint">
		<wsdl:operation name="ReportIncident">
			<wsdl:input message="tns:inputReportIncident"/>
			<wsdl:output message="tns:outputReportIncident"/>
		</wsdl:operation>
	</wsdl:portType>

	<!-- Port bindings to transports and encoding - HTTP, document literal encoding is used -->
	<wsdl:binding name="ReportIncidentBinding" type="tns:ReportIncidentEndpoint">
		<soap:binding transport="http://schemas.xmlsoap.org/soap/http"/>
		<wsdl:operation name="ReportIncident">
			<soap:operation
				soapAction="http://reportincident.example.camel.apache.org/ReportIncident"
				style="document"/>
			<wsdl:input>
				<soap:body parts="parameters" use="literal"/>
			</wsdl:input>
			<wsdl:output>
				<soap:body parts="parameters" use="literal"/>
			</wsdl:output>
		</wsdl:operation>
	</wsdl:binding>

	<!-- Service definition -->
	<wsdl:service name="ReportIncidentService">
		<wsdl:port name="ReportIncidentPort" binding="tns:ReportIncidentBinding">
			<soap:address location="http://reportincident.example.camel.apache.org"/>
		</wsdl:port>
	</wsdl:service>

</wsdl:definitions>
Configuring Axis
Okay we are now setup for the contract first development and can generate the source file. For now we are still only using standard Axis and not Spring nor Camel. We still need to setup Axis as a web application so we configure the web.xml in src/main/webapp/WEB-INF/web.xml as:
    <servlet>
        <servlet-name>axis</servlet-name>
        <servlet-class>org.apache.axis.transport.http.AxisServlet</servlet-class>
    </servlet>

    <servlet-mapping>
        <servlet-name>axis</servlet-name>
        <url-pattern>/services/*</url-pattern>
    </servlet-mapping>
The web.xml just registers Axis servlet that is handling the incoming web requests to its servlet mapping. We still need to configure Axis itself and this is done using its special configuration file server-config.wsdd. We nearly get this file for free if we let Axis generate the source code so we run the maven goal:
mvn axistools:wsdl2java
The tool will generate the source code based on the wsdl and save the files to the following folder:
.\target\generated-sources\axistools\wsdl2java\org\apache\camel\example\reportincident
deploy.wsdd
InputReportIncident.java
OutputReportIncident.java
ReportIncidentBindingImpl.java
ReportIncidentBindingStub.java
ReportIncidentService_PortType.java
ReportIncidentService_Service.java
ReportIncidentService_ServiceLocator.java
undeploy.wsdd
This is standard Axis and so far no Camel or Spring has been touched. To implement our webservice we will add our code, so we create a new class AxisReportIncidentService that implements the port type interface where we can implement our code logic what happens when the webservice is invoked.
package org.apache.camel.example.axis;

import org.apache.camel.example.reportincident.InputReportIncident;
import org.apache.camel.example.reportincident.OutputReportIncident;
import org.apache.camel.example.reportincident.ReportIncidentService_PortType;

import java.rmi.RemoteException;

/**
 * Axis webservice
 */
public class AxisReportIncidentService implements ReportIncidentService_PortType {

    public OutputReportIncident reportIncident(InputReportIncident parameters) throws RemoteException {
        System.out.println("Hello AxisReportIncidentService is called from " + parameters.getGivenName());

        OutputReportIncident out = new OutputReportIncident();
        out.setCode("OK");
        return out;
    }

}
Now we need to configure Axis itself and this is done using its server-config.wsdd file. We nearly get this for for free from the auto generated code, we copy the stuff from deploy.wsdd and made a few modifications:
<?xml version="1.0" encoding="UTF-8"?>
<deployment xmlns="http://xml.apache.org/axis/wsdd/" xmlns:java="http://xml.apache.org/axis/wsdd/providers/java">
  <!-- global configuration -->
	<globalConfiguration>
		<parameter name="sendXsiTypes" value="true"/>
		<parameter name="sendMultiRefs" value="true"/>
		<parameter name="sendXMLDeclaration" value="true"/>
		<parameter name="axis.sendMinimizedElements" value="true"/>
	</globalConfiguration>
	<handler name="URLMapper" type="java:org.apache.axis.handlers.http.URLMapper"/>

  <!-- this service is from deploy.wsdd -->
  <service name="ReportIncidentPort" provider="java:RPC" style="document" use="literal">
      <parameter name="wsdlTargetNamespace" value="http://reportincident.example.camel.apache.org"/>
      <parameter name="wsdlServiceElement" value="ReportIncidentService"/>
      <parameter name="schemaUnqualified" value="http://reportincident.example.camel.apache.org"/>
      <parameter name="wsdlServicePort" value="ReportIncidentPort"/>
      <parameter name="className" value="org.apache.camel.example.reportincident.ReportIncidentBindingImpl"/>
      <parameter name="wsdlPortType" value="ReportIncidentService"/>
      <parameter name="typeMappingVersion" value="1.2"/>
      <operation name="reportIncident" qname="ReportIncident" returnQName="retNS:outputReportIncident" xmlns:retNS="http://reportincident.example.camel.apache.org"
                 returnType="rtns:>outputReportIncident" xmlns:rtns="http://reportincident.example.camel.apache.org"
                 soapAction="http://reportincident.example.camel.apache.org/ReportIncident" >
        <parameter qname="pns:inputReportIncident" xmlns:pns="http://reportincident.example.camel.apache.org"
                 type="tns:>inputReportIncident" xmlns:tns="http://reportincident.example.camel.apache.org"/>
      </operation>
      <parameter name="allowedMethods" value="reportIncident"/>

      <typeMapping
        xmlns:ns="http://reportincident.example.camel.apache.org"
        qname="ns:>outputReportIncident"
        type="java:org.apache.camel.example.reportincident.OutputReportIncident"
        serializer="org.apache.axis.encoding.ser.BeanSerializerFactory"
        deserializer="org.apache.axis.encoding.ser.BeanDeserializerFactory"
        encodingStyle=""
      />
      <typeMapping
        xmlns:ns="http://reportincident.example.camel.apache.org"
        qname="ns:>inputReportIncident"
        type="java:org.apache.camel.example.reportincident.InputReportIncident"
        serializer="org.apache.axis.encoding.ser.BeanSerializerFactory"
        deserializer="org.apache.axis.encoding.ser.BeanDeserializerFactory"
        encodingStyle=""
      />
  </service>

  <!-- part of Axis configuration -->
	<transport name="http">
		<requestFlow>
			<handler type="URLMapper"/>
			<handler type="java:org.apache.axis.handlers.http.HTTPAuthHandler"/>
		</requestFlow>
	</transport>
</deployment>
The globalConfiguration and transport is not in the deploy.wsdd file so you gotta write that yourself. The service is a 100% copy from deploy.wsdd. Axis has more configuration to it than shown here, but then you should check the Axis documentation.
What we need to do now is important, as we need to modify the above configuration to use our webservice class than the default one, so we change the classname parameter to our class AxisReportIncidentService:
<parameter name="className" value="org.apache.camel.example.axis.AxisReportIncidentService"/>
Running the Example
Now we are ready to run our example for the first time, so we use Jetty as the quick web container using its maven command:
mvn jetty:run
Then we can hit the web browser and enter this URL: http://localhost:8080/camel-example-axis/services and you should see the famous Axis start page with the text And now... Some Services.
Clicking on the .wsdl link shows the wsdl file, but what. It's an auto generated one and not our original .wsdl file. So we need to fix this ASAP and this is done by configuring Axis in the server-config.wsdd file:
  <service name="ReportIncidentPort" provider="java:RPC" style="document" use="literal">
    <wsdlFile>/WEB-INF/wsdl/report_incident.wsdl</wsdlFile>
    ...
We do this by adding the wsdlFile tag in the service element where we can point to the real .wsdl file.
Integrating Spring
First we need to add its dependencies to the pom.xml.
        <dependency>
            <groupId>org.springframework</groupId>
            <artifactId>spring-web</artifactId>
            <version>2.5.5</version>
        </dependency>
Spring is integrated just as it would like to, we add its listener to the web.xml and a context parameter to be able to configure precisely what spring xml files to use:
    <context-param>
        <param-name>contextConfigLocation</param-name>
        <param-value>
            classpath:axis-example-context.xml
        </param-value>
    </context-param>

    <listener>
        <listener-class>org.springframework.web.context.ContextLoaderListener</listener-class>
    </listener>
Next is to add a plain spring XML file named axis-example-context.xml in the src/main/resources folder.
<?xml version="1.0" encoding="UTF-8"?>
<beans xmlns="http://www.springframework.org/schema/beans"
       xmlns:xsi="http://www.w3.org/2001/XMLSchema-instance"
       xsi:schemaLocation="
         http://www.springframework.org/schema/beans http://www.springframework.org/schema/beans/spring-beans-2.5.xsd">

</beans>
The spring XML file is currently empty. We hit jetty again with mvn jetty:run just to make sure Spring was setup correctly.
Using Spring
We would like to be able to get hold of the Spring ApplicationContext from our webservice so we can get access to the glory spring, but how do we do this? And our webservice class AxisReportIncidentService is created and managed by Axis we want to let Spring do this. So we have two problems.
We solve these problems by creating a delegate class that Axis creates, and this delegate class gets hold on Spring and then gets our real webservice as a spring bean and invoke the service.
First we create a new class that is 100% independent from Axis and just a plain POJO. This is our real service.
package org.apache.camel.example.axis;

import org.apache.camel.example.reportincident.InputReportIncident;
import org.apache.camel.example.reportincident.OutputReportIncident;

/**
 * Our real service that is not tied to Axis
 */
public class ReportIncidentService  {

    public OutputReportIncident reportIncident(InputReportIncident parameters) {
        System.out.println("Hello ReportIncidentService is called from " + parameters.getGivenName());

        OutputReportIncident out = new OutputReportIncident();
        out.setCode("OK");
        return out;
    }

}
So now we need to get from AxisReportIncidentService to this one ReportIncidentService using Spring. Well first of all we add our real service to spring XML configuration file so Spring can handle its lifecycle:
<?xml version="1.0" encoding="UTF-8"?>
<beans xmlns="http://www.springframework.org/schema/beans"
       xmlns:xsi="http://www.w3.org/2001/XMLSchema-instance"
       xsi:schemaLocation="
         http://www.springframework.org/schema/beans http://www.springframework.org/schema/beans/spring-beans-2.5.xsd">

    <bean id="incidentservice" class="org.apache.camel.example.axis.ReportIncidentService"/>

</beans>
And then we need to modify AxisReportIncidentService to use Spring to lookup the spring bean id="incidentservice" and delegate the call. We do this by extending the spring class org.springframework.remoting.jaxrpc.ServletEndpointSupport so the refactored code is:
package org.apache.camel.example.axis;

import org.apache.camel.example.reportincident.InputReportIncident;
import org.apache.camel.example.reportincident.OutputReportIncident;
import org.apache.camel.example.reportincident.ReportIncidentService_PortType;
import org.springframework.remoting.jaxrpc.ServletEndpointSupport;

import java.rmi.RemoteException;

/**
 * Axis webservice
 */
public class AxisReportIncidentService extends ServletEndpointSupport implements ReportIncidentService_PortType {

    public OutputReportIncident reportIncident(InputReportIncident parameters) throws RemoteException {
        // get hold of the spring bean from the application context
        ReportIncidentService service = (ReportIncidentService) getApplicationContext().getBean("incidentservice");

        // delegate to the real service
        return service.reportIncident(parameters);
    }

}
To see if everything is okay we run mvn jetty:run.
In the code above we get hold of our service at each request by looking up in the application context. However Spring also supports an init method where we can do this once. So we change the code to:
public class AxisReportIncidentService extends ServletEndpointSupport implements ReportIncidentService_PortType {

    private ReportIncidentService service;

    @Override
    protected void onInit() throws ServiceException {
        // get hold of the spring bean from the application context
        service = (ReportIncidentService) getApplicationContext().getBean("incidentservice");
    }

    public OutputReportIncident reportIncident(InputReportIncident parameters) throws RemoteException {
        // delegate to the real service
        return service.reportIncident(parameters);
    }

}
So now we have integrated Axis with Spring and we are ready for Camel.
Integrating Camel
Again the first step is to add the dependencies to the maven pom.xml file:
        <dependency>
            <groupId>org.apache.camel</groupId>
            <artifactId>camel-core</artifactId>
            <version>1.5.0</version>
        </dependency>

        <dependency>
            <groupId>org.apache.camel</groupId>
            <artifactId>camel-spring</artifactId>
            <version>1.5.0</version>
        </dependency>
Now that we have integrated with Spring then we easily integrate with Camel as Camel works well with Spring.
Camel does not require Spring
Camel does not require Spring, we could easily have used Camel without Spring, but most users prefer to use Spring also.
We choose to integrate Camel in the Spring XML file so we add the camel namespace and the schema location:
xmlns:camel="http://activemq.apache.org/camel/schema/spring"
http://activemq.apache.org/camel/schema/spring http://activemq.apache.org/camel/schema/spring/camel-spring.xsd"
CamelContext
CamelContext is the heart of Camel its where all the routes, endpoints, components, etc. is registered. So we setup a CamelContext and the spring XML files looks like:
<?xml version="1.0" encoding="UTF-8"?>
<beans xmlns="http://www.springframework.org/schema/beans"
       xmlns:xsi="http://www.w3.org/2001/XMLSchema-instance"
       xmlns:camel="http://activemq.apache.org/camel/schema/spring"
       xsi:schemaLocation="
         http://www.springframework.org/schema/beans http://www.springframework.org/schema/beans/spring-beans-2.5.xsd
         http://activemq.apache.org/camel/schema/spring http://activemq.apache.org/camel/schema/spring/camel-spring.xsd">

    <bean id="incidentservice" class="org.apache.camel.example.axis.ReportIncidentService"/>

    <camel:camelContext id="camel">
        <!-- TODO: Here we can add Camel stuff -->
    </camel:camelContext>

</beans>
Store a file backup
We want to store the web service request as a file before we return a response. To do this we want to send the file content as a message to an endpoint that produces the file. So we need to do two steps:
- configure the file backup endpoint
- send the message to the endpoint
The endpoint is configured in spring XML so we just add it as:
    <camel:camelContext id="camelContext">
        <!-- endpoint named backup that is configued as a file component -->
        <camel:endpoint id="backup" uri="file://target?append=false"/>
    </camel:camelContext>
In the CamelContext we have defined our endpoint with the id backup and configured it use the URL notation that we know from the internet. Its a file scheme that accepts a context and some options. The contest is target and its the folder to store the file. The option is just as the internet with ? and & for subsequent options. We configure it to not append, meaning than any existing file will be overwritten. See the File component for options and how to use the camel file endpoint.
Next up is to be able to send a message to this endpoint. The easiest way is to use a ProducerTemplate. A ProducerTemplate is inspired by Spring template pattern with for instance JmsTemplate or JdbcTemplate in mind. The template that all the grunt work and exposes a simple interface to the end-user where he/she can set the payload to send. Then the template will do proper resource handling and all related issues in that regard. But how do we get hold of such a template? Well the CamelContext is able to provide one. This is done by configuring the template on the camel context in the spring XML as:
    <camel:camelContext id="camelContext">
        <!-- producer template exposed with this id -->
        <camel:template id="camelTemplate"/>

        <!-- endpoint named backup that is configued as a file component -->
        <camel:endpoint id="backup" uri="file://target?append=false"/>
    </camel:camelContext>
Then we can expose a ProducerTemplate property on our service with a setter in the Java code as:
public class ReportIncidentService {

    private ProducerTemplate template;

    public void setTemplate(ProducerTemplate template) {
        this.template = template;
    }
And then let Spring handle the dependency inject as below:
    <bean id="incidentservice" class="org.apache.camel.example.axis.ReportIncidentService">
        <!-- set the producer template to use from the camel context below -->
        <property name="template" ref="camelTemplate"/>
    </bean>
Now we are ready to use the producer template in our service to send the payload to the endpoint. The template has many sendXXX methods for this purpose. But before we send the payload to the file endpoint we must also specify what filename to store the file as. This is done by sending meta data with the payload. In Camel metadata is sent as headers. Headers is just a plain Map<String, Object>. So if we needed to send several metadata then we could construct an ordinary HashMap and put the values in there. But as we just need to send one header with the filename Camel has a convenient send method sendBodyAndHeader so we choose this one.
    public OutputReportIncident reportIncident(InputReportIncident parameters) {
        System.out.println("Hello ReportIncidentService is called from " + parameters.getGivenName());

        String data = parameters.getDetails();

        // store the data as a file
        String filename = parameters.getIncidentId() + ".txt";
        // send the data to the endpoint and the header contains what filename it should be stored as
        template.sendBodyAndHeader("backup", data, "org.apache.camel.file.name", filename);

        OutputReportIncident out = new OutputReportIncident();
        out.setCode("OK");
        return out;
    }
The template in the code above uses 4 parameters:
- the endpoint name, in this case the id referring to the endpoint defined in Spring XML in the camelContext element.
- the payload, can be any kind of object
- the key for the header, in this case a Camel keyword to set the filename
- and the value for the header
Running the example
We start our integration with maven using mvn jetty:run. Then we open a browser and hit http://localhost:8080. Jetty is so smart that it display a frontpage with links to the deployed application so just hit the link and you get our application. Now we hit append /services to the URL to access the Axis frontpage. The URL should be http://localhost:8080/camel-example-axis/services.
You can then test it using a web service test tools such as SoapUI.
Hitting the service will output to the console
2008-09-06 15:01:41.718::INFO:  Started SelectChannelConnector @ 0.0.0.0:8080
[INFO] Started Jetty Server
Hello ReportIncidentService is called from Ibsen
And there should be a file in the target subfolder.
dir target /b
123.txt
Unit Testing
We would like to be able to unit test our ReportIncidentService class. So we add junit to the maven dependency:
        <dependency>
            <groupId>junit</groupId>
            <artifactId>junit</artifactId>
            <version>3.8.2</version>
            <scope>test</scope>
        </dependency>
And then we create a plain junit testcase for our service class.
package org.apache.camel.example.axis;

import junit.framework.TestCase;
import org.apache.camel.example.reportincident.InputReportIncident;
import org.apache.camel.example.reportincident.OutputReportIncident;

/**
 * Unit test of service
 */
public class ReportIncidentServiceTest extends TestCase {

    public void testIncident() {
        ReportIncidentService service = new ReportIncidentService();

        InputReportIncident input = createDummyIncident();
        OutputReportIncident output = service.reportIncident(input);
        assertEquals("OK", output.getCode());
    }

   protected InputReportIncident createDummyIncident() {
        InputReportIncident input = new InputReportIncident();
        input.setEmail("davsclaus@apache.org");
        input.setIncidentId("12345678");
        input.setIncidentDate("2008-07-13");
        input.setPhone("+45 2962 7576");
        input.setSummary("Failed operation");
        input.setDetails("The wrong foot was operated.");
        input.setFamilyName("Ibsen");
        input.setGivenName("Claus");
        return input;
    }

}
Then we can run the test with maven using: mvn test. But we will get a failure:
Running org.apache.camel.example.axis.ReportIncidentServiceTest
Hello ReportIncidentService is called from Claus
Tests run: 1, Failures: 0, Errors: 1, Skipped: 0, Time elapsed: 0.235 sec <<< FAILURE!

Results :

Tests in error:
  testIncident(org.apache.camel.example.axis.ReportIncidentServiceTest)

Tests run: 1, Failures: 0, Errors: 1, Skipped: 0
What is the problem? Well our service uses a CamelProducer (the template) to send a message to the file endpoint so the message will be stored in a file. What we need is to get hold of such a producer and inject it on our service, by calling the setter.
Since Camel is very light weight and embedable we are able to create a CamelContext and add the endpoint in our unit test code directly. We do this to show how this is possible:
    private CamelContext context;

    @Override
    protected void setUp() throws Exception {
        super.setUp();
        // CamelContext is just created like this
        context = new DefaultCamelContext();

        // then we can create our endpoint and set the options
        FileEndpoint endpoint = new FileEndpoint();
        // the endpoint must have the camel context set also
        endpoint.setCamelContext(context);
        // our output folder
        endpoint.setFile(new File("target"));
        // and the option not to append
        endpoint.setAppend(false);

        // then we add the endpoint just in java code just as the spring XML, we register it with the "backup" id.
        context.addSingletonEndpoint("backup", endpoint);

        // finally we need to start the context so Camel is ready to rock
        context.start();
    }

    @Override
    protected void tearDown() throws Exception {
        super.tearDown();
        // and we are nice boys so we stop it to allow resources to clean up
        context.stop();
    }
So now we are ready to set the ProducerTemplate on our service, and we get a hold of that baby from the CamelContext as:
    public void testIncident() {
        ReportIncidentService service = new ReportIncidentService();

        // get a producer template from the camel context
        ProducerTemplate template = context.createProducerTemplate();
        // inject it on our service using the setter
        service.setTemplate(template);

        InputReportIncident input = createDummyIncident();
        OutputReportIncident output = service.reportIncident(input);
        assertEquals("OK", output.getCode());
    }
And this time when we run the unit test its a success:
Results :

Tests run: 1, Failures: 0, Errors: 0, Skipped: 0
We would like to test that the file exists so we add these two lines to our test method:
        // should generate a file also
        File file = new File("target/" + input.getIncidentId() + ".txt");
        assertTrue("File should exists", file.exists());
Smarter Unit Testing with Spring
The unit test above requires us to assemble the Camel pieces manually in java code. What if we would like our unit test to use our spring configuration file axis-example-context.xml where we already have setup the endpoint. And of course we would like to test using this configuration file as this is the real file we will use. Well hey presto the xml file is a spring ApplicationContext file and spring is able to load it, so we go the spring path for unit testing. First we add the spring-test jar to our maven dependency:
        <dependency>
            <groupId>org.springframework</groupId>
            <artifactId>spring-test</artifactId>
            <scope>test</scope>
        </dependency>
And then we refactor our unit test to be a standard spring unit class. What we need to do is to extend AbstractJUnit38SpringContextTests instead of TestCase in our unit test. Since Spring 2.5 embraces annotations we will use one as well to instruct what our xml configuration file is located:
@ContextConfiguration(locations = "classpath:axis-example-context.xml")
public class ReportIncidentServiceTest extends AbstractJUnit38SpringContextTests {
What we must remember to add is the classpath: prefix as our xml file is located in src/main/resources. If we omit the prefix then Spring will by default try to locate the xml file in the current package and that is org.apache.camel.example.axis. If the xml file is located outside the classpath you can use file: prefix instead. So with these two modifications we can get rid of all the setup and teardown code we had before and now we will test our real configuration.
The last change is to get hold of the producer template and now we can just refer to the bean id it has in the spring xml file:
        <!-- producer template exposed with this id -->
        <camel:template id="camelTemplate"/>
So we get hold of it by just getting it from the spring ApplicationContext as all spring users is used to do:
        // get a producer template from the the spring context
        ProducerTemplate template = (ProducerTemplate) applicationContext.getBean("camelTemplate");
        // inject it on our service using the setter
        service.setTemplate(template);
Now our unit test is much better, and a real power of Camel is that is fits nicely with Spring and you can use standard Spring'ish unit test to test your Camel applications as well.
Unit Test calling WebService
What if you would like to execute a unit test where you send a webservice request to the AxisReportIncidentService how do we unit test this one? Well first of all the code is merely just a delegate to our real service that we have just tested, but nevertheless its a good question and we would like to know how. Well the answer is that we can exploit that fact that Jetty is also a slim web container that can be embedded anywhere just as Camel can. So we add this to our pom.xml:
        <dependency>
            <groupId>org.mortbay.jetty</groupId>
            <artifactId>jetty</artifactId>
            <version>${jetty-version}</version>
            <scope>test</scope>
        </dependency>
Then we can create a new class AxisReportIncidentServiceTest to unit test with Jetty. The code to setup Jetty is shown below with code comments:
public class AxisReportIncidentServiceTest extends TestCase {

    private Server server;

    private void startJetty() throws Exception {
        // create an embedded Jetty server
        server = new Server();

        // add a listener on port 8080 on localhost (127.0.0.1)
        Connector connector = new SelectChannelConnector();
        connector.setPort(8080);
        connector.setHost("127.0.0.1");
        server.addConnector(connector);

        // add our web context path
        WebAppContext wac = new WebAppContext();
        wac.setContextPath("/unittest");
        // set the location of the exploded webapp where WEB-INF is located
        // this is a nice feature of Jetty where we can point to src/main/webapp
        wac.setWar("./src/main/webapp");
        server.setHandler(wac);

        // then start Jetty
        server.setStopAtShutdown(true);
        server.start();
    }

    @Override
    protected void setUp() throws Exception {
        super.setUp();
        startJetty();
    }

    @Override
    protected void tearDown() throws Exception {
        super.tearDown();
        server.stop();
    }

}
Now we just need to send the incident as a webservice request using Axis. So we add the following code:
    public void testReportIncidentWithAxis() throws Exception {
        // the url to the axis webservice exposed by jetty
        URL url = new URL("http://localhost:8080/unittest/services/ReportIncidentPort");

        // Axis stuff to get the port where we can send the webservice request
        ReportIncidentService_ServiceLocator locator = new ReportIncidentService_ServiceLocator();
        ReportIncidentService_PortType port = locator.getReportIncidentPort(url);

        // create input to send
        InputReportIncident input = createDummyIncident();
        // send the webservice and get the response
        OutputReportIncident output = port.reportIncident(input);
        assertEquals("OK", output.getCode());

        // should generate a file also
        File file = new File("target/" + input.getIncidentId() + ".txt");
        assertTrue("File should exists", file.exists());
    }

    protected InputReportIncident createDummyIncident() {
        InputReportIncident input = new InputReportIncident();
        input.setEmail("davsclaus@apache.org");
        input.setIncidentId("12345678");
        input.setIncidentDate("2008-07-13");
        input.setPhone("+45 2962 7576");
        input.setSummary("Failed operation");
        input.setDetails("The wrong foot was operated.");
        input.setFamilyName("Ibsen");
        input.setGivenName("Claus");
        return input;
    }
And now we have an unittest that sends a webservice request using good old Axis.
Annotations
Both Camel and Spring has annotations that can be used to configure and wire trivial settings more elegantly. Camel has the endpoint annotation @EndpointInjected that is just what we need. With this annotation we can inject the endpoint into our service. The annotation takes either a name or uri parameter. The name is the bean id in the Registry. The uri is the URI configuration for the endpoint. Using this you can actually inject an endpoint that you have not defined in the camel context. As we have defined our endpoint with the id backup we use the name parameter.
    @EndpointInject(name = "backup")
    private ProducerTemplate template;
Camel is smart as @EndpointInjected supports different kinds of object types. We like the ProducerTemplate so we just keep it as it is.
Since we use annotations on the field directly we do not need to set the property in the spring xml file so we change our service bean:
<bean id="incidentservice" class="org.apache.camel.example.axis.ReportIncidentService"/>
Running the unit test with mvn test reveals that it works nicely.
And since we use the @EndpointInjected that refers to the endpoint with the id backup directly we can loose the template tag in the xml, so its shorter:
    <bean id="incidentservice" class="org.apache.camel.example.axis.ReportIncidentService"/>

    <camel:camelContext id="camelContext">
        <!-- producer template exposed with this id -->
        <camel:template id="camelTemplate"/>

        <!-- endpoint named backup that is configued as a file component -->
        <camel:endpoint id="backup" uri="file://target?append=false"/>

    </camel:camelContext>
And the final touch we can do is that since the endpoint is injected with concrete endpoint to use we can remove the "backup" name parameter when we send the message. So we change from:
        // send the data to the endpoint and the header contains what filename it should be stored as
        template.sendBodyAndHeader("backup", data, "org.apache.camel.file.name", filename);
To without the name:
        // send the data to the endpoint and the header contains what filename it should be stored as
        template.sendBodyAndHeader(data, "org.apache.camel.file.name", filename);
Then we avoid to duplicate the name and if we rename the endpoint name then we don't forget to change it in the code also.
The End
This tutorial hasn't really touched the one of the key concept of Camel as a powerful routing and mediation framework. But we wanted to demonstrate its flexibility and that it integrates well with even older frameworks such as Apache Axis 1.4.
Check out the other tutorials on Camel and the other examples.
Note that the code shown here also applies to Camel 1.4 so actually you can get started right away with the released version of Camel. As this time of writing Camel 1.5 is work in progress.